Welcome to this tutorial for getting started with Proxmox VE, a powerful open-source server solution for virtualization. Proxmox VE offers a web interface to manage VMs and containers, software-defined storage and networking, high-availability clustering, and multiple out-of-the-box tools on a single solution. In this multi-part tutorial, we will cover a lot of differnet items about Proxmox VE. In this tutorial, we will cover the following topics:
– What is Proxmox and why is it awesome?
– How to download and install Proxmox VE (Virtual Environment)
– How to create and manage VMs and containers using Proxmox VE
Let’s get started!
What is Proxmox VE and why it’s awesome
Proxmox VE (for the rest of this post, I’ll just be calling it “Proxmox” but know I’m talking about the virtualization product) is a type 1 hypervisor that is built on top of the Debian Linux distribution. You can even install Proxmox on top of Debian directly, but in this guide I’ll be showing you how to install using the Proxmox supplied ISO. Proxmox is popular because it makes virtualization easy to use and because it’s open source has meant that it is free to use. This has lead to it being a great competitor to VMware ESXi. Especially where budget is important.
Proxmox works great on individual nodes or it can be clustered together to allow for high availability and hyperconverged infrastructure (HCI). It additionally supports KVM and containerization with Linux Containers (LXC). I’ll also be discussing the differences between these two technologies as well.
While Proxmox has a reputation of being popular among homelabbers, it is also a great choice for businesses as well. The permissive licensing of Linux means that anyone is free to download, install, and use Proxmox, they also offer subscriptions that enable rigorously tested updates and support directly from Proxmox (the company). If you need the backing of a company, then Proxmox is a very affordable alternative.
Another thing I’d like to mention is that Proxmox doesn’t have the hardware strictness like VMware ESXi has. That means you can install the latest version of Proxmox on hardware that is well over 10 years old! Not that you should, but you absolutely could! Try doing that with ESXi!
How to download and install Proxmox VE
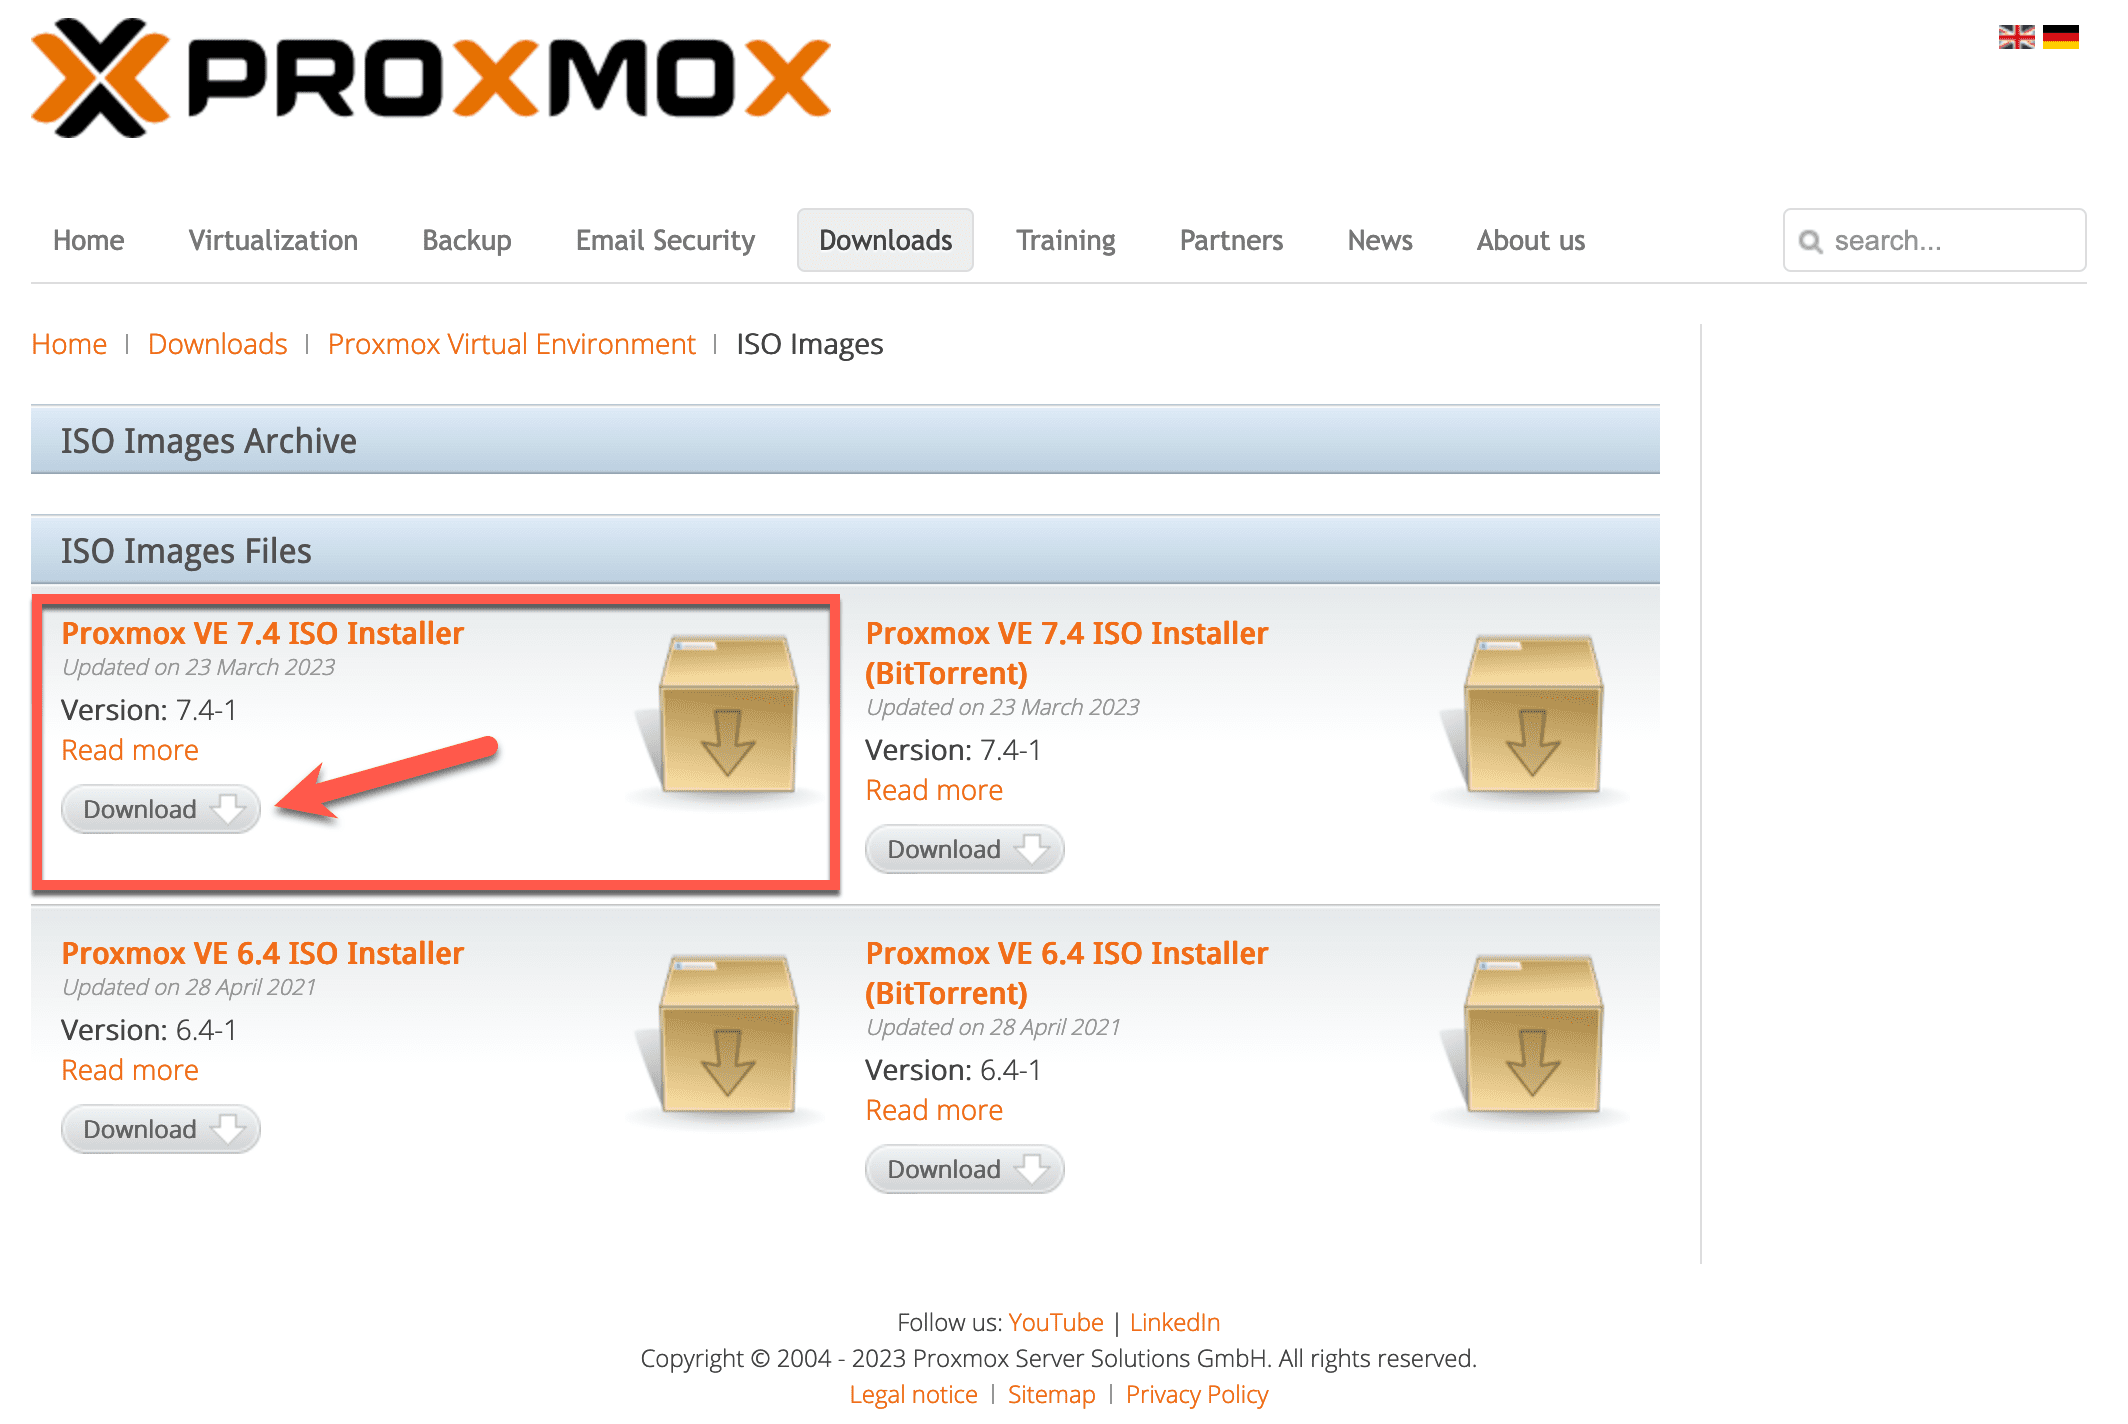
In order to get started with Proxmox, you’re going to need to download it. This is as easy as going to the Proxmox website and downloading the ISO. Here’s a direct link to the Proxmox VE ISO download page. When you get there, you’re going to notice four different downloads – Proxmox VE 7.4 ISO Installer, the same thing delivered BitTorrent, Proxmox VE 6.4 ISO Installer, and the same thing delivered BitTorrent. You can download either directly or BitTorrent, but I strongly recommend you download Proxmox VE 7.4. Proxmox VE 6.4 has been unsupported since July 2022.
Once the ISO is downloaded, you can write it to a USB stick (or burn it to a DVD if that is still your thing!). On Windows, Rufus is a popular tool that is also free. If you’re on macOS or Linux, Balena Etcher is also an easy tool to use. But this tool can be used on Windows as well. Once the ISO is written to your medium, you need a server!
Remember how I said that Proxmox isn’t picky like VMware ESXi? Yeah, you can install Proxmox on a low-power PC or a high-end server. How awesome is that? That’s what makes Proxmox great! So if you have an old desktop PC or an old laptop, you can install Proxmox on that to learn with. What is most important are the resources you can dedicate to it. Your top priorities are RAM and storage. At minimum, I would recommend at least 16 GB of RAM, 8 CPU cores (but 4 will also work), and ideally 1 TB of storage, or you can go with less, but the ability to expand storage is beneficial. You should also have 2x NIC at at least 1 Gbps, but 1x NIC will work fine.
Cluster Note: If you plan on creating a cluster, you will need at least 3 nodes and they should be as identical as possible. 2x NICs are strongly recommended for clusters but they can be ran on a single NIC but performance will be impacted.
Installing Proxmox is very easy. Just boot from your USB like you would any other OS.
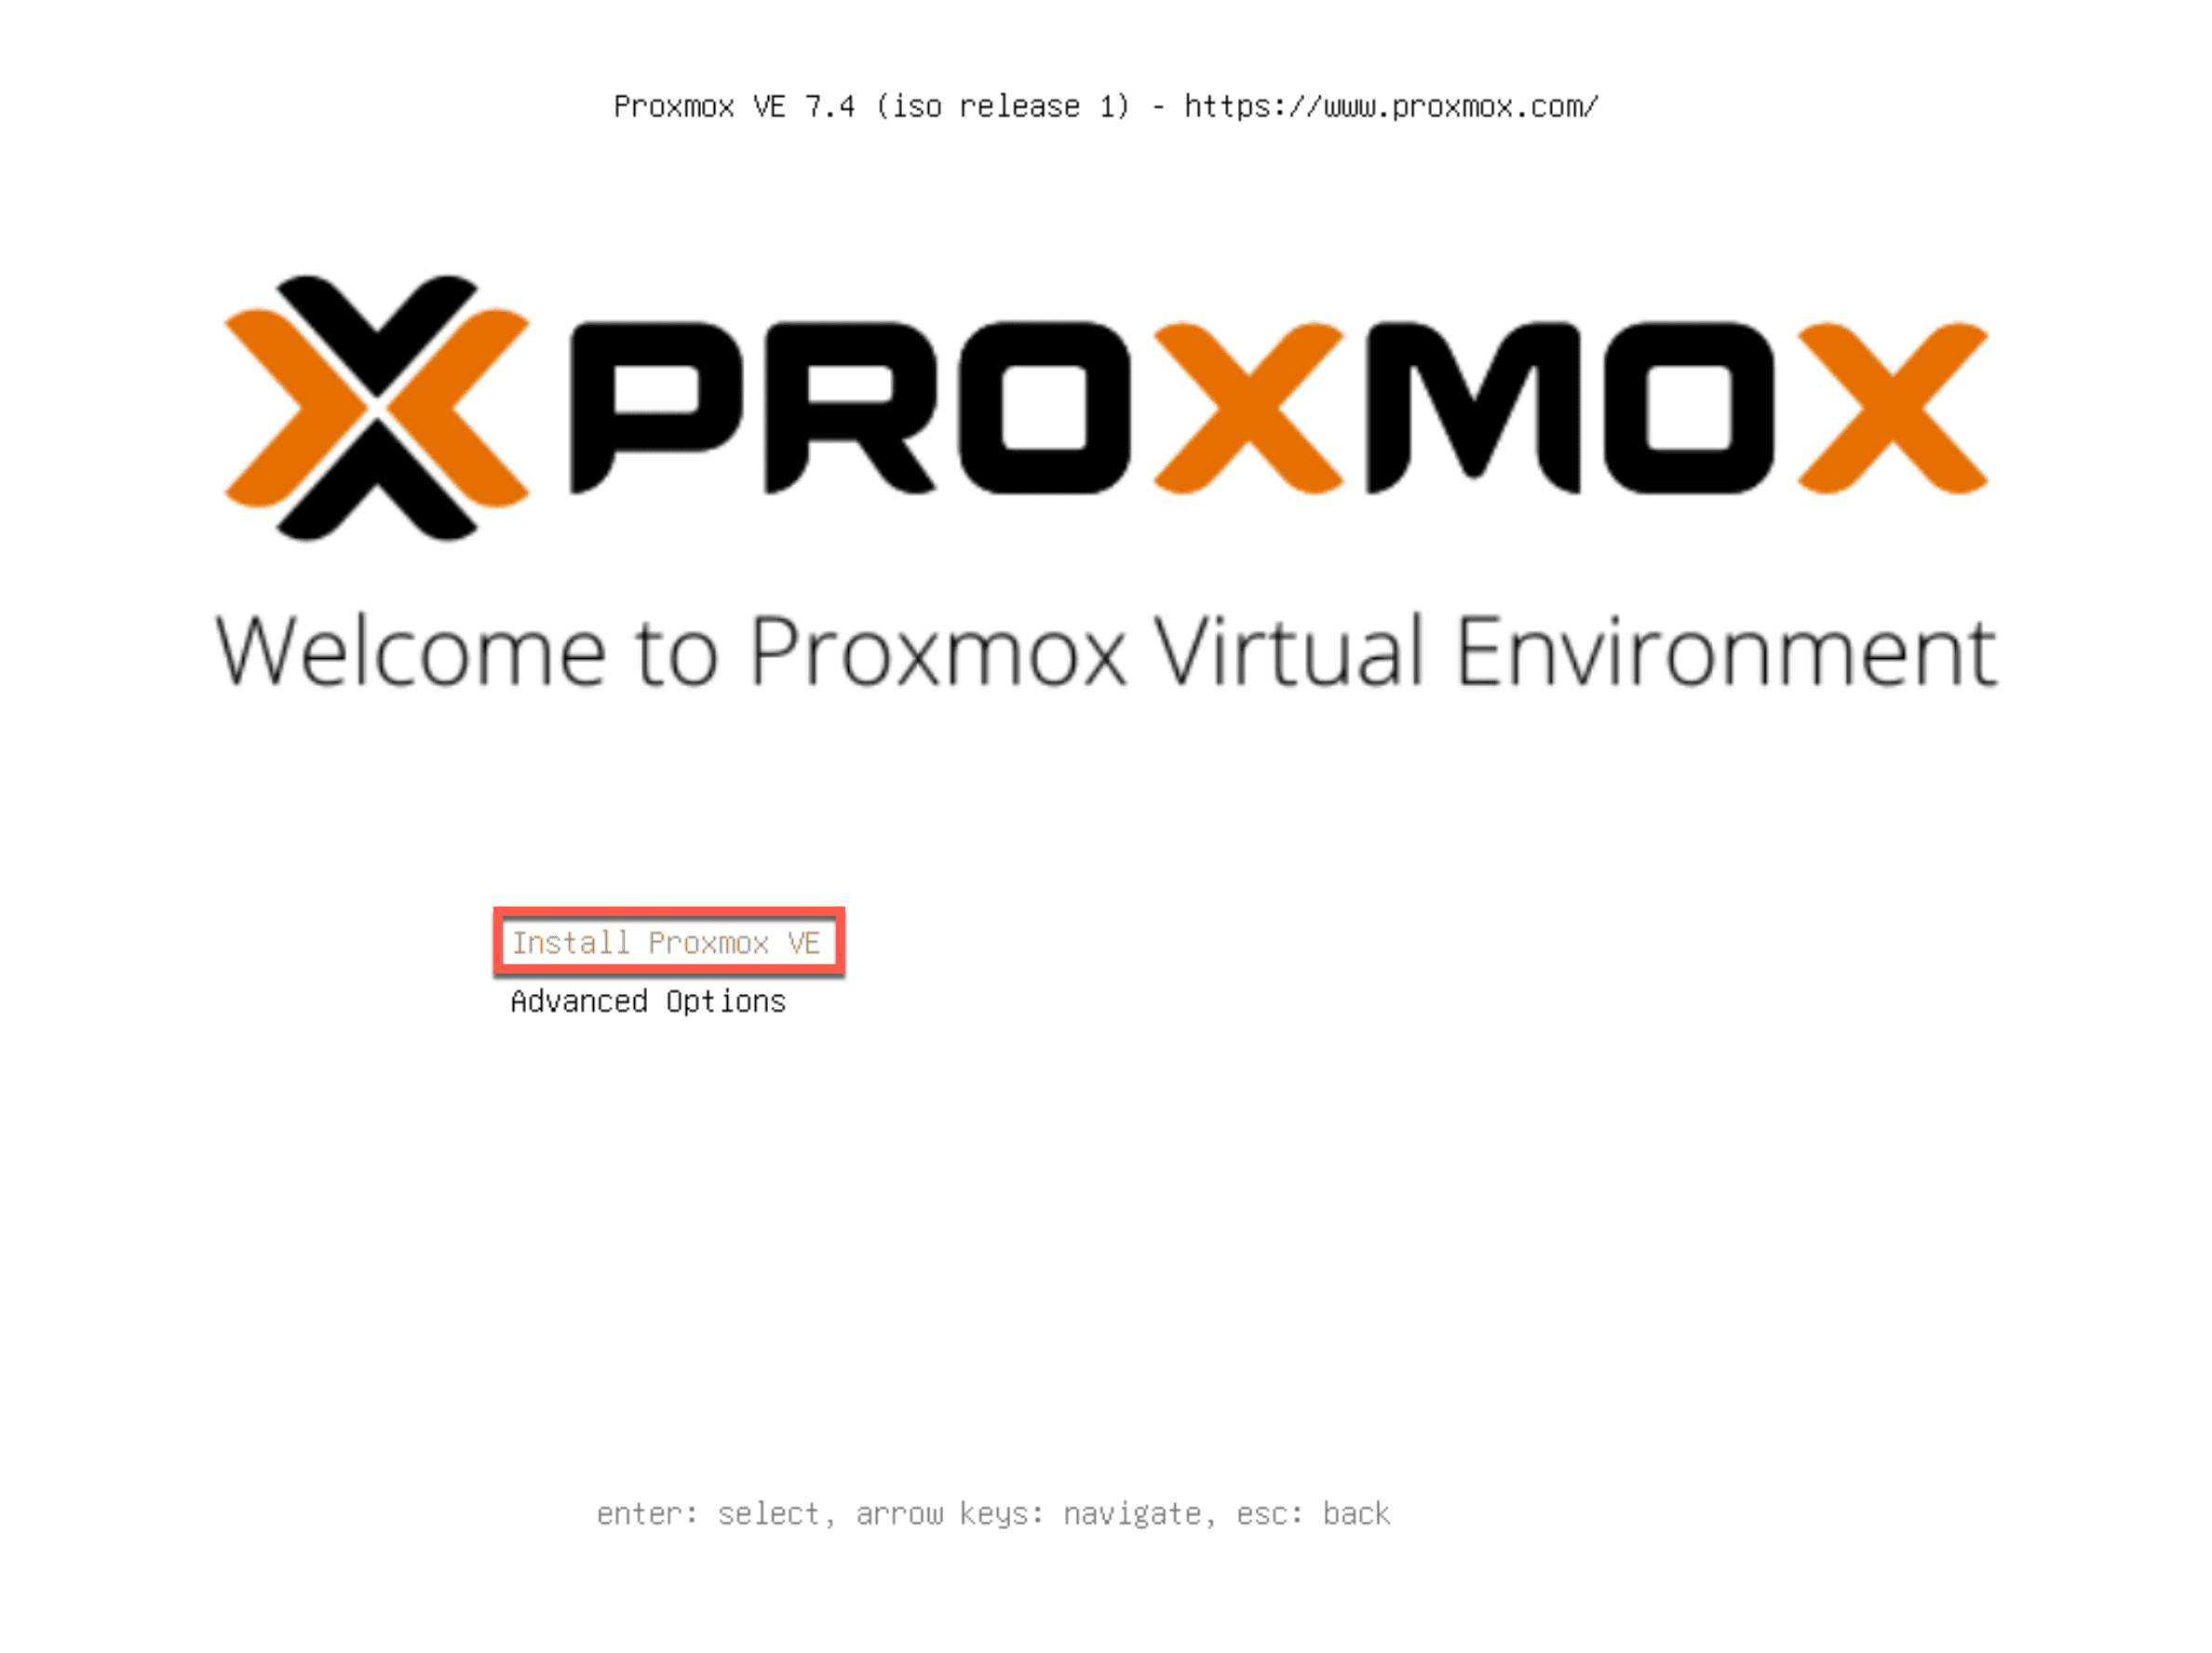
Select the Install Proxmox VE option and then press Enter.
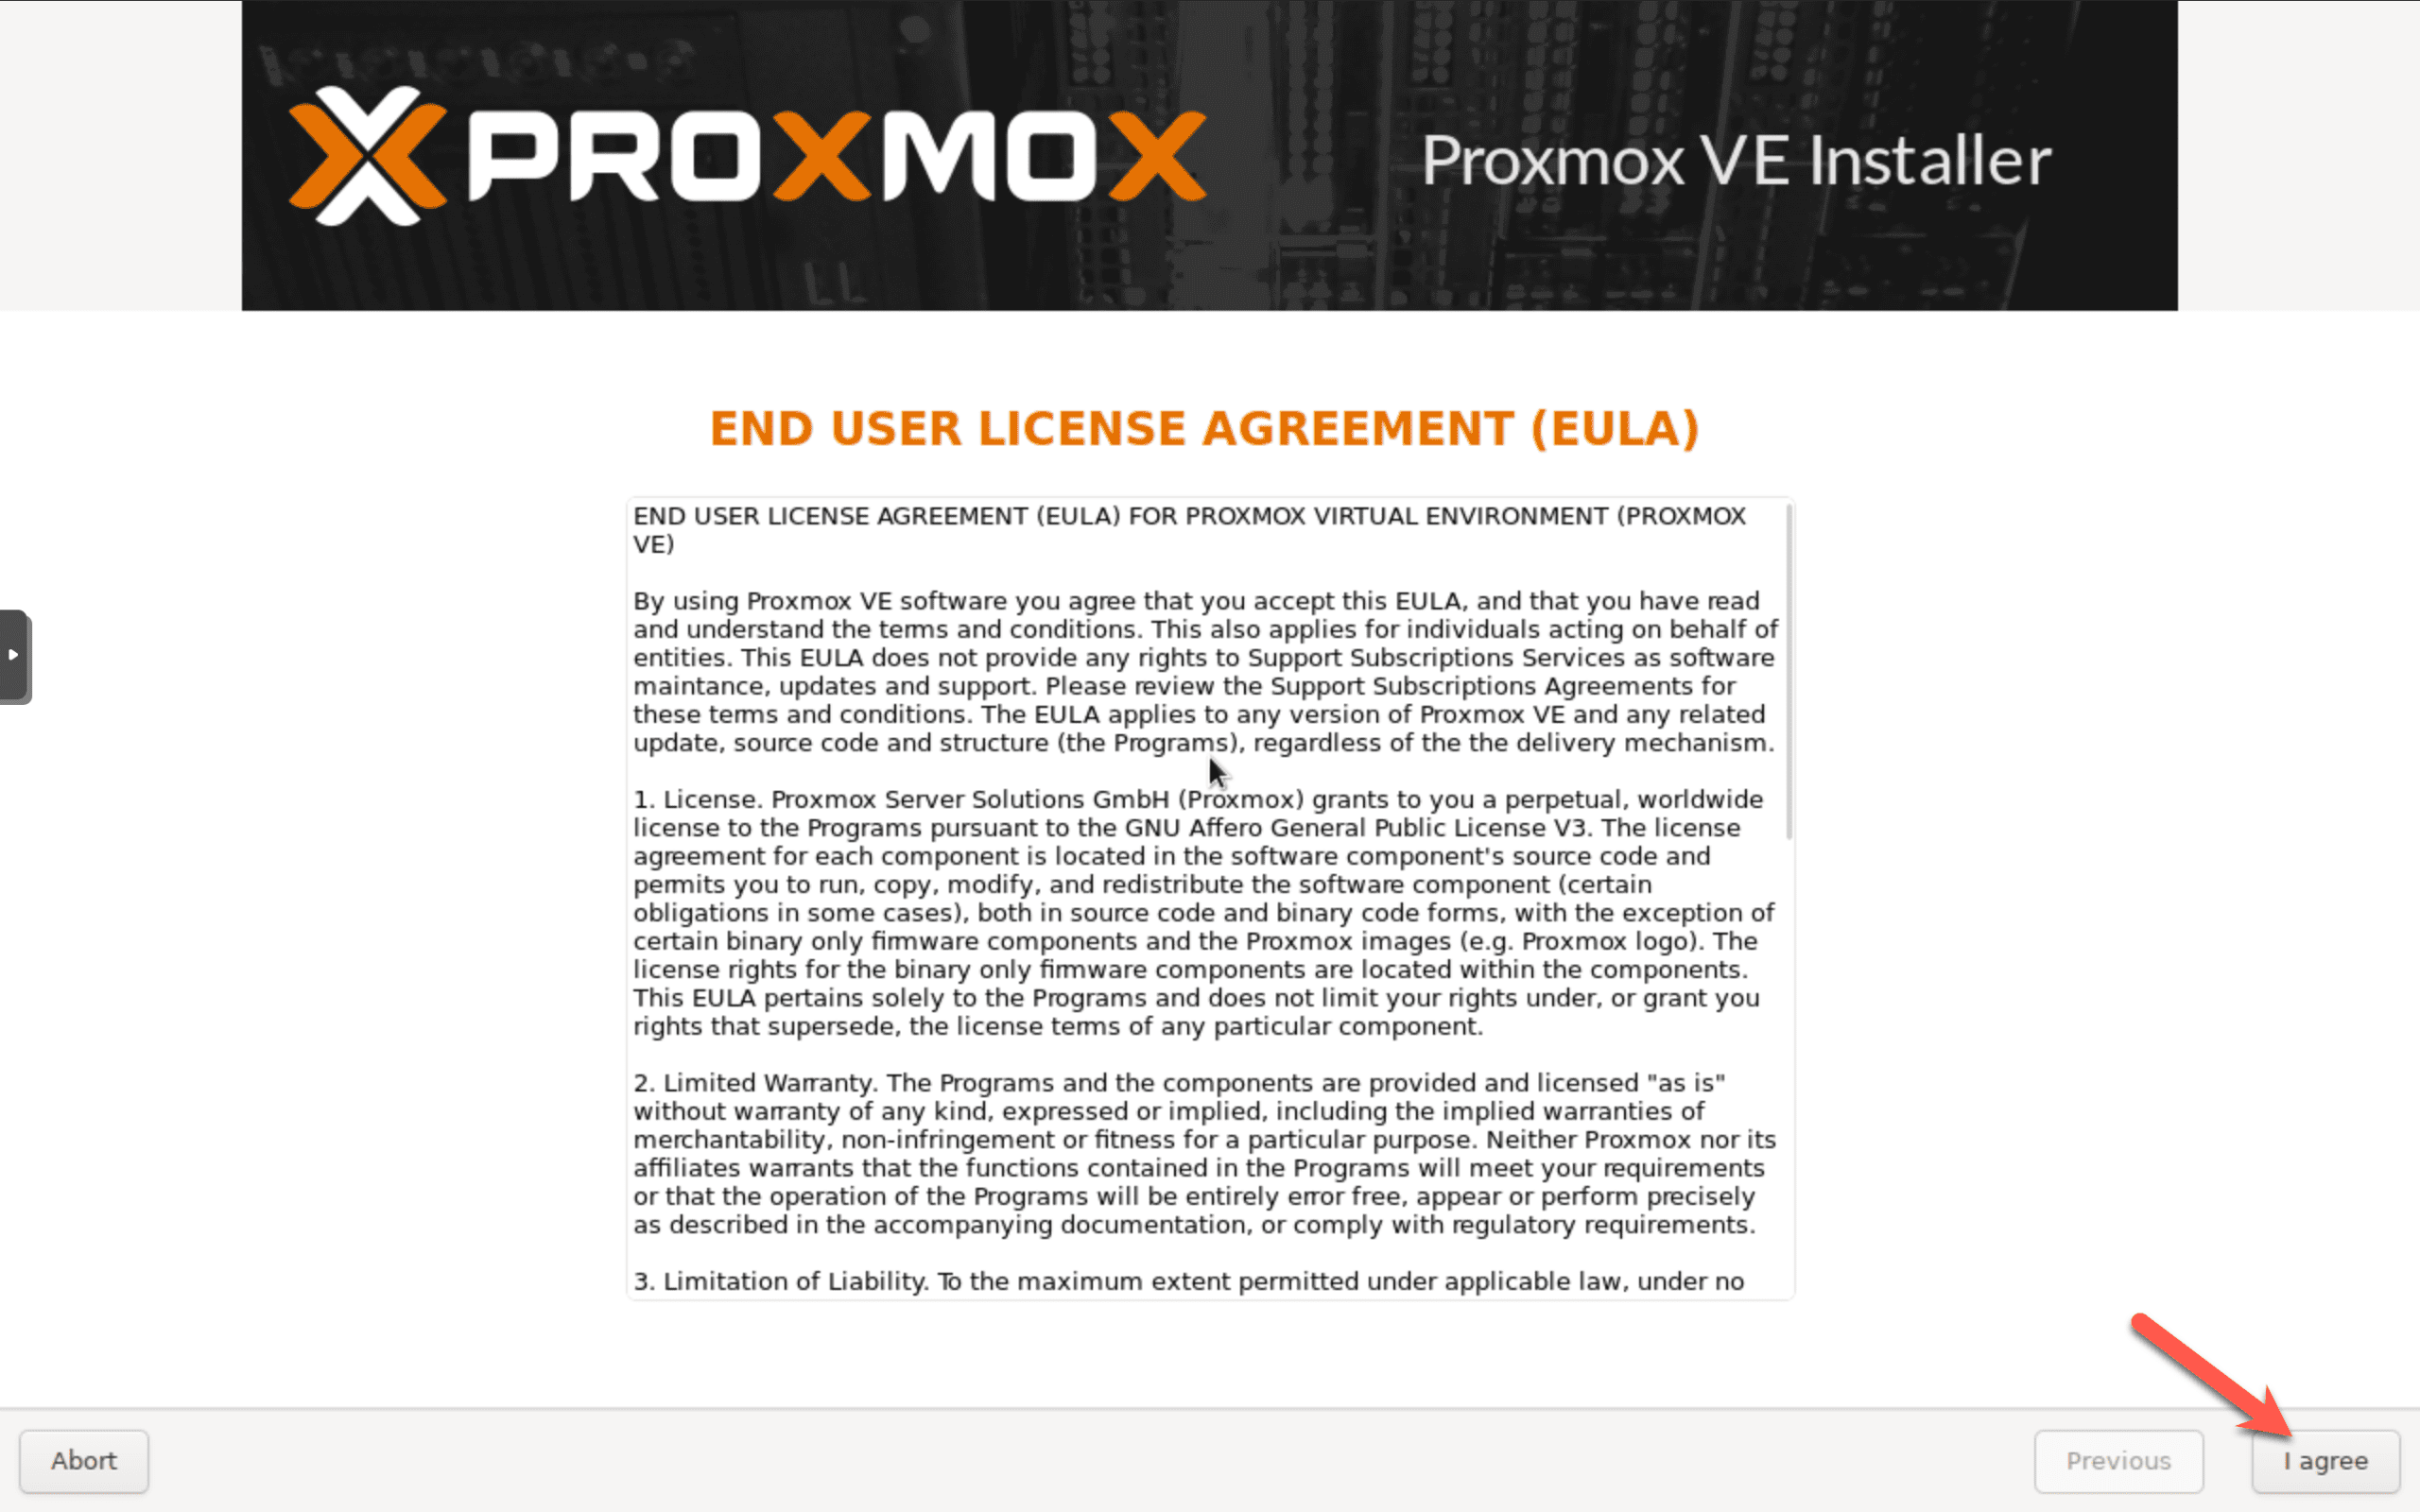
When the EULA comes up, click on I Agree (or read it first and then agree to it – but I’m not a lawyer so I can’t tell you what to do!).
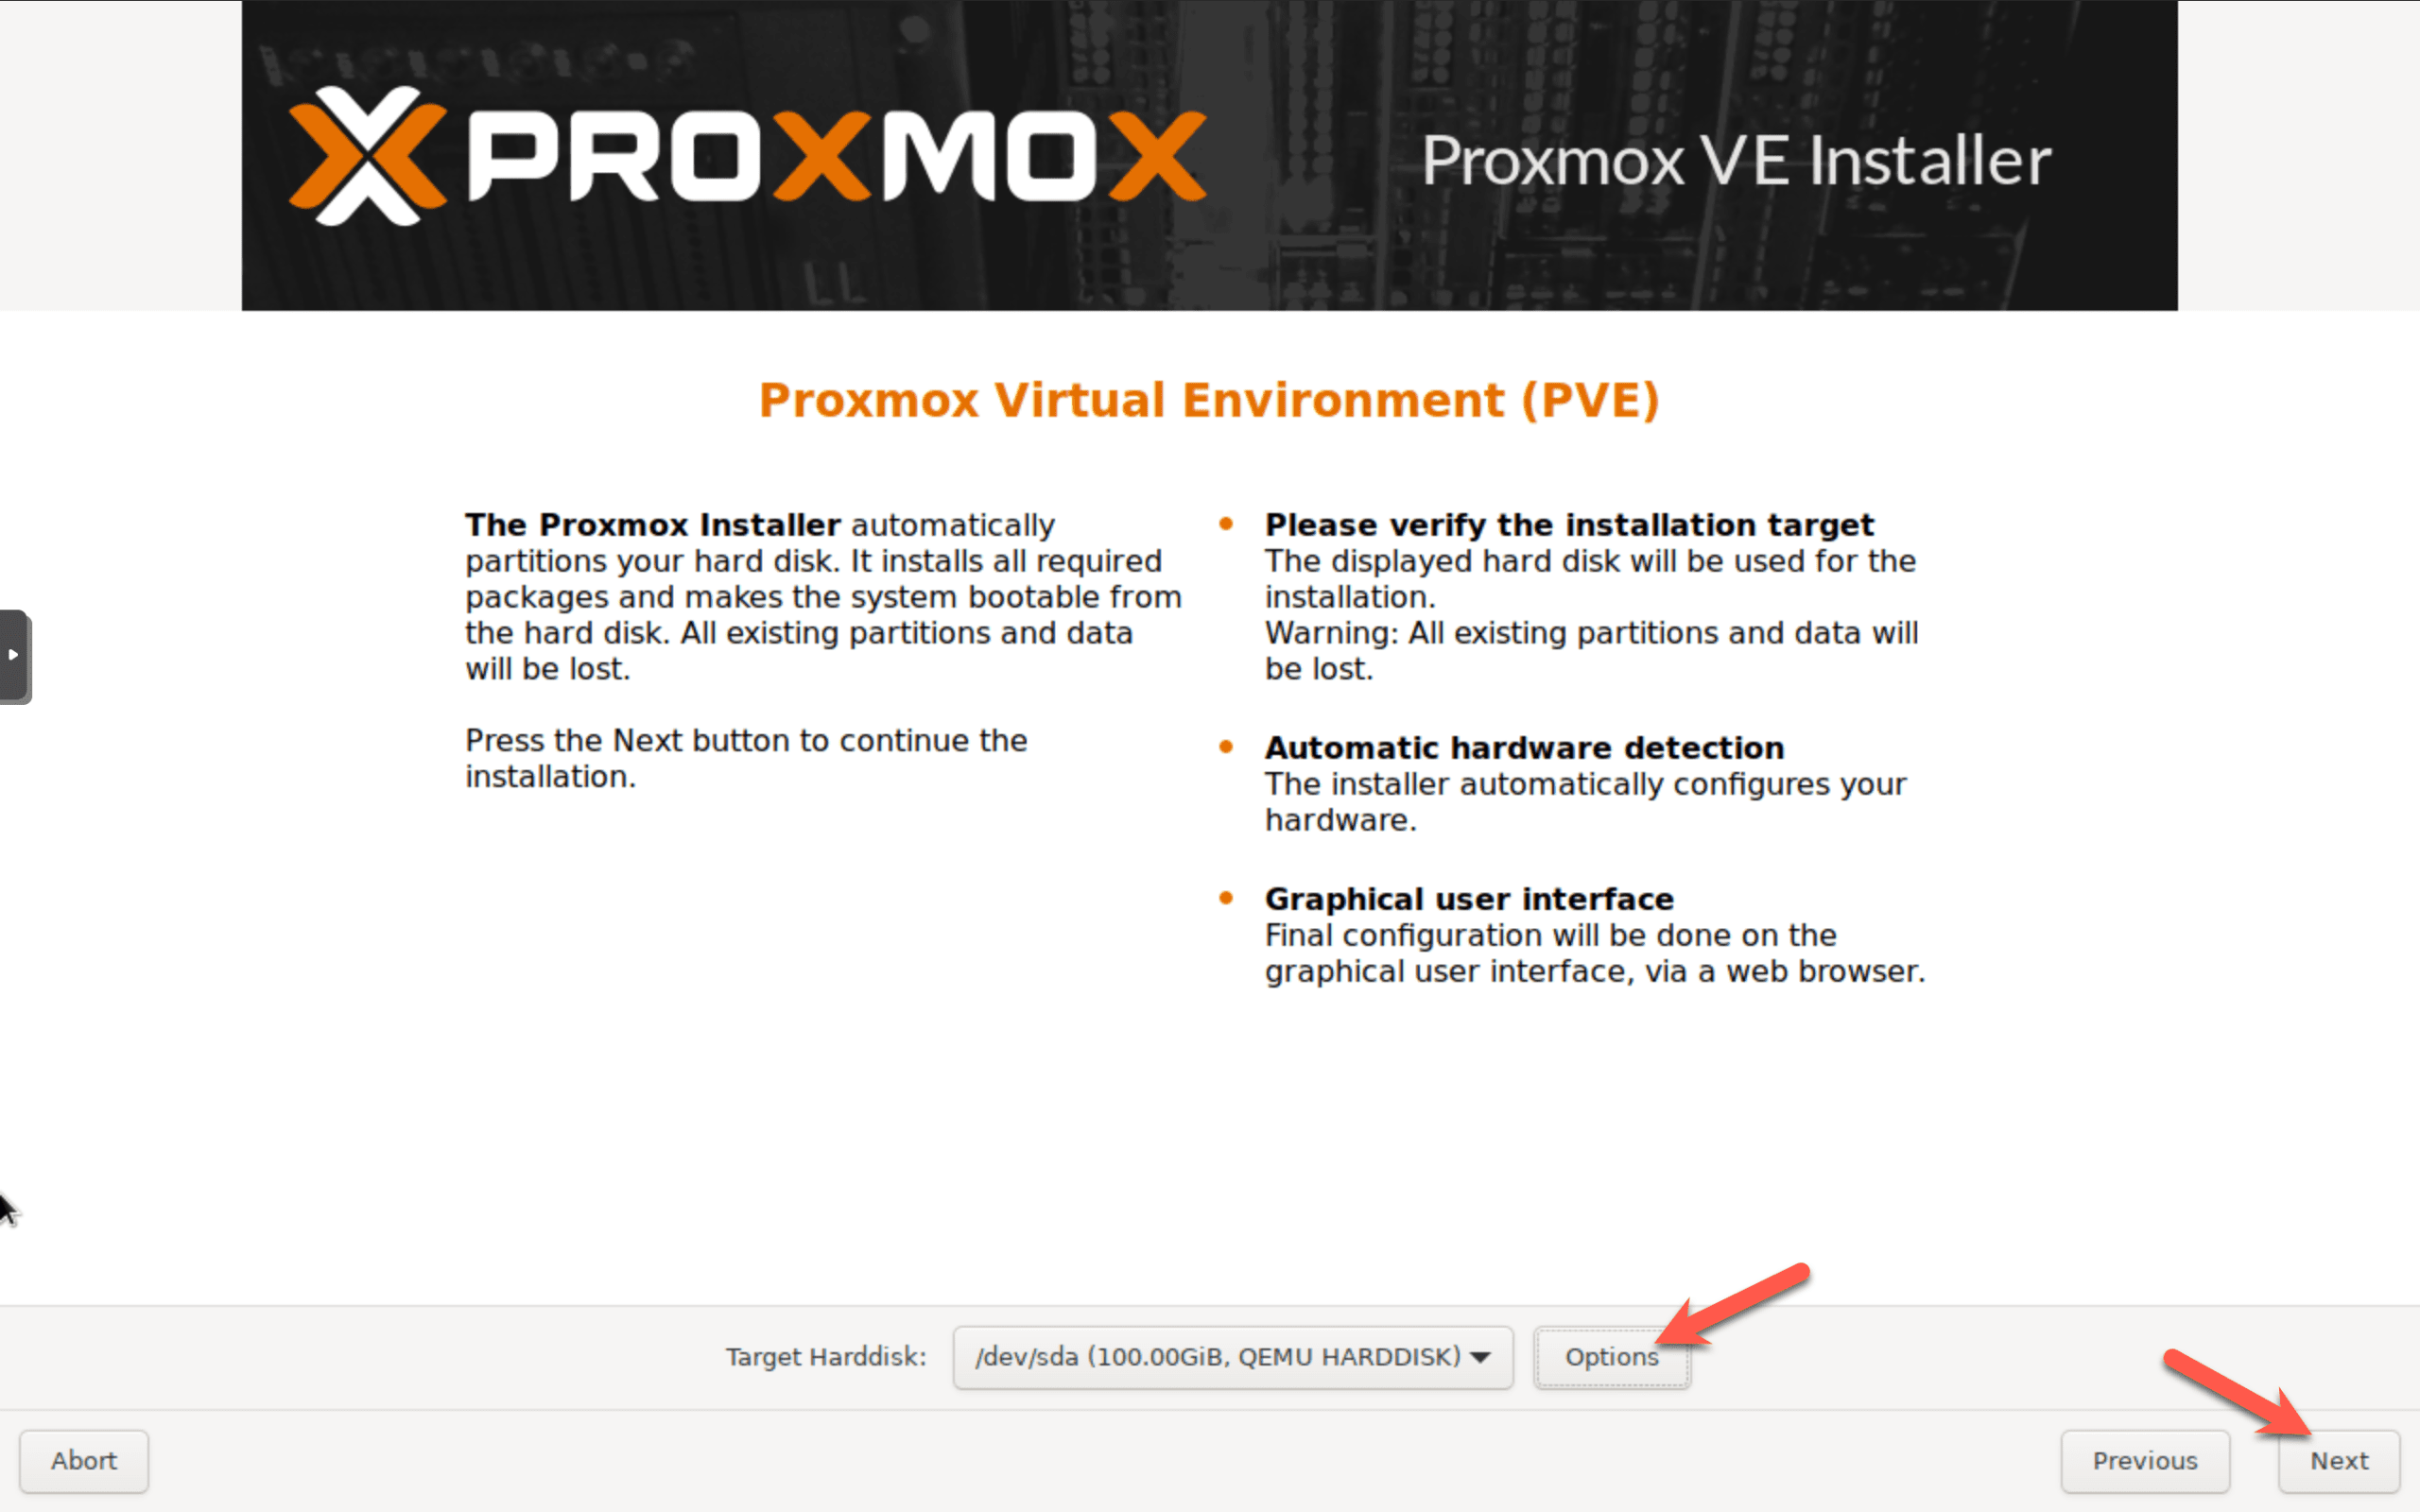
Select the hard disk you want to install Proxmox on.
Do not install Proxmox on a USB drive or SD card! Proxmox writes a lot of data to log files frequently and you will wear out the USB or SD card. If you’re going to use a separate disk for Proxmox, a 120 GB SSD will work. Even a small SATA HDD will work just fine.
If you have multiple drives, you can use software RAID or ZFS. Once you’re happy with your selection, press Next.
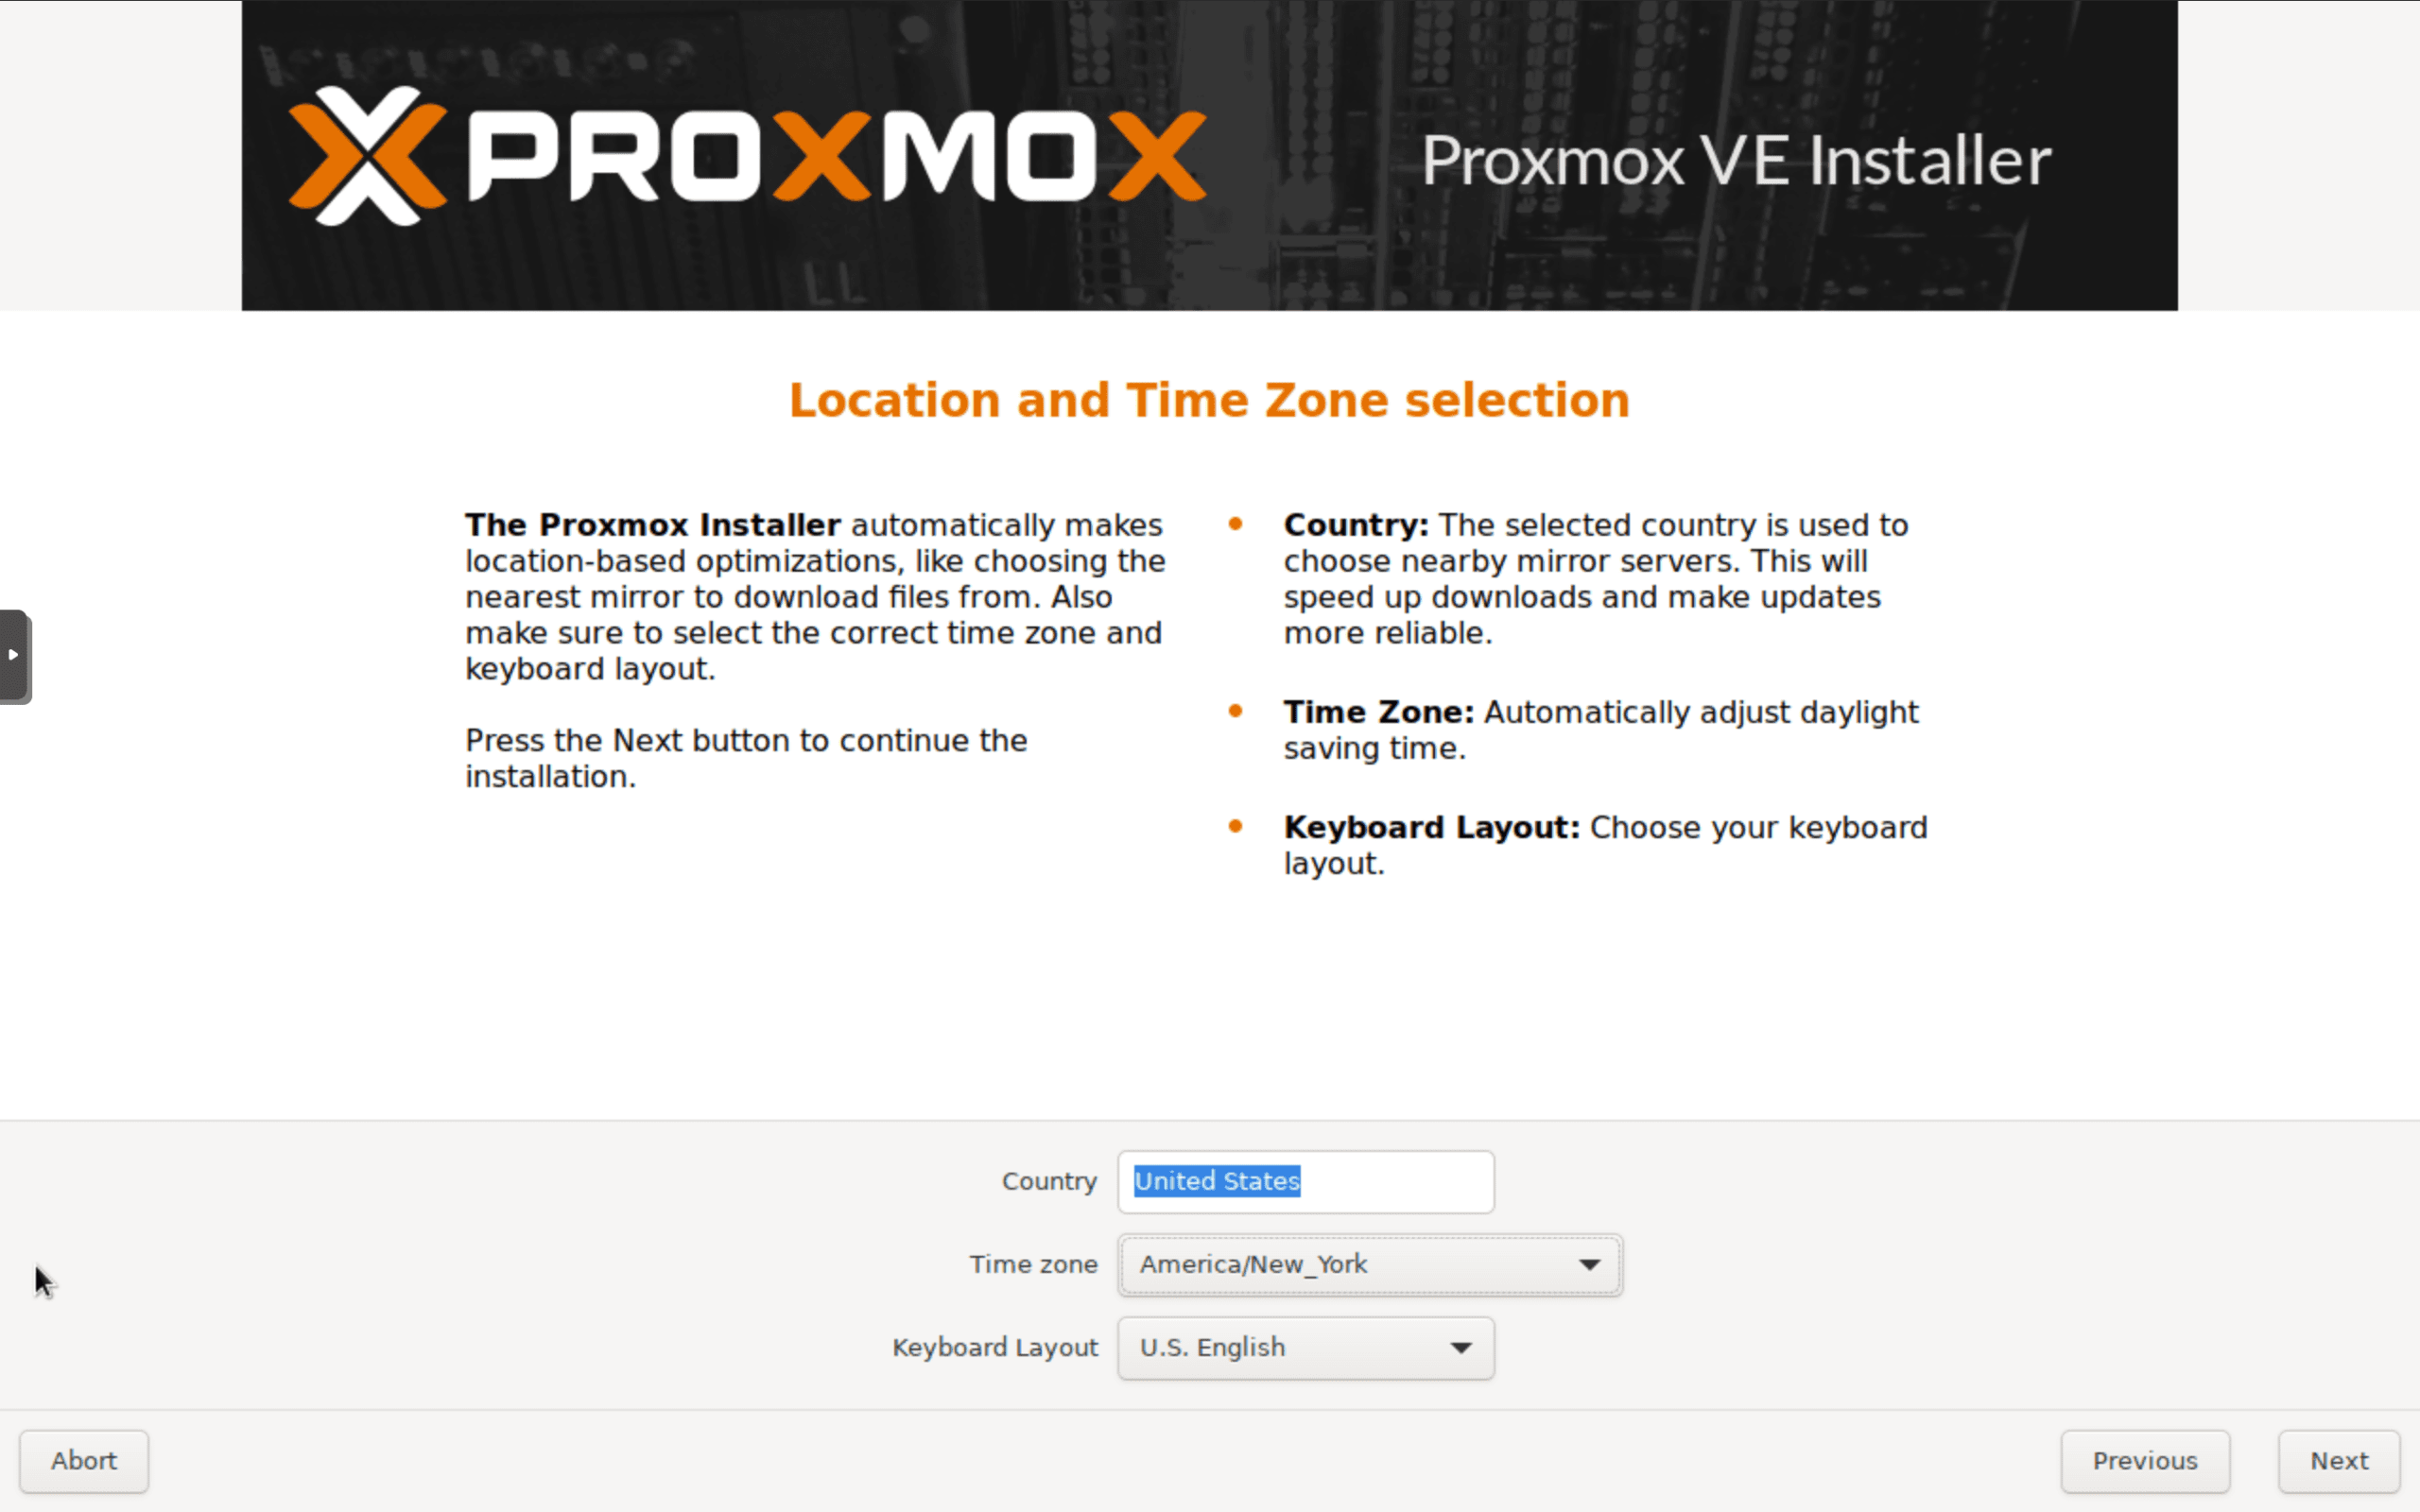
Next, set your country, time zone, and keyboard layout and then click on Next.
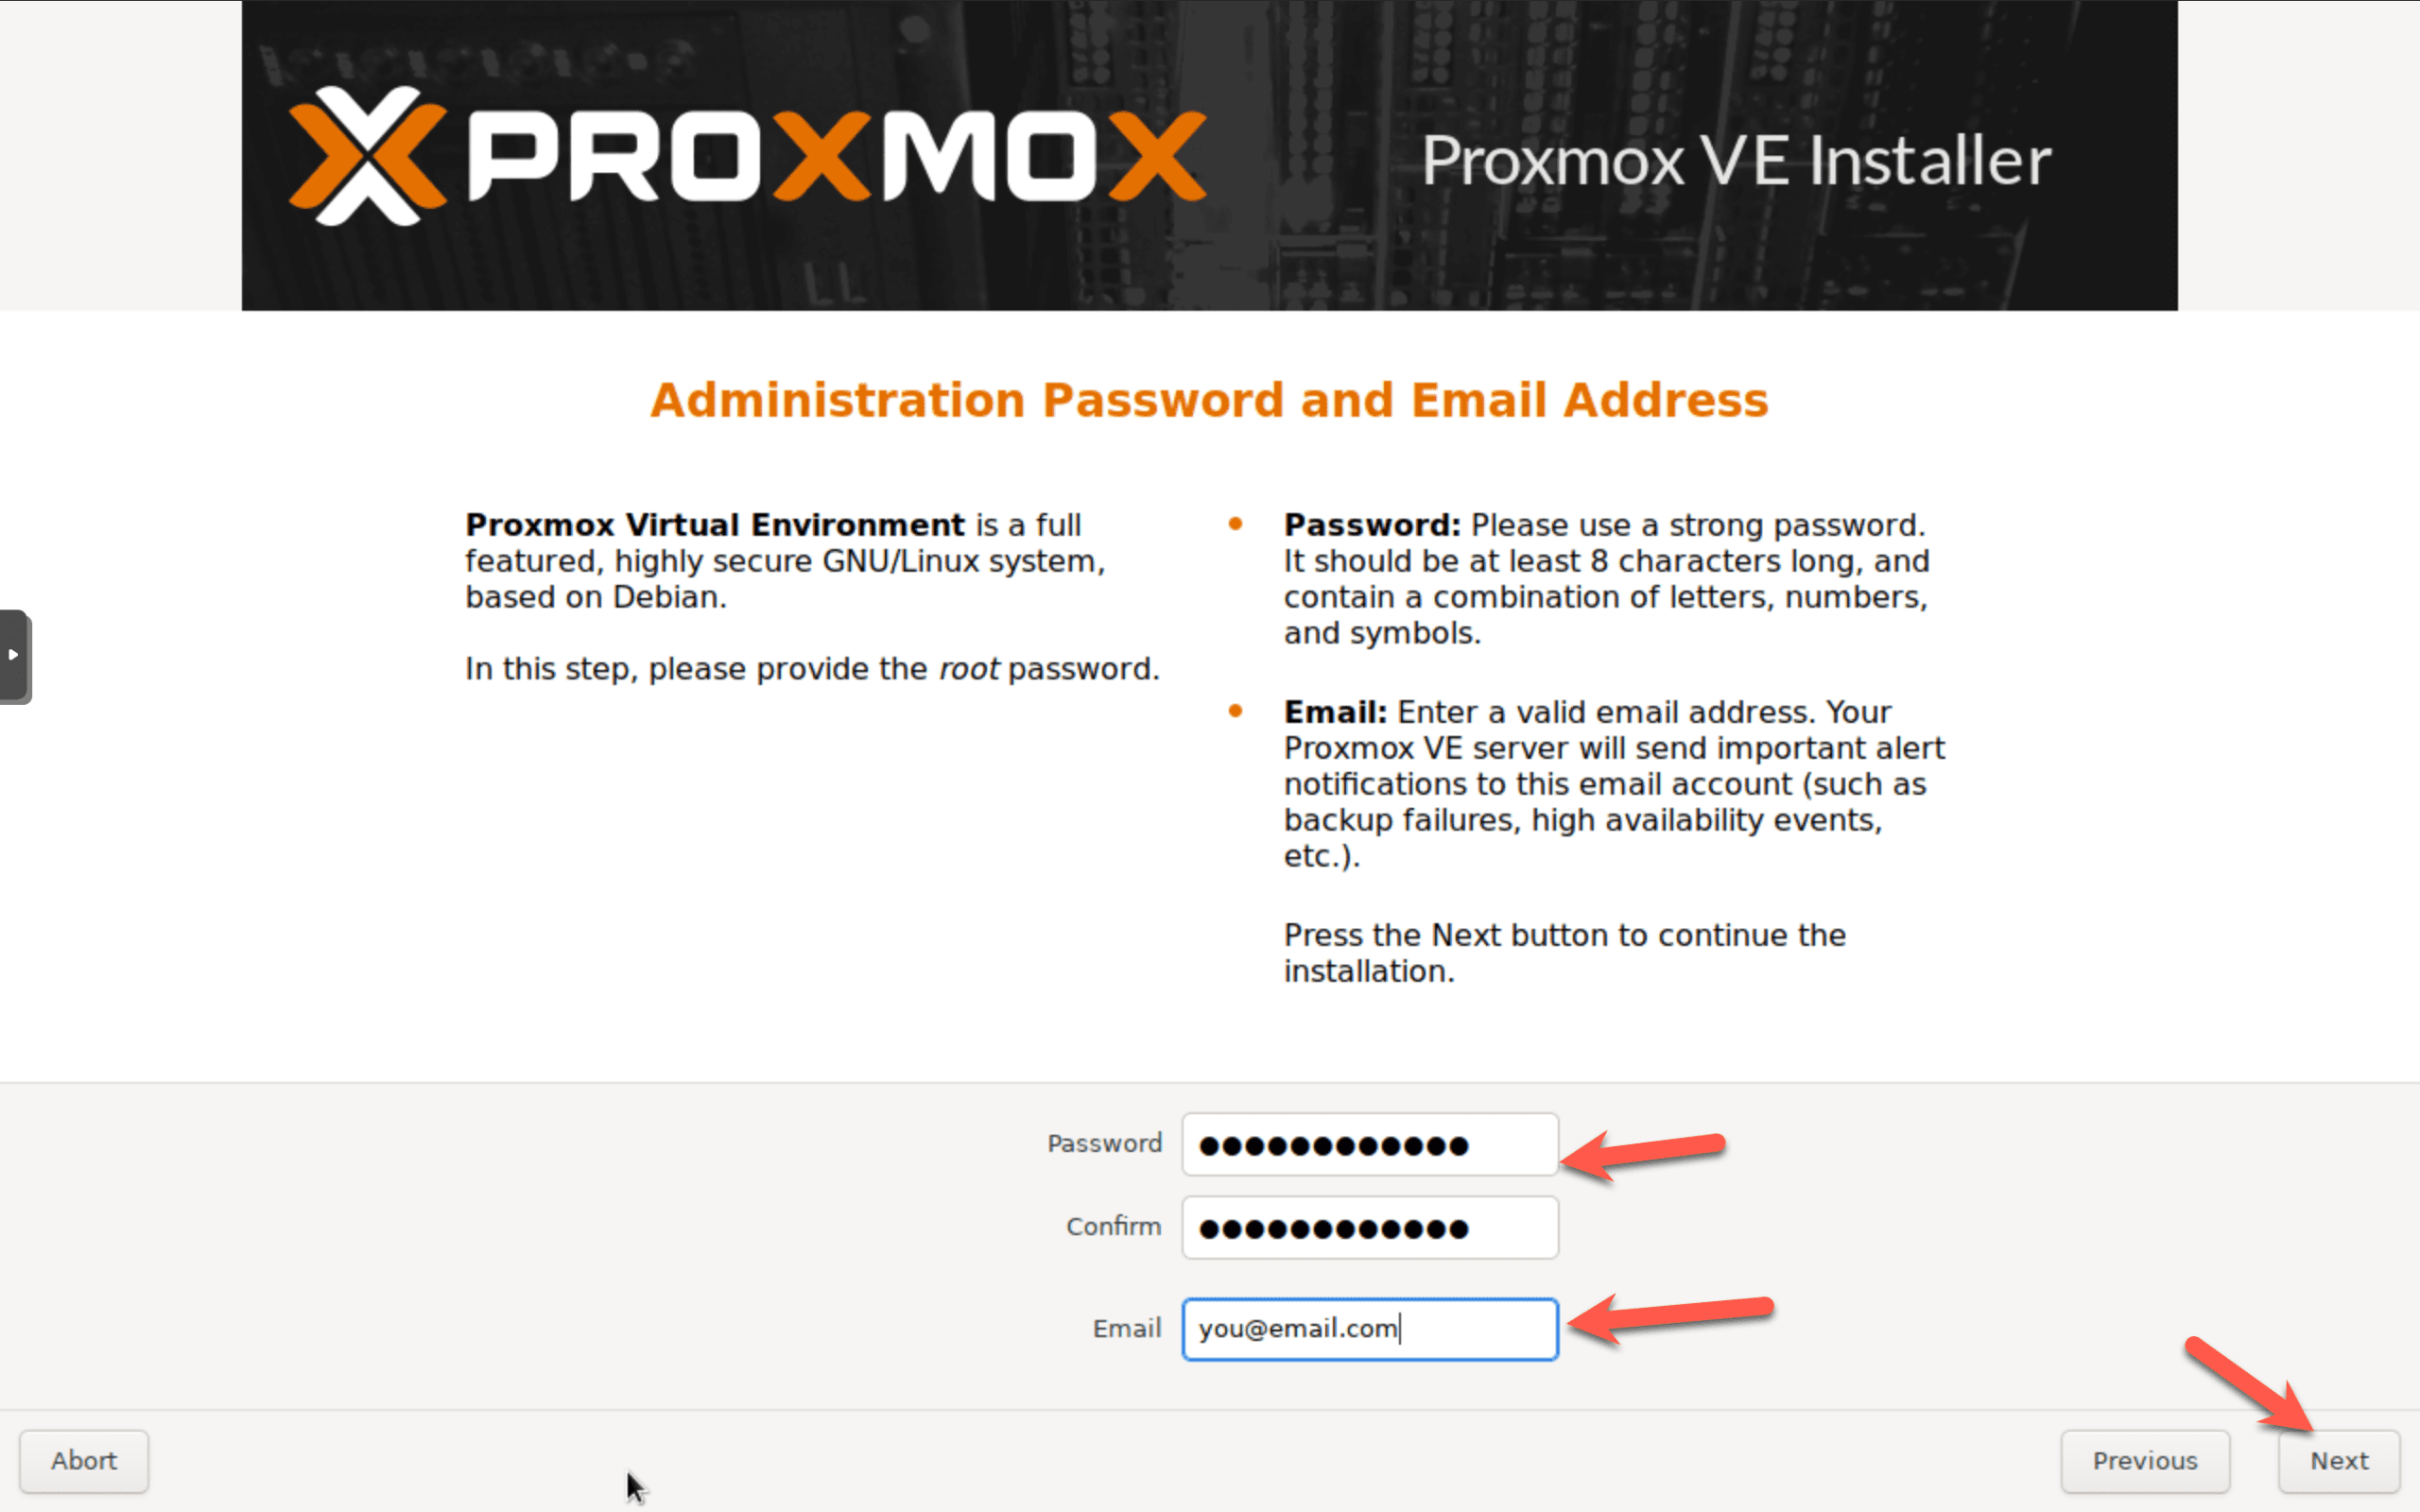
Set a password for the root user and then your email address. Proxmox will send important notifications to this email address. Click on Next.
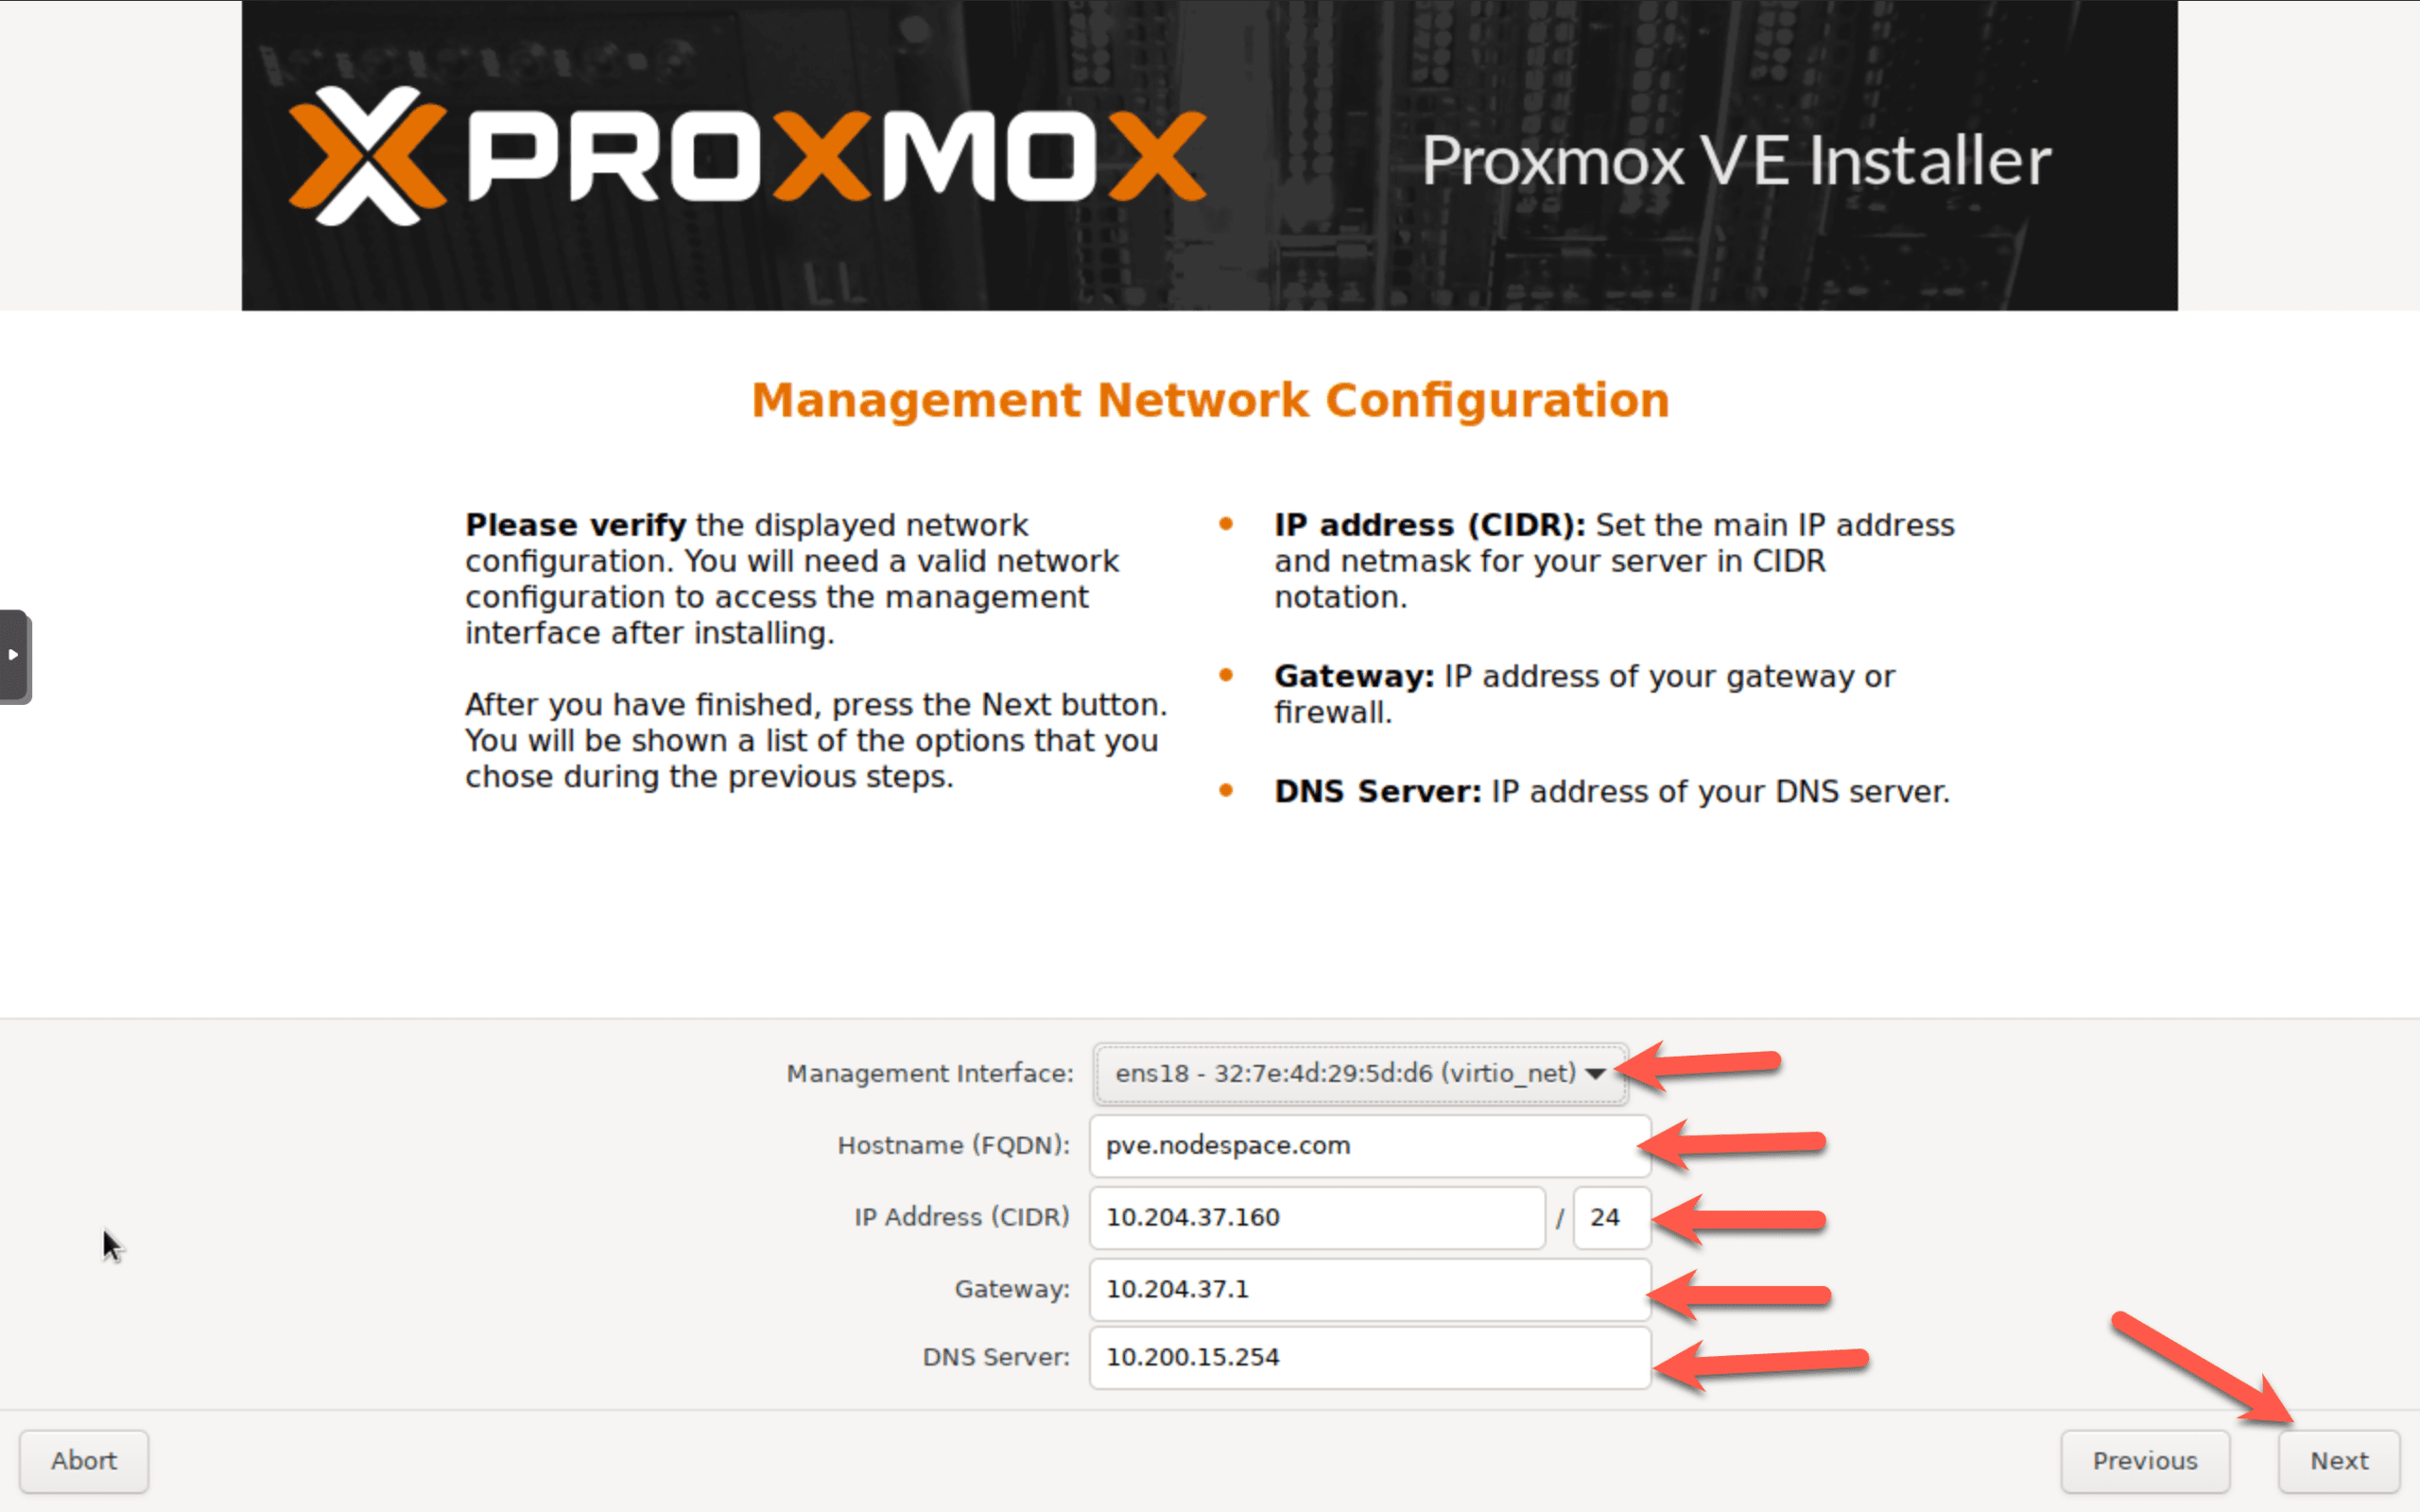
Now you need to set your network details. At home, your server should pick up an IP from DHCP. Ideally, you should set this statically – well, if Proxmox picks up a DHCP address, it will statically set it within the OS. So you should reserve that IP or manually pick a static IP. Also, the DNS server setting only supports a single DNS server. So enter just one DNS IP. Then click on next.
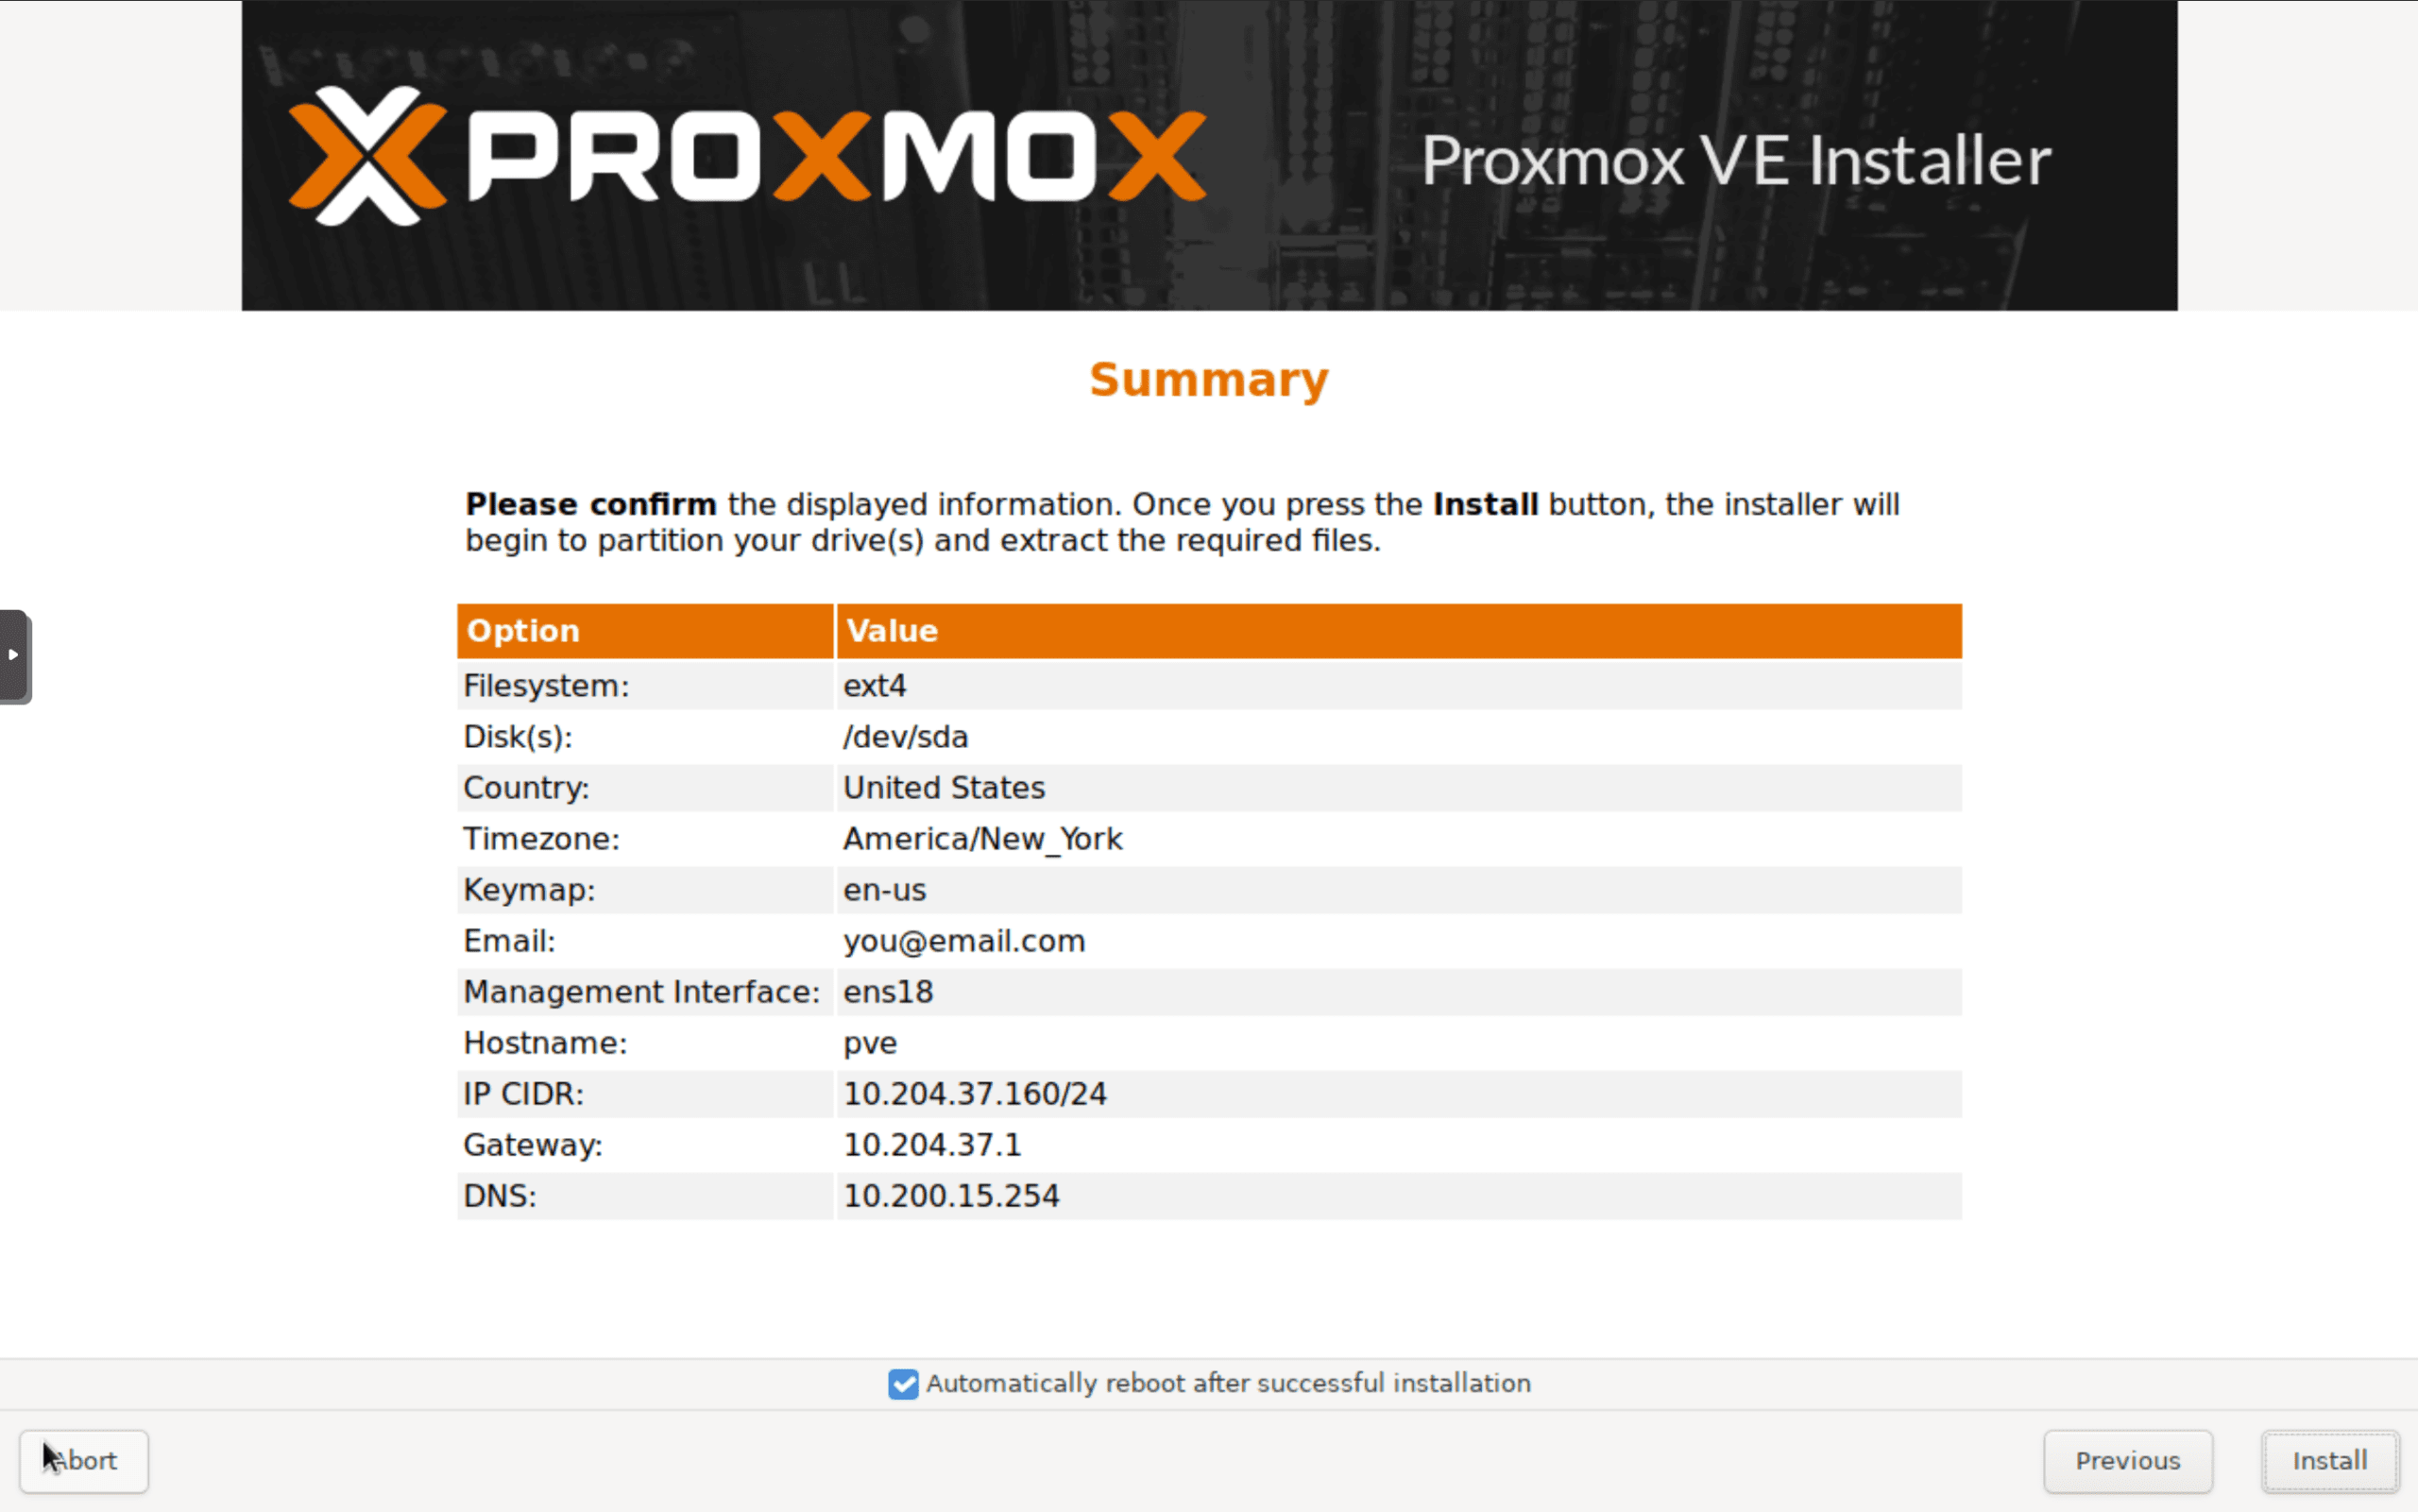
Finally, you’ll see the summary screen. This is your last chance to make any changes! If it all looks good, click Install.
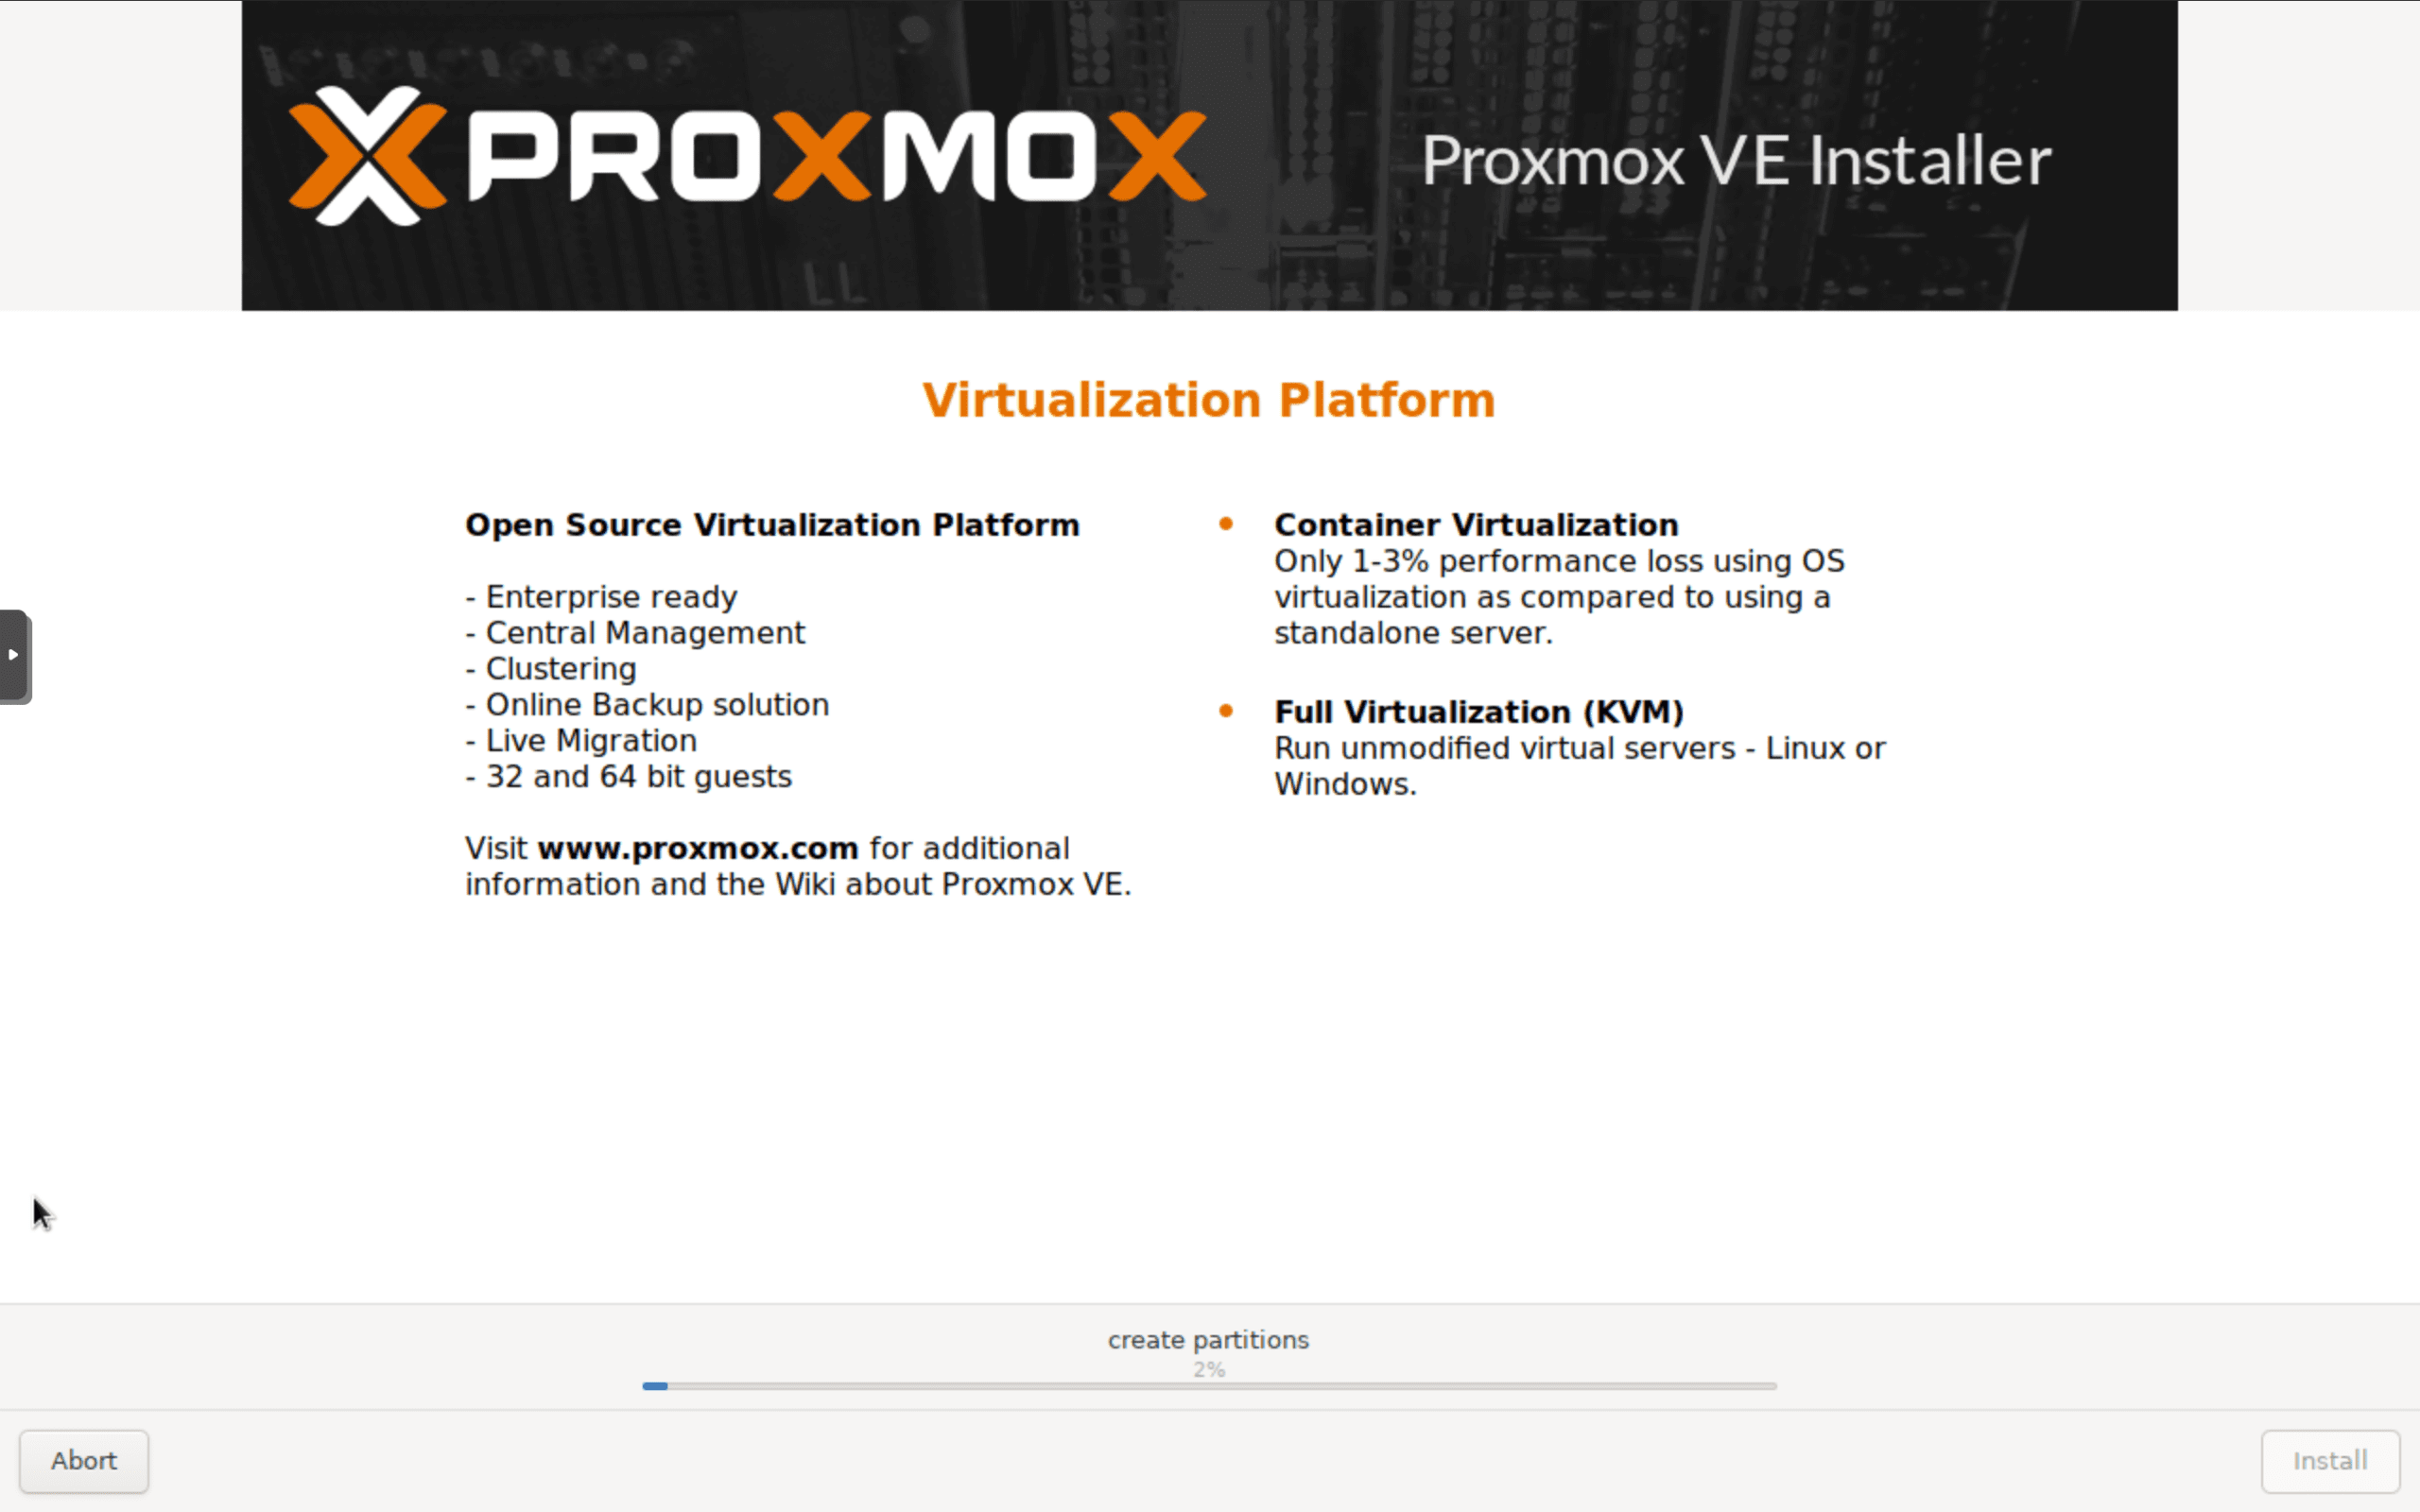
At this point the installer will kick off and show you a slideshow with information about Proxmox. Once Proxmox is installed, your server will reboot (assuming you left the box ticked).
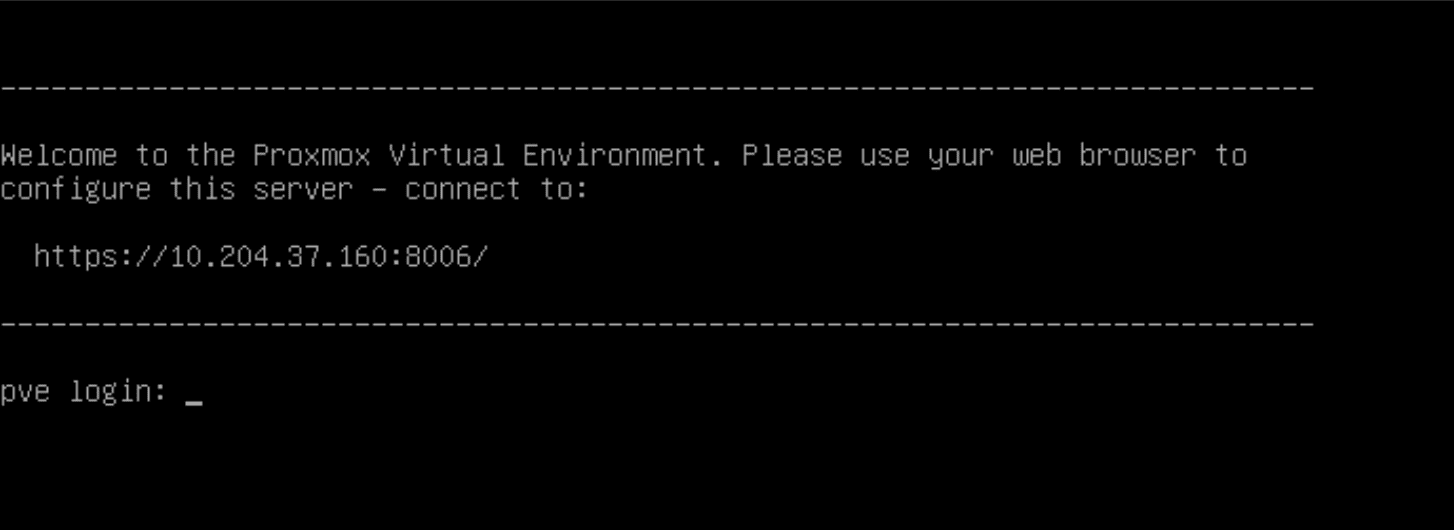
Once installed, the console will tell you to go to your web browser and enter the server IP. At this point in the install process, if there’s a keyboard and monitor hooked up to your Proxmox server, you can detach them and put them away. From this point on, everything will be done from the browser.
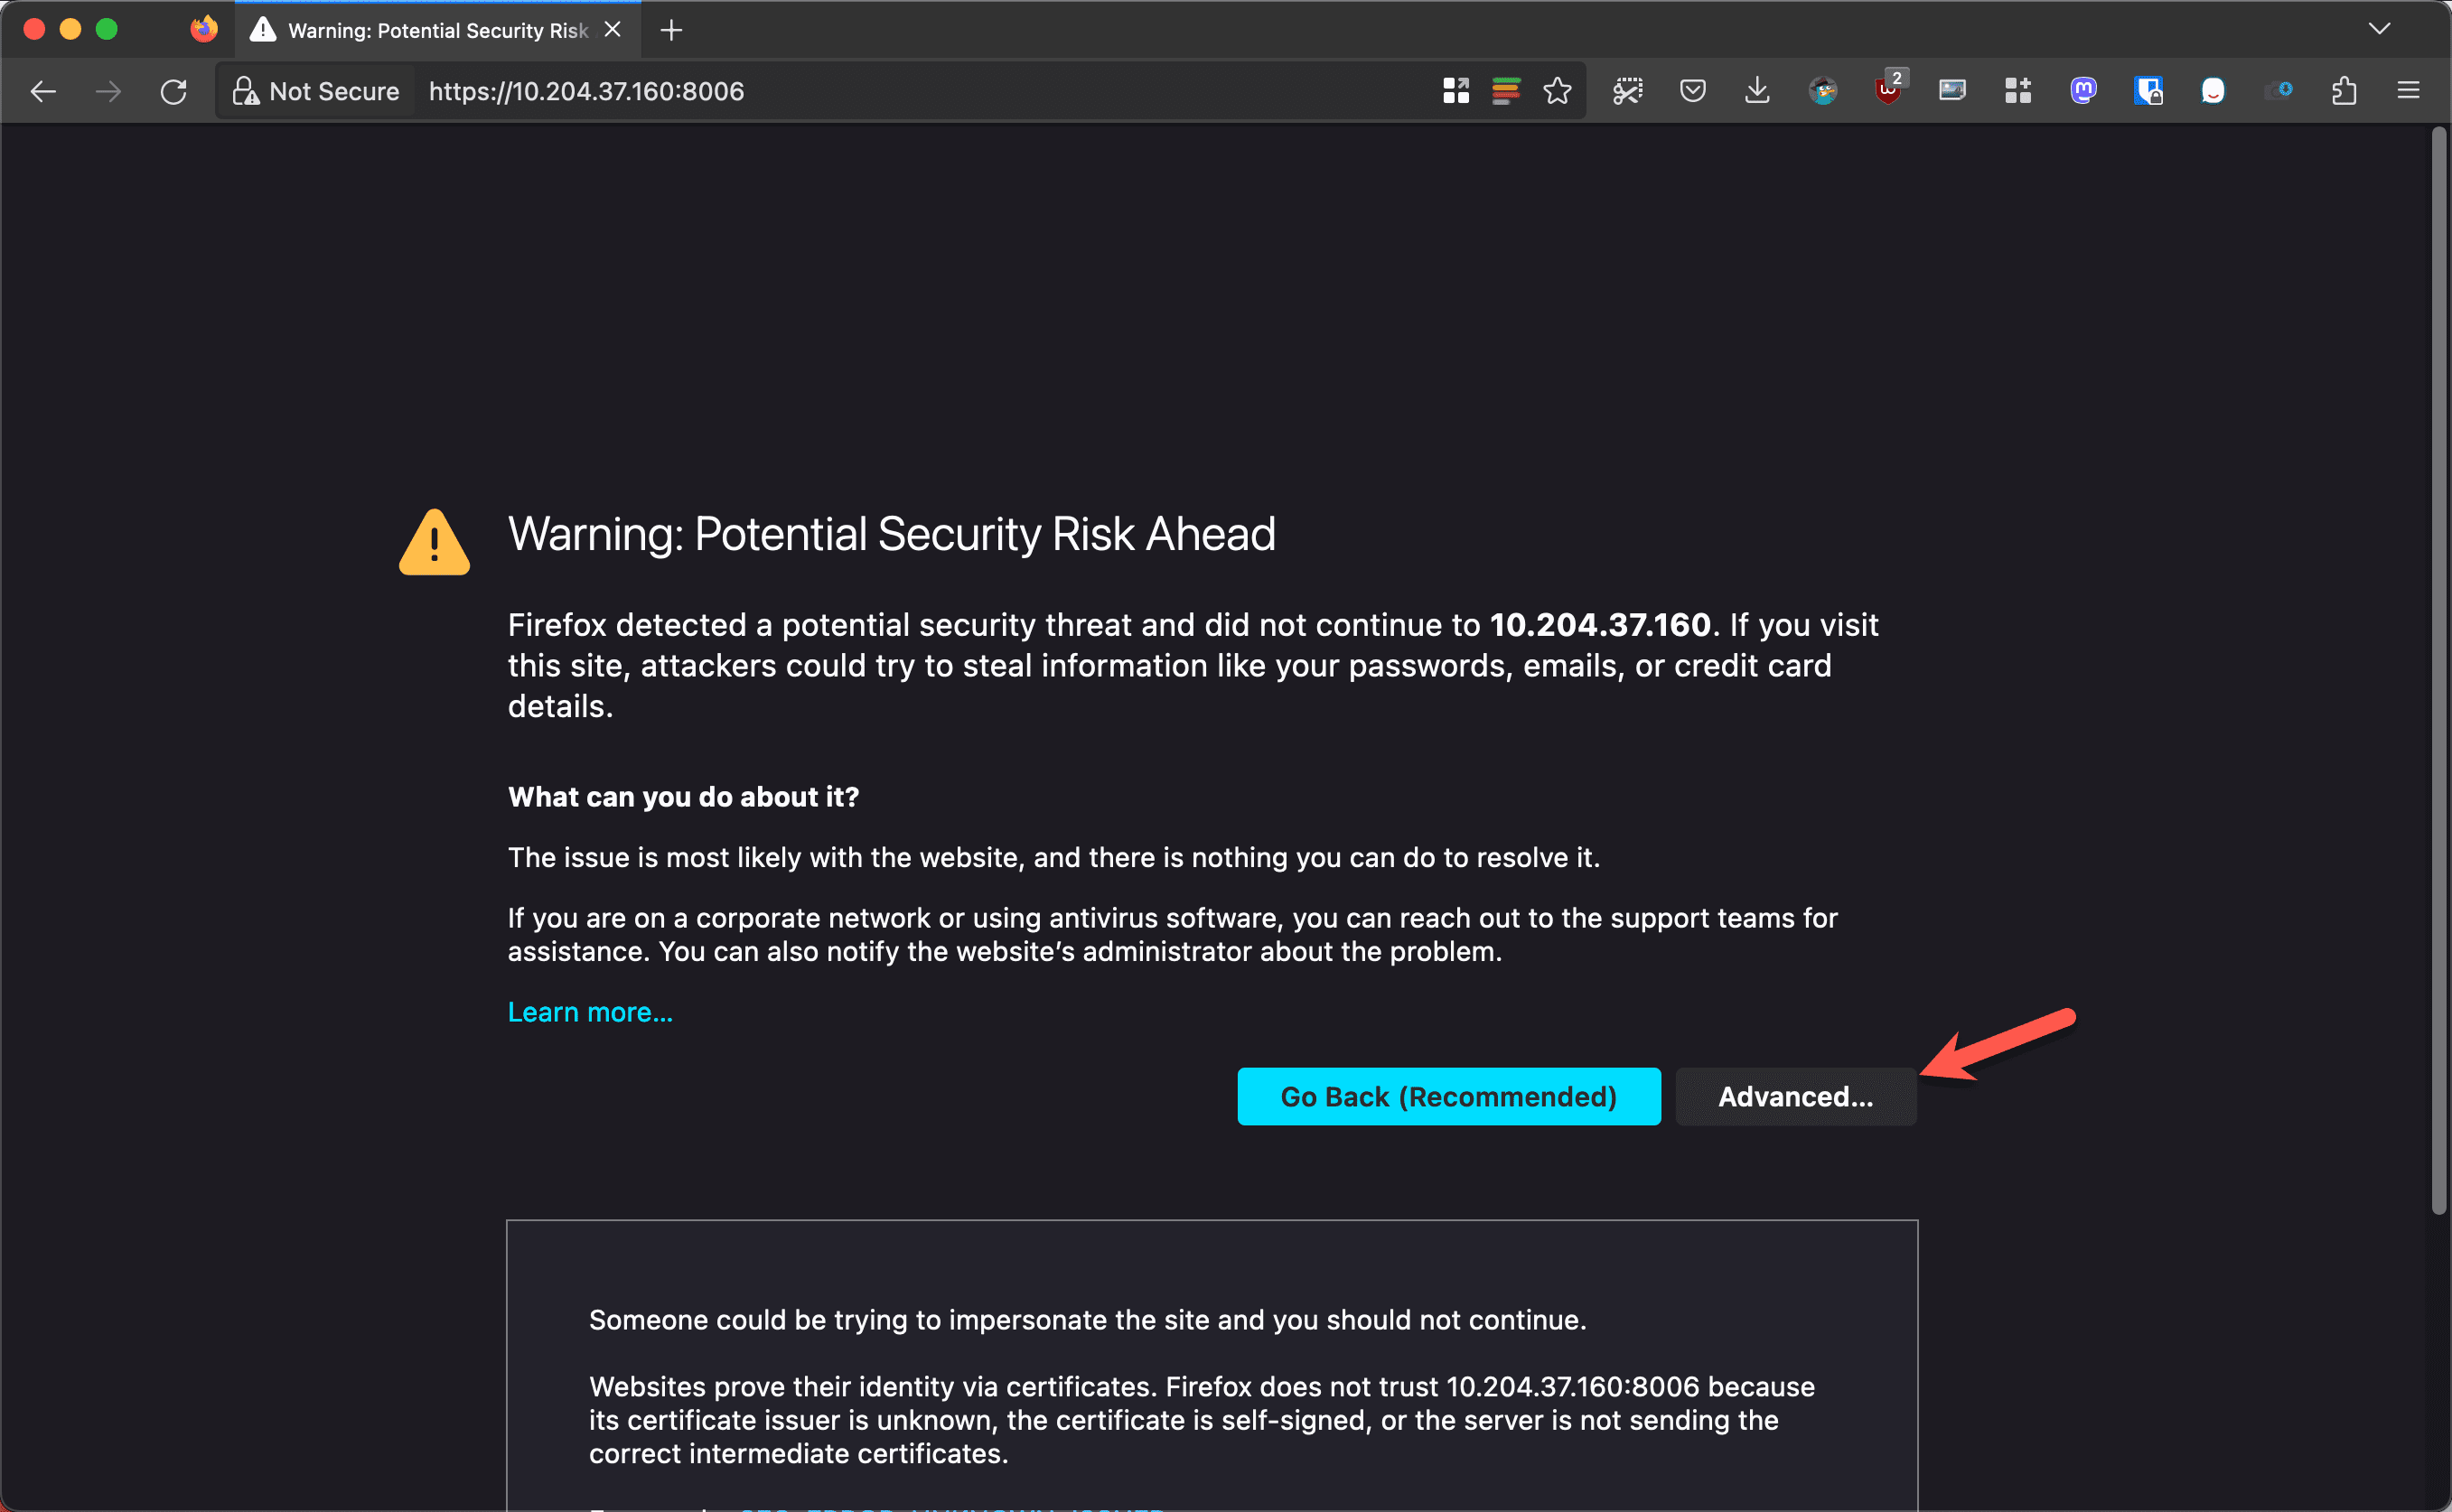
Proxmox generates a self-signed certificate so you will need to click through to get access.
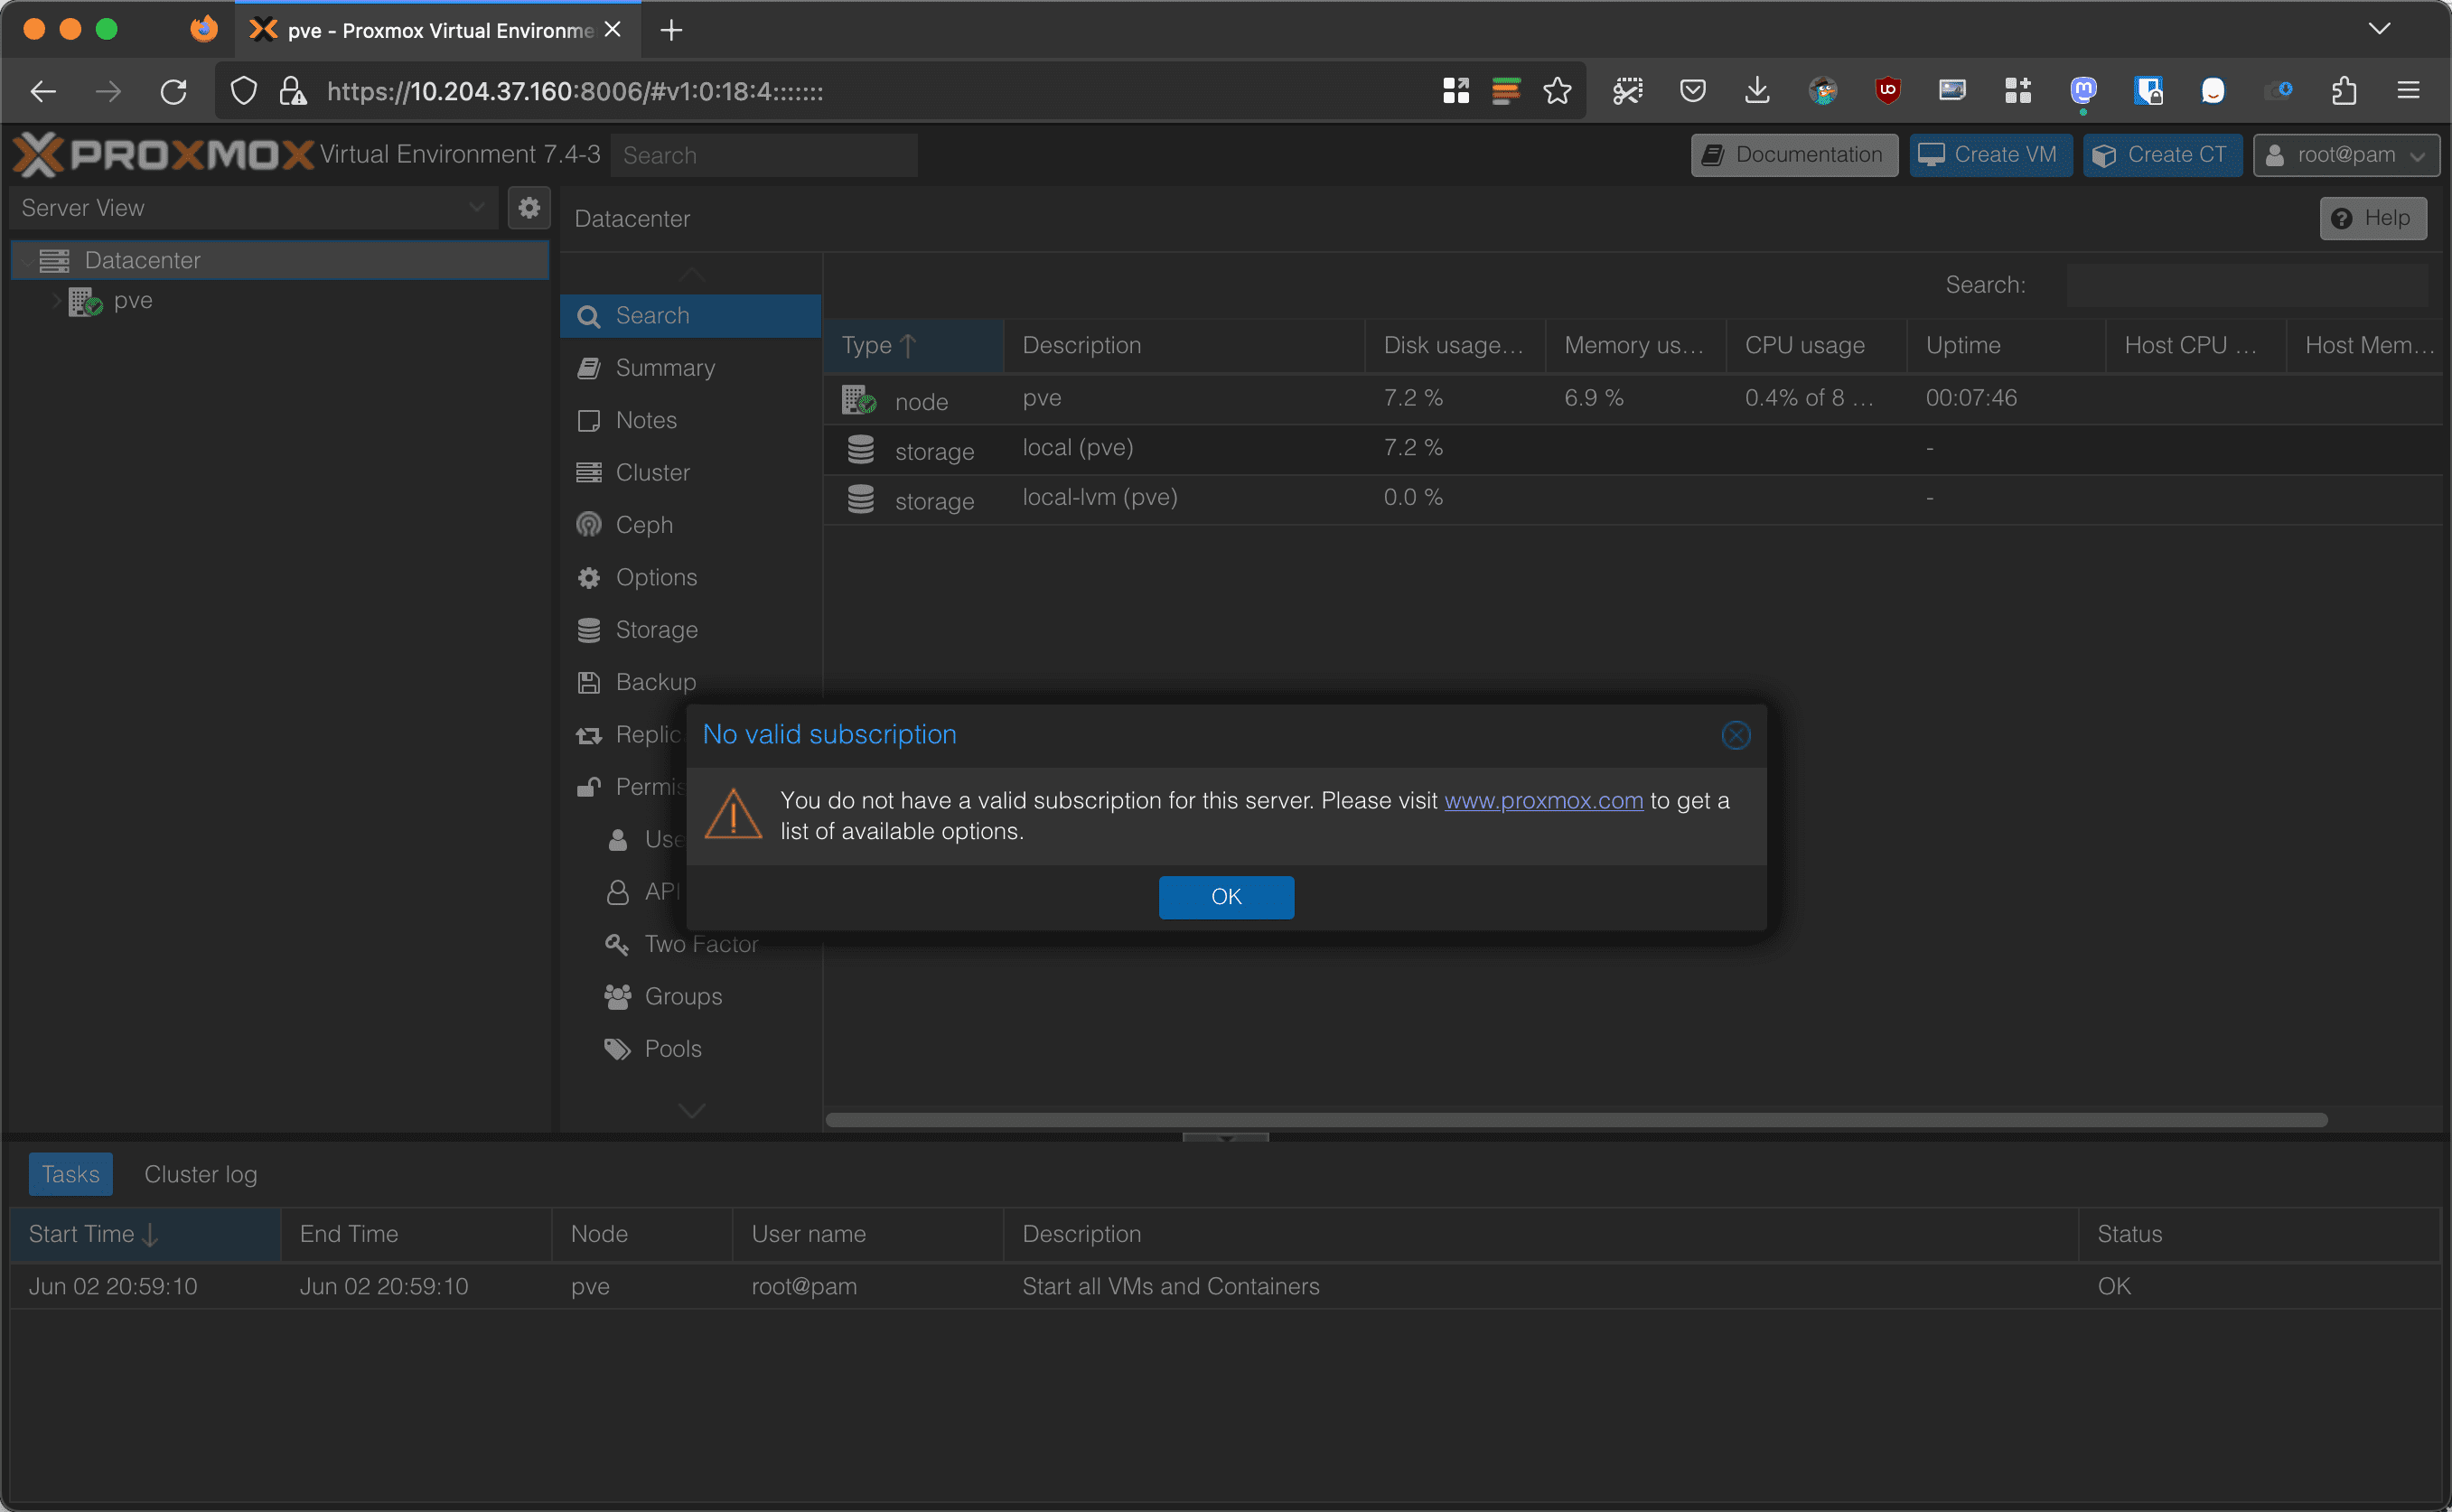
Once you are logged in, you’ll get this popup telling you that you don’t have a subscription. This is normal. You can click OK and continue to use Proxmox without a subscription. You will just see this popup occasionally.
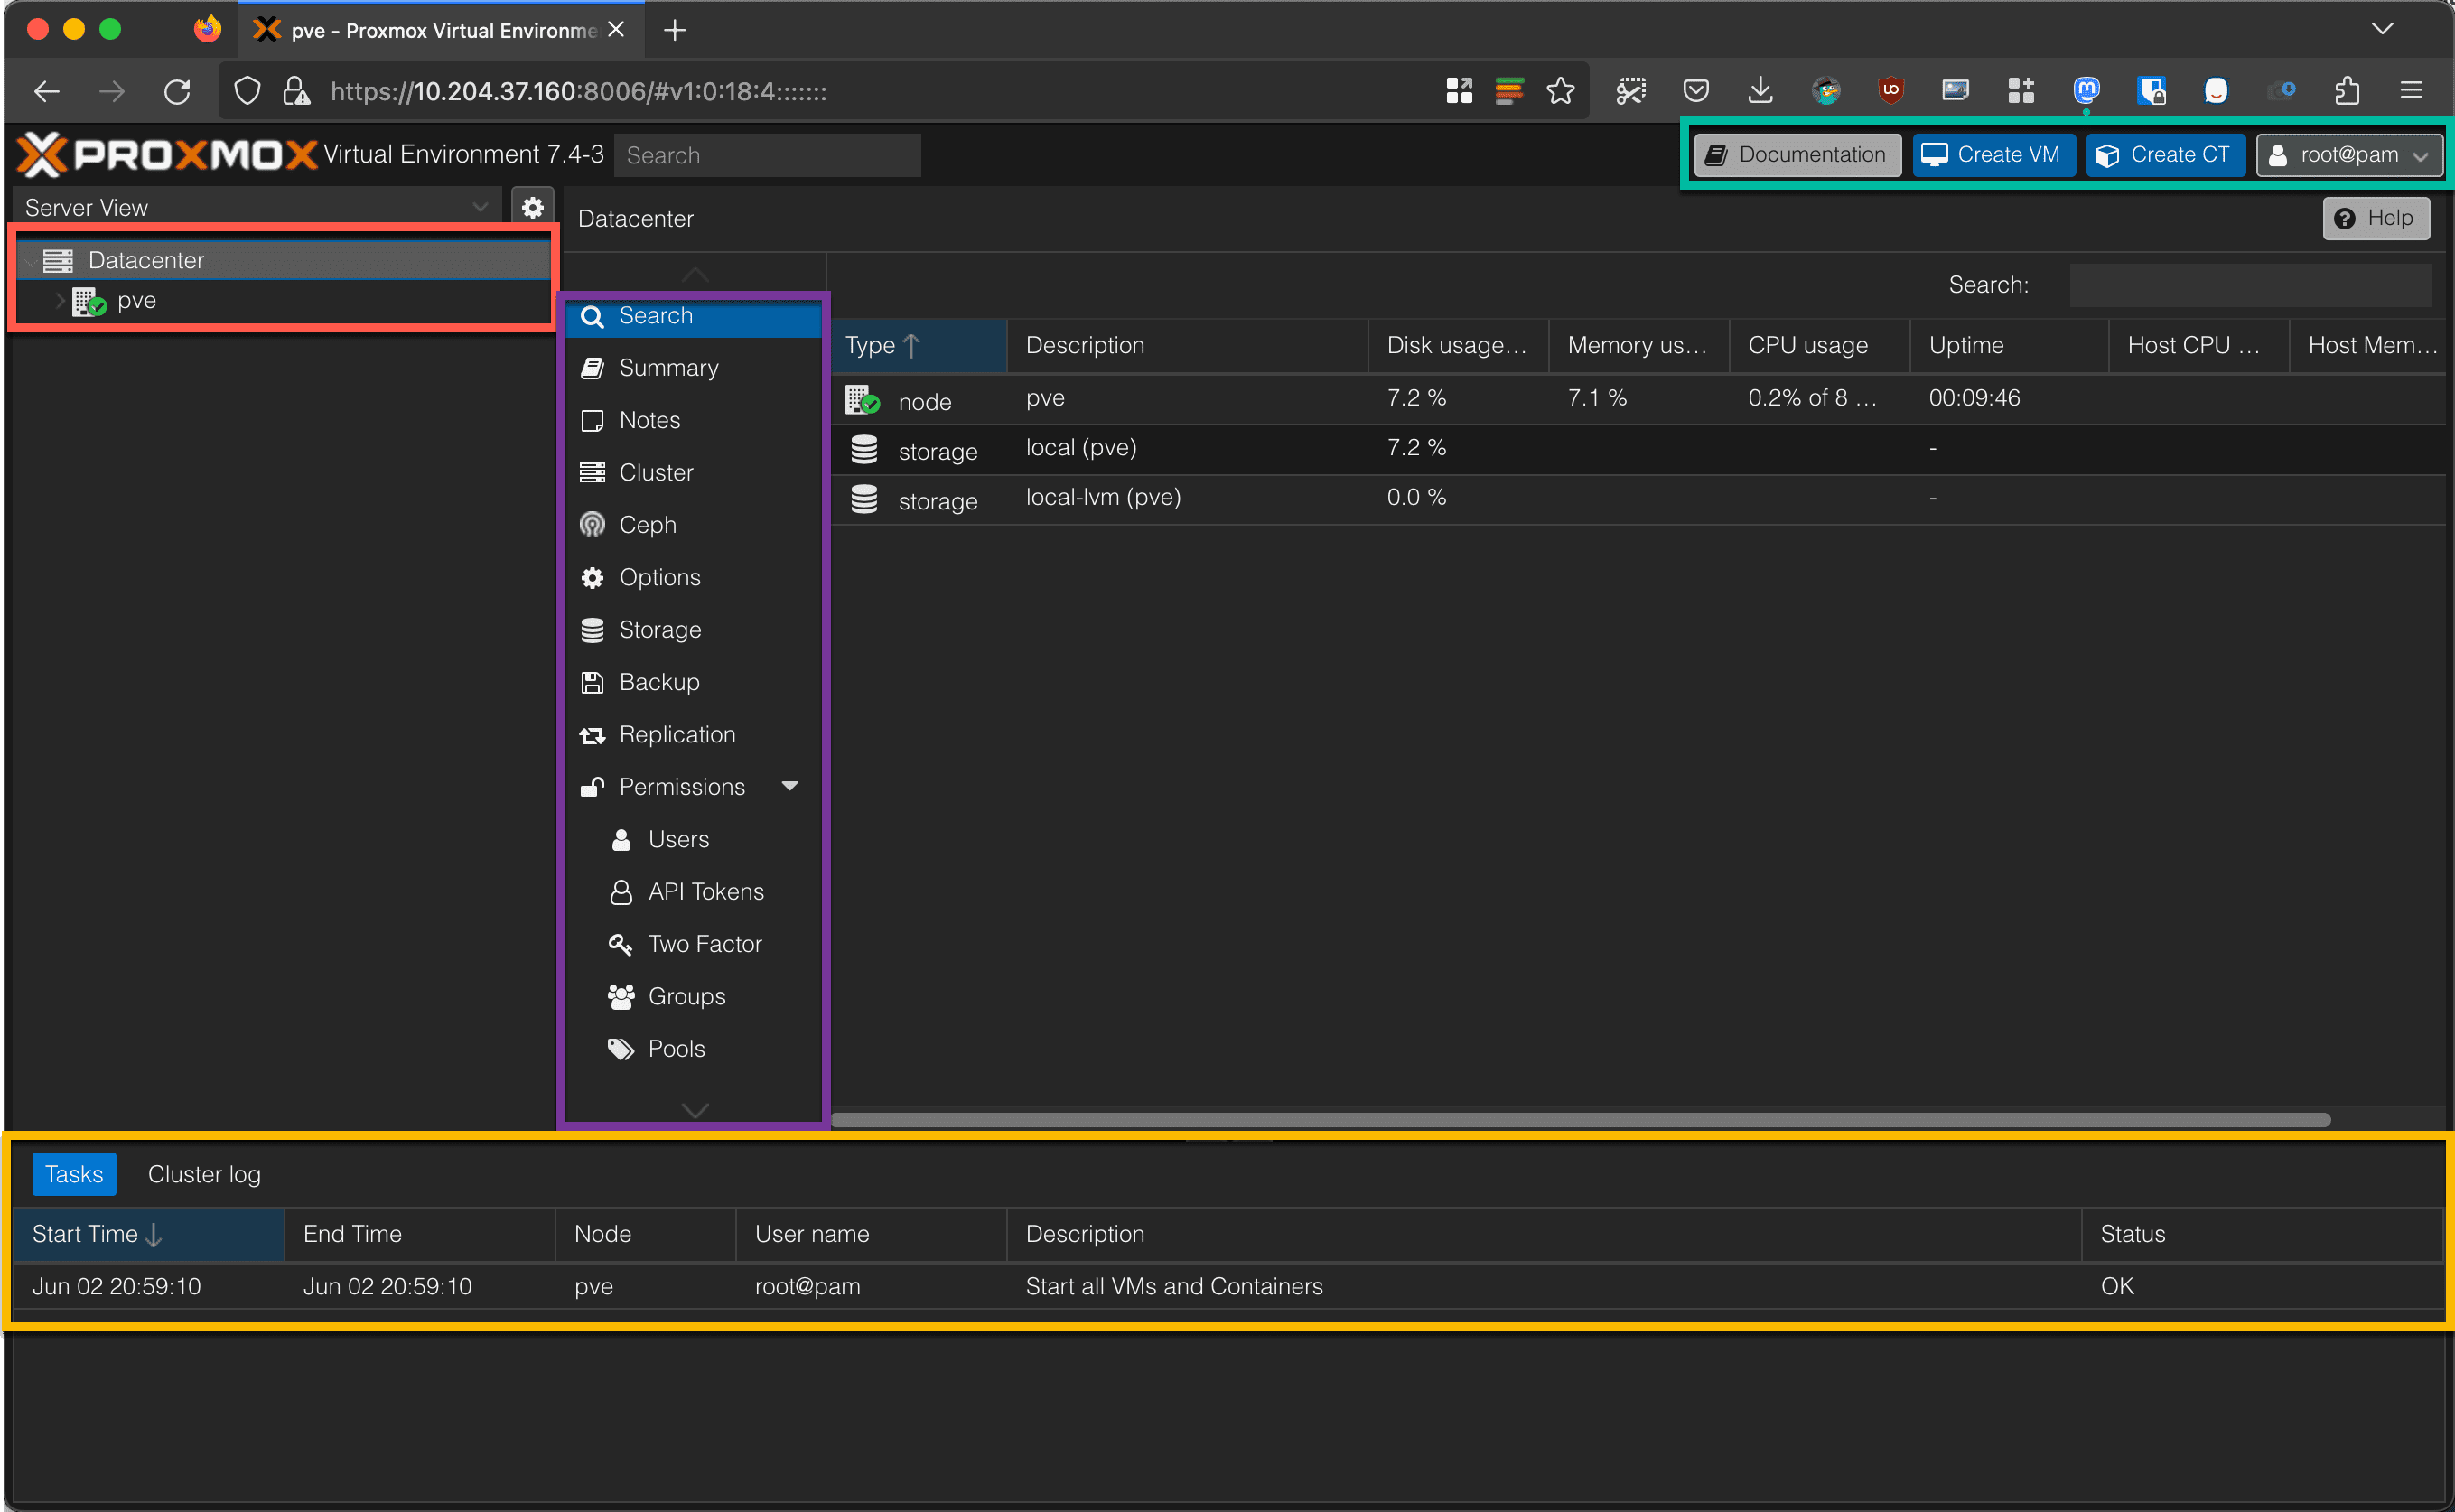
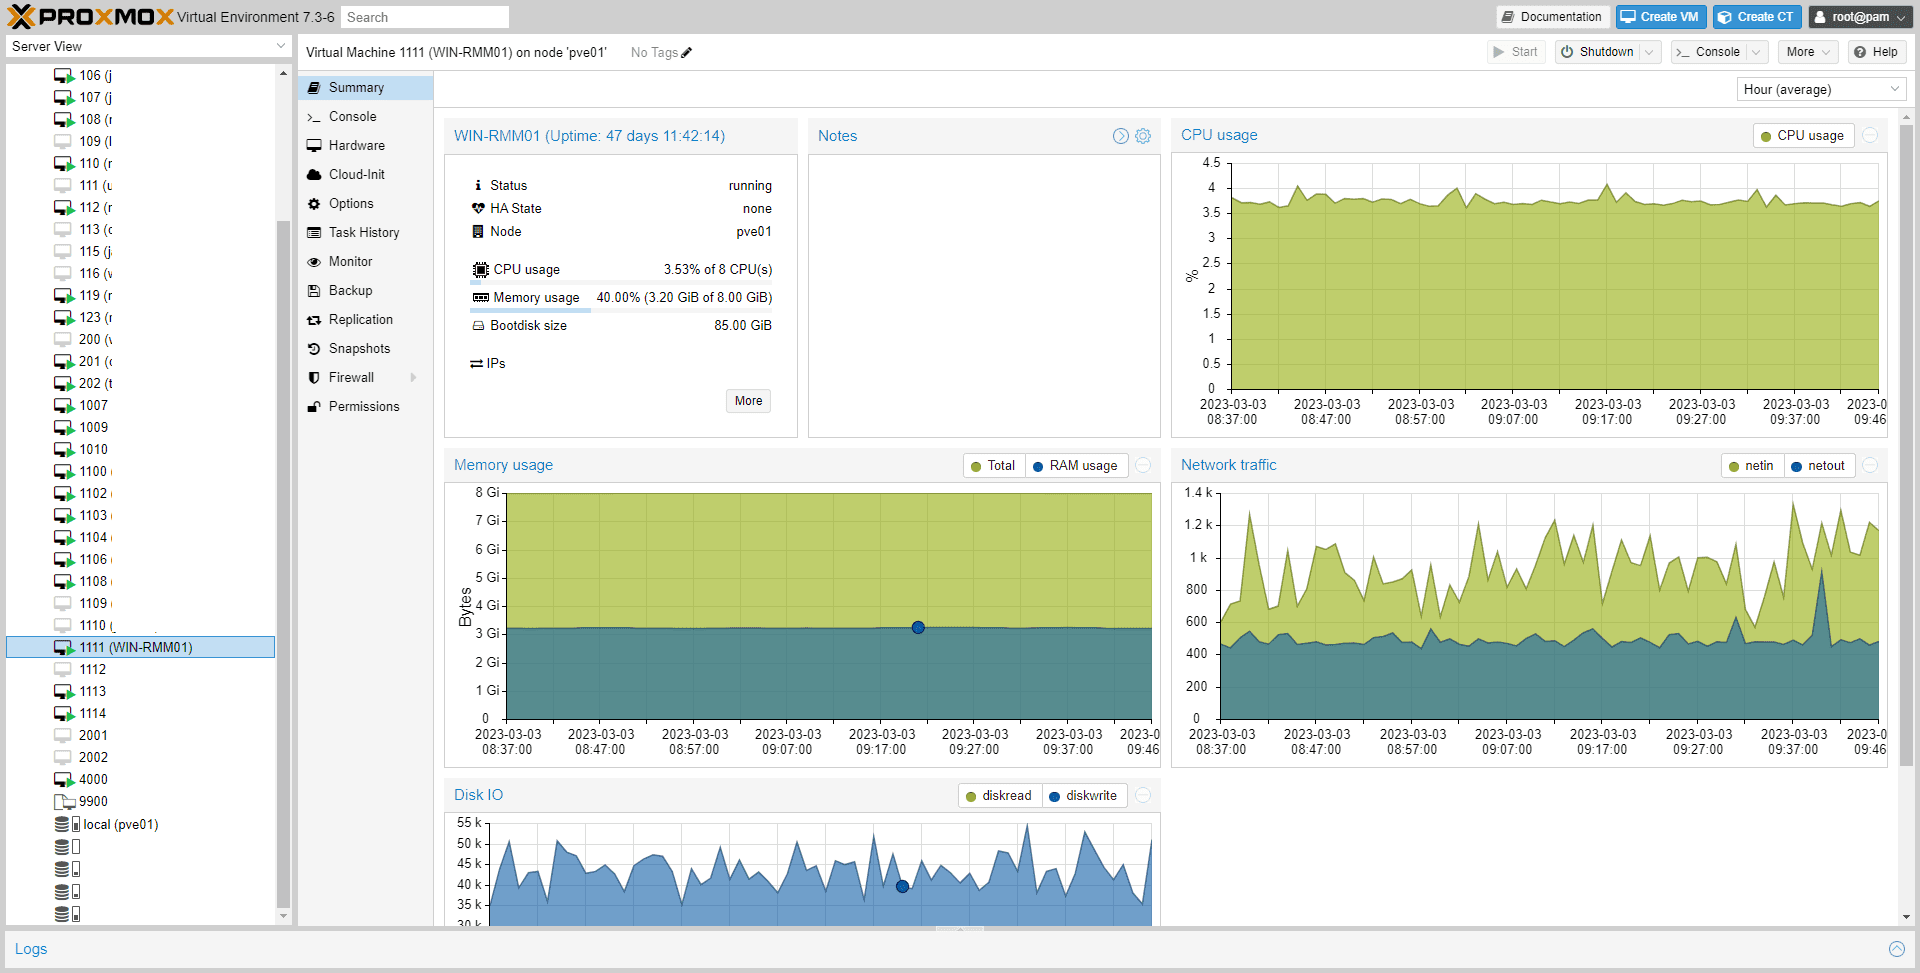
This is the main Proxmox console. The side tree will list servers, VMs, and storage. Everything is listed under a “Datacenter”. Unlike VMware vSphere, Proxmox will only let you manage clusters or individual servers, not multiple clusters. But we’re only focusing on a single server for now. But you should know that Proxmox works in a hierarchy. Datacenter is the top most level, then you have the node level, followed by the VM level.
The purple menu will dynamically change based on what you selected. There are different options available based on datacenter, node, and VM.
The top menu will let you create VMs and containers.
And the bottom will be a log of all tasks.
Before you do anything else, you should go ahead and update Proxmox to the latest version. The ISO images don’t get updated nearly as fast as the packages so there’s usually going to be a bunch of updates.
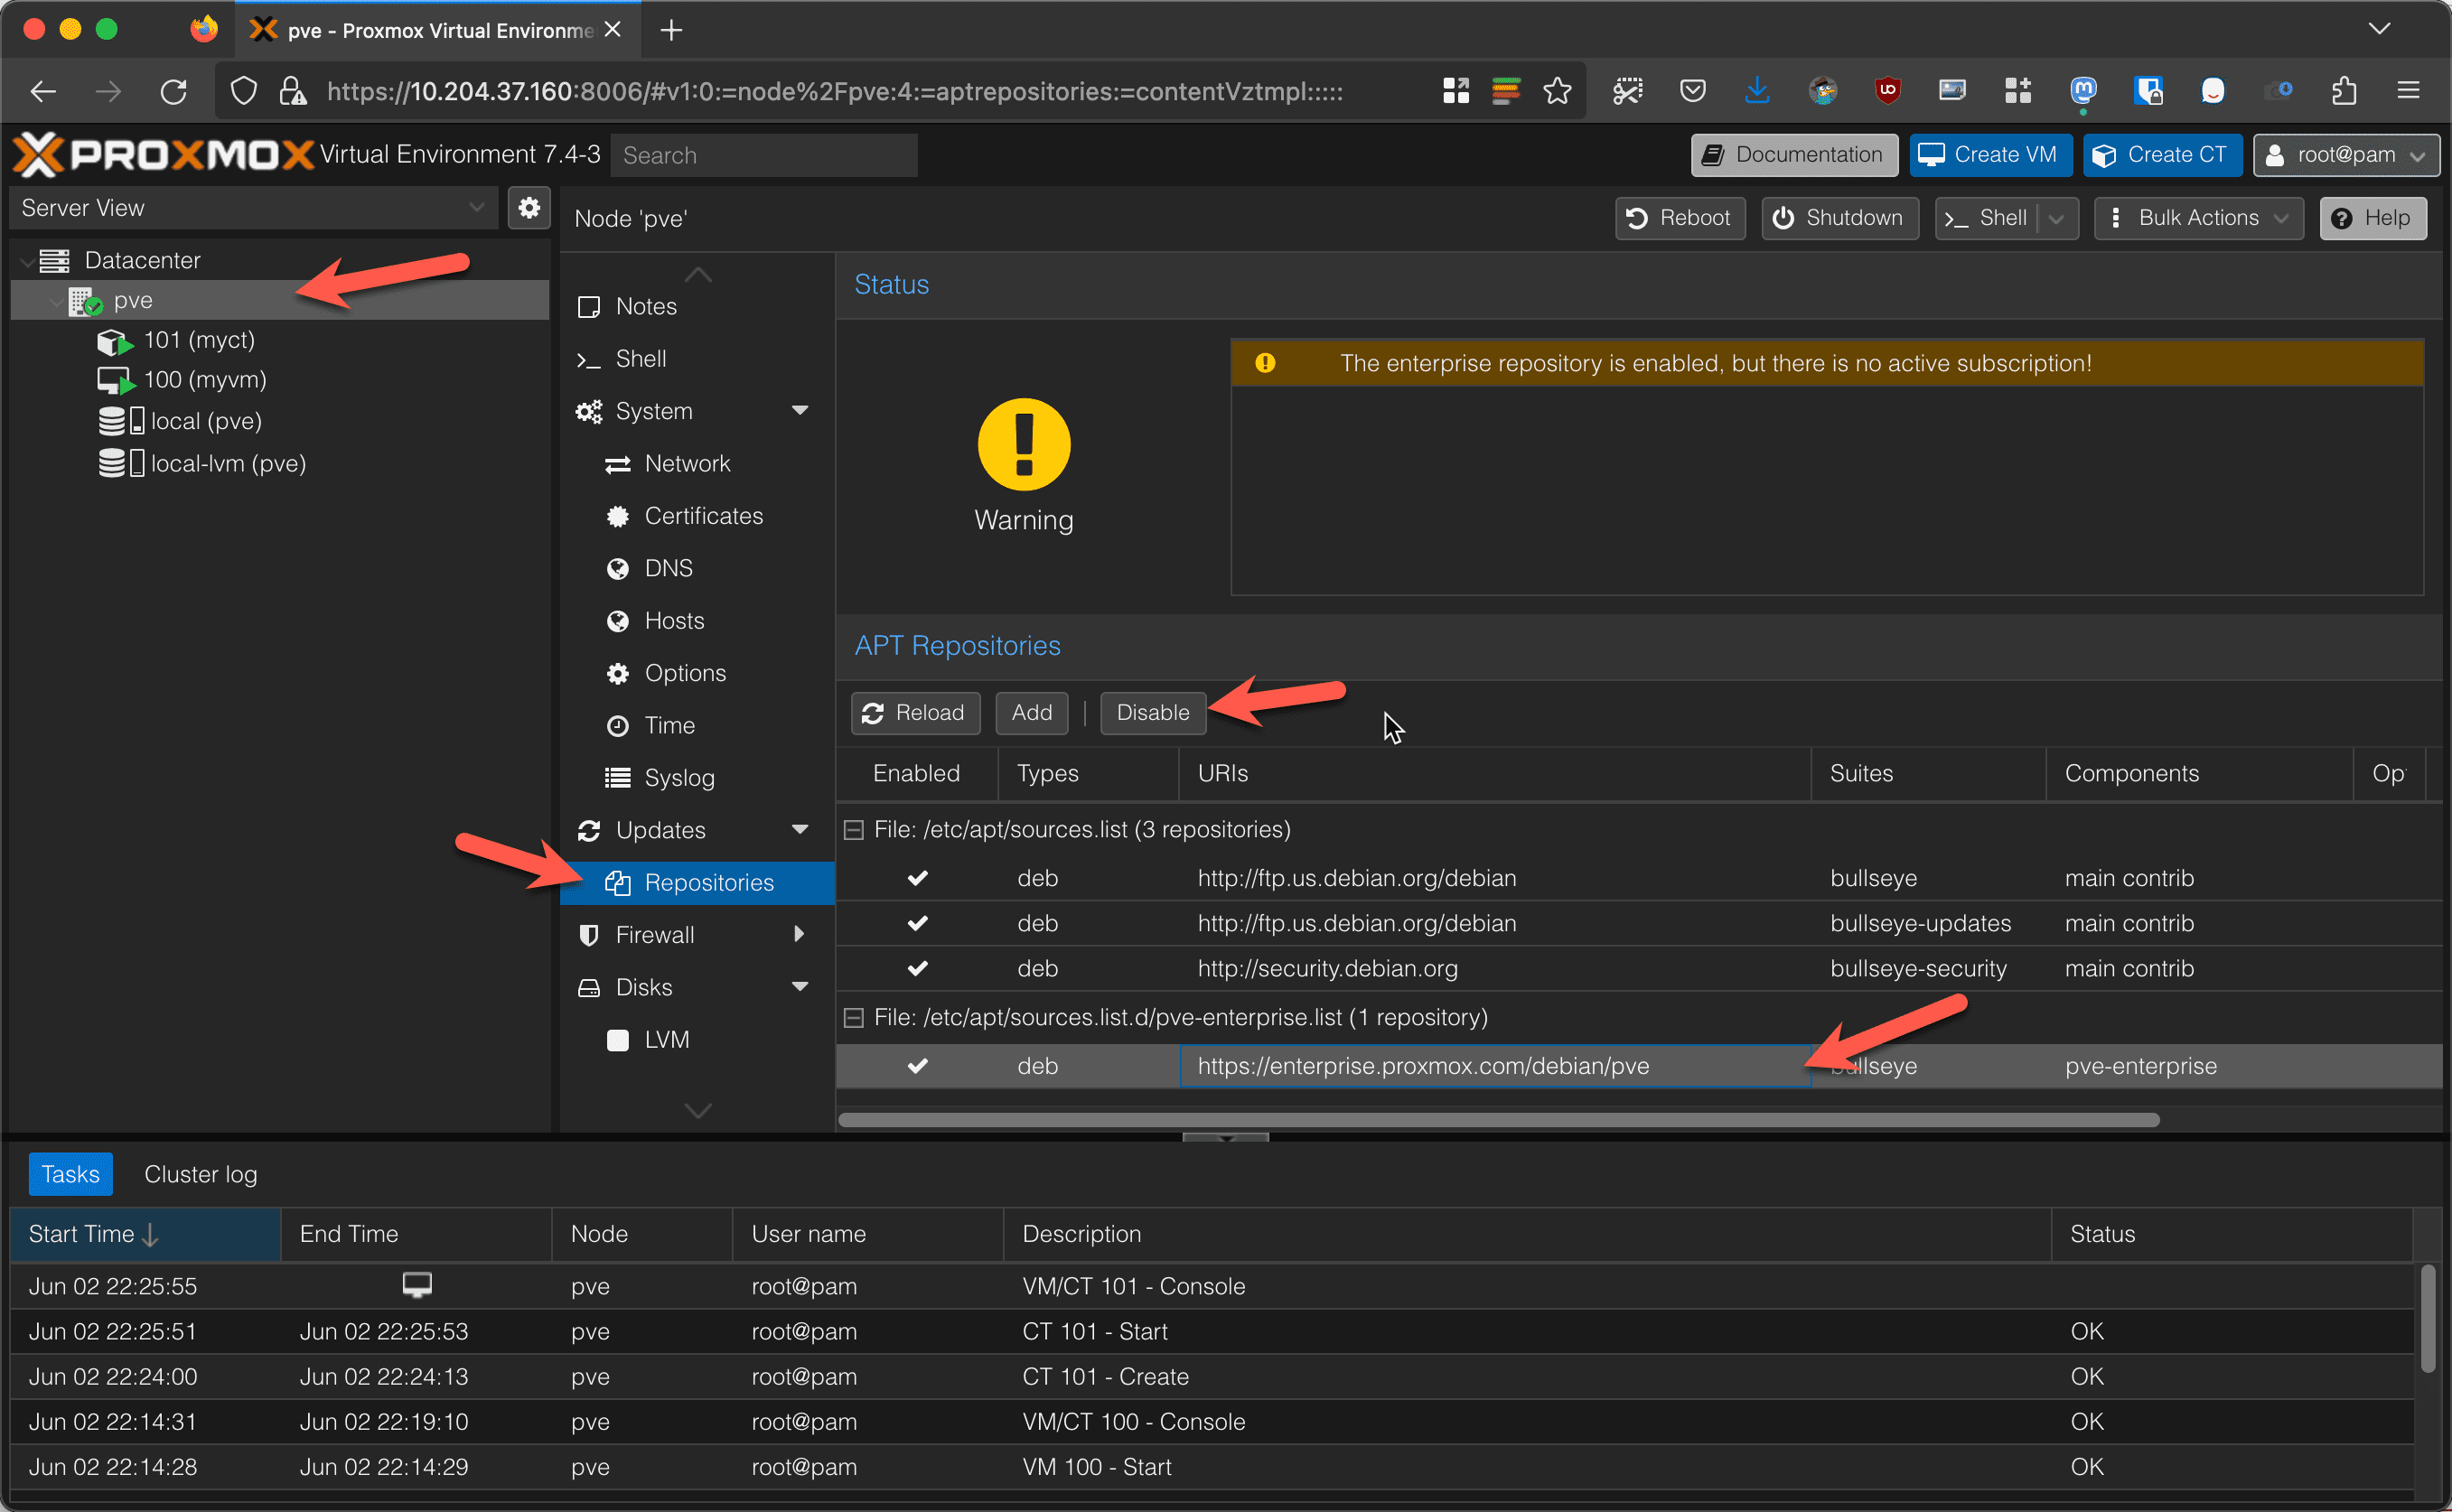
Click on the node in the list and then click on Repositories. From the list of repositories, select the Enterprise repo and click on Disable.
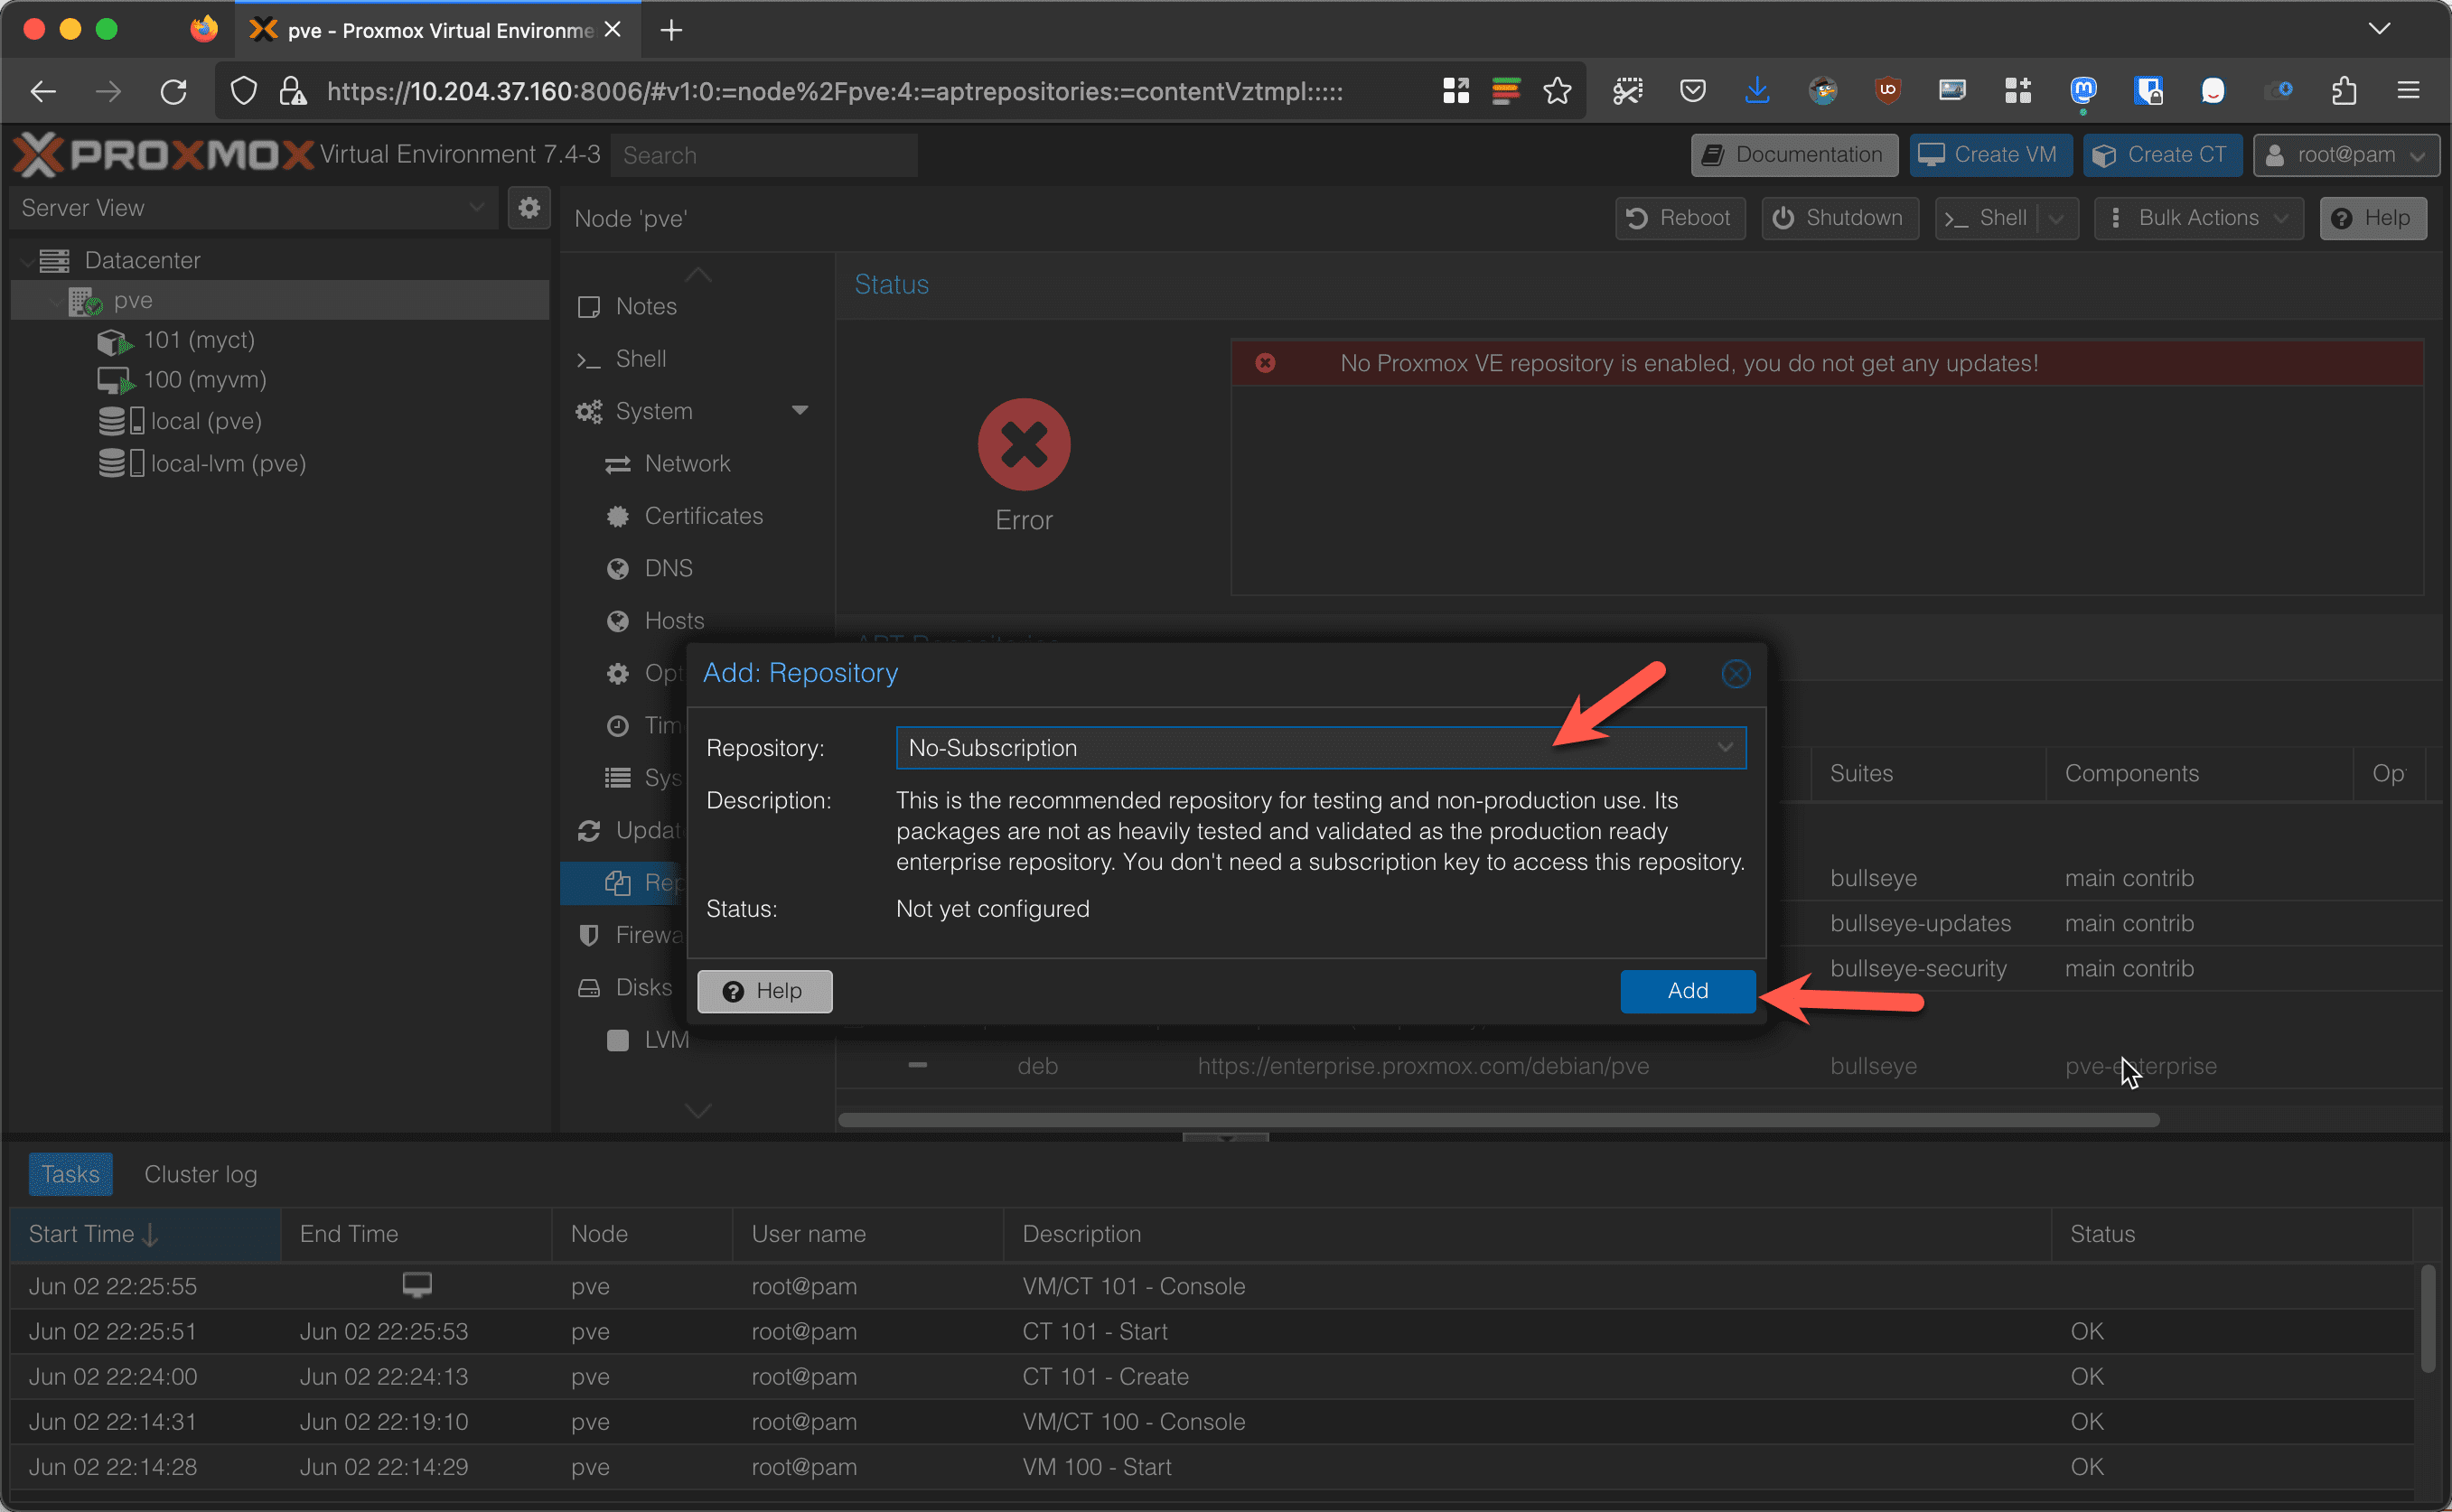
Click on Add and then select the No-Subscription repository and click on Add. At this point, you can SSH to your Proxmox node or select the Shell option to connect to the Proxmox console.

As it’s a Debian system, issue the command apt update and press enter.
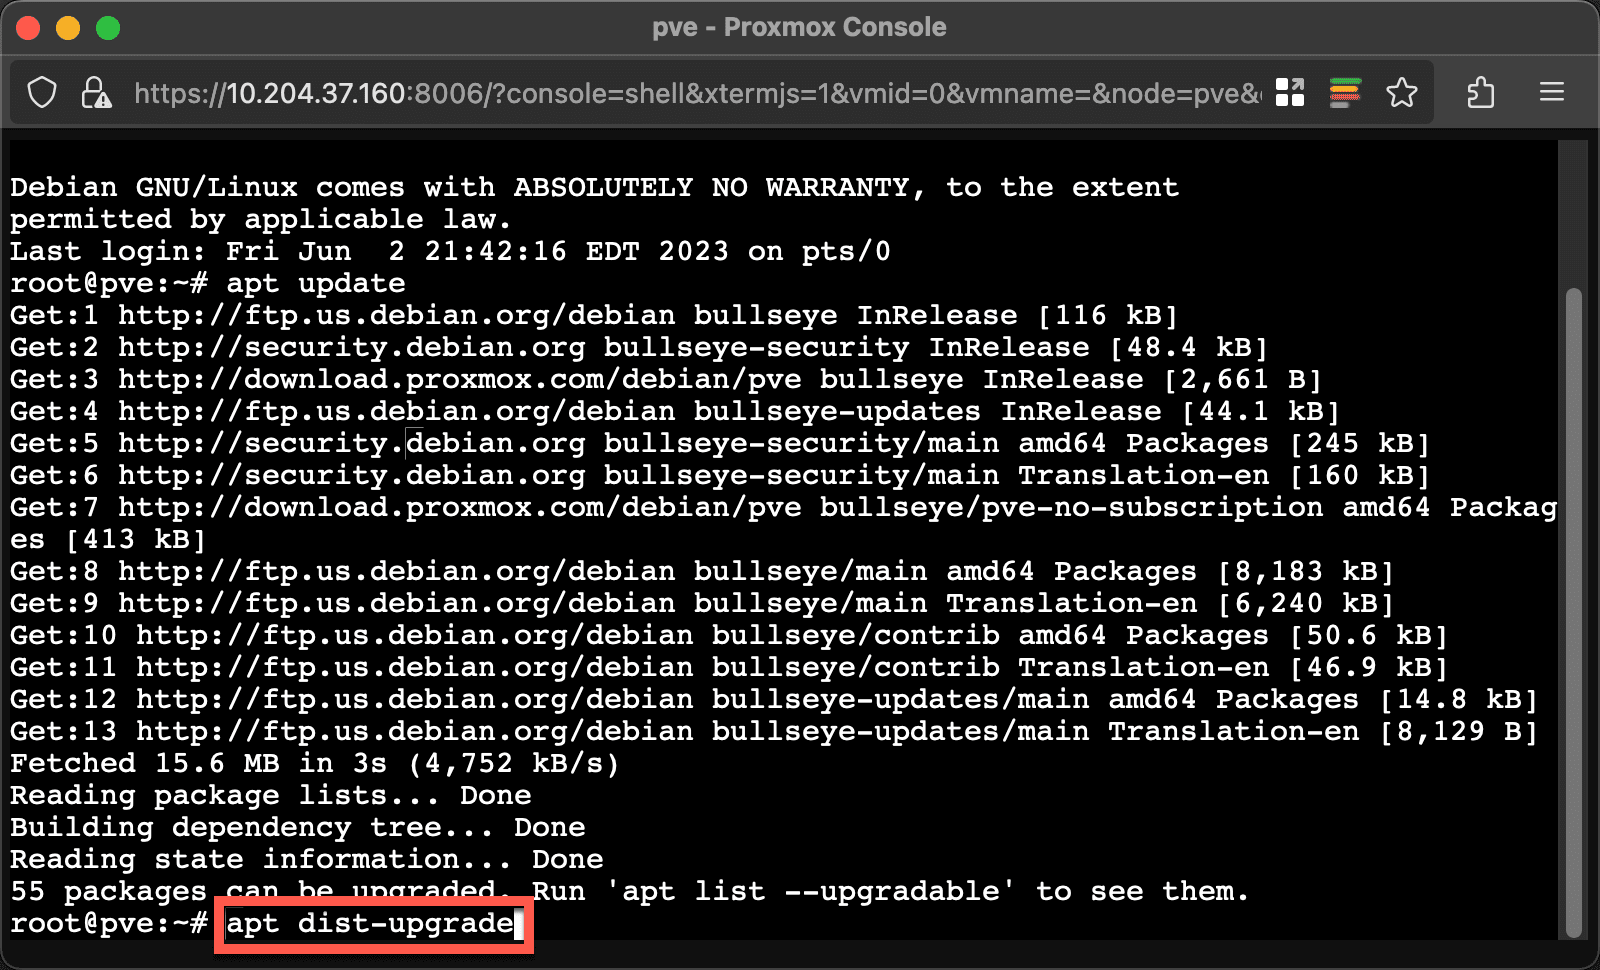
Once the cache is updated, run the command apt dist-upgrade to upgrade the system. Unlike Debian or Ubuntu, Proxmox strongly recommends you use apt dist-upgrade instead of apt upgrade. Since there is more than likely a kernel update, you should reboot the system before proceeding.
How to create and manage VMs and containers
Finally, the part you’ve wanted to get into! Creating VMs and containers! This is what Proxmox is all about and it’s easy to do. But first, let’s talk about VMs and containers.
A VM uses KVM virtualization. This type of virtualization emulates physical hardware which means you can install and run just about any operating system – from Windows XP to Arch to FreeBSD. You can even install OS2/warp. This offers the most flexibility but it is a bit more resource intensive as you’re obviously going to need additional CPU, RAM, and storage for all that software.
The second type of virtualization is containers. Proxmox uses the LXC (Linux Containers) virtualization technology. These work similar to Docker or OpenVZ. Containers are super lightweight but they do have some drawbacks. First, they use the hosts kernel to run. That means you cannot run full virtualization – Linux only. They’re also dependent on the host’s hardware. This means that if you move to a HA setup with Proxmox, containers are not compatible. They can be migrated, but they must be shutdown first.
Whether to use KVM or LXC is up to you. You’ll definitely have a mix, that’s for sure. And that’s perfectly fine!
Loading ISOs into Proxmox is easy. You can do it from the web interface and you can upload from your computer or download from a URL directly (saving you a step!).
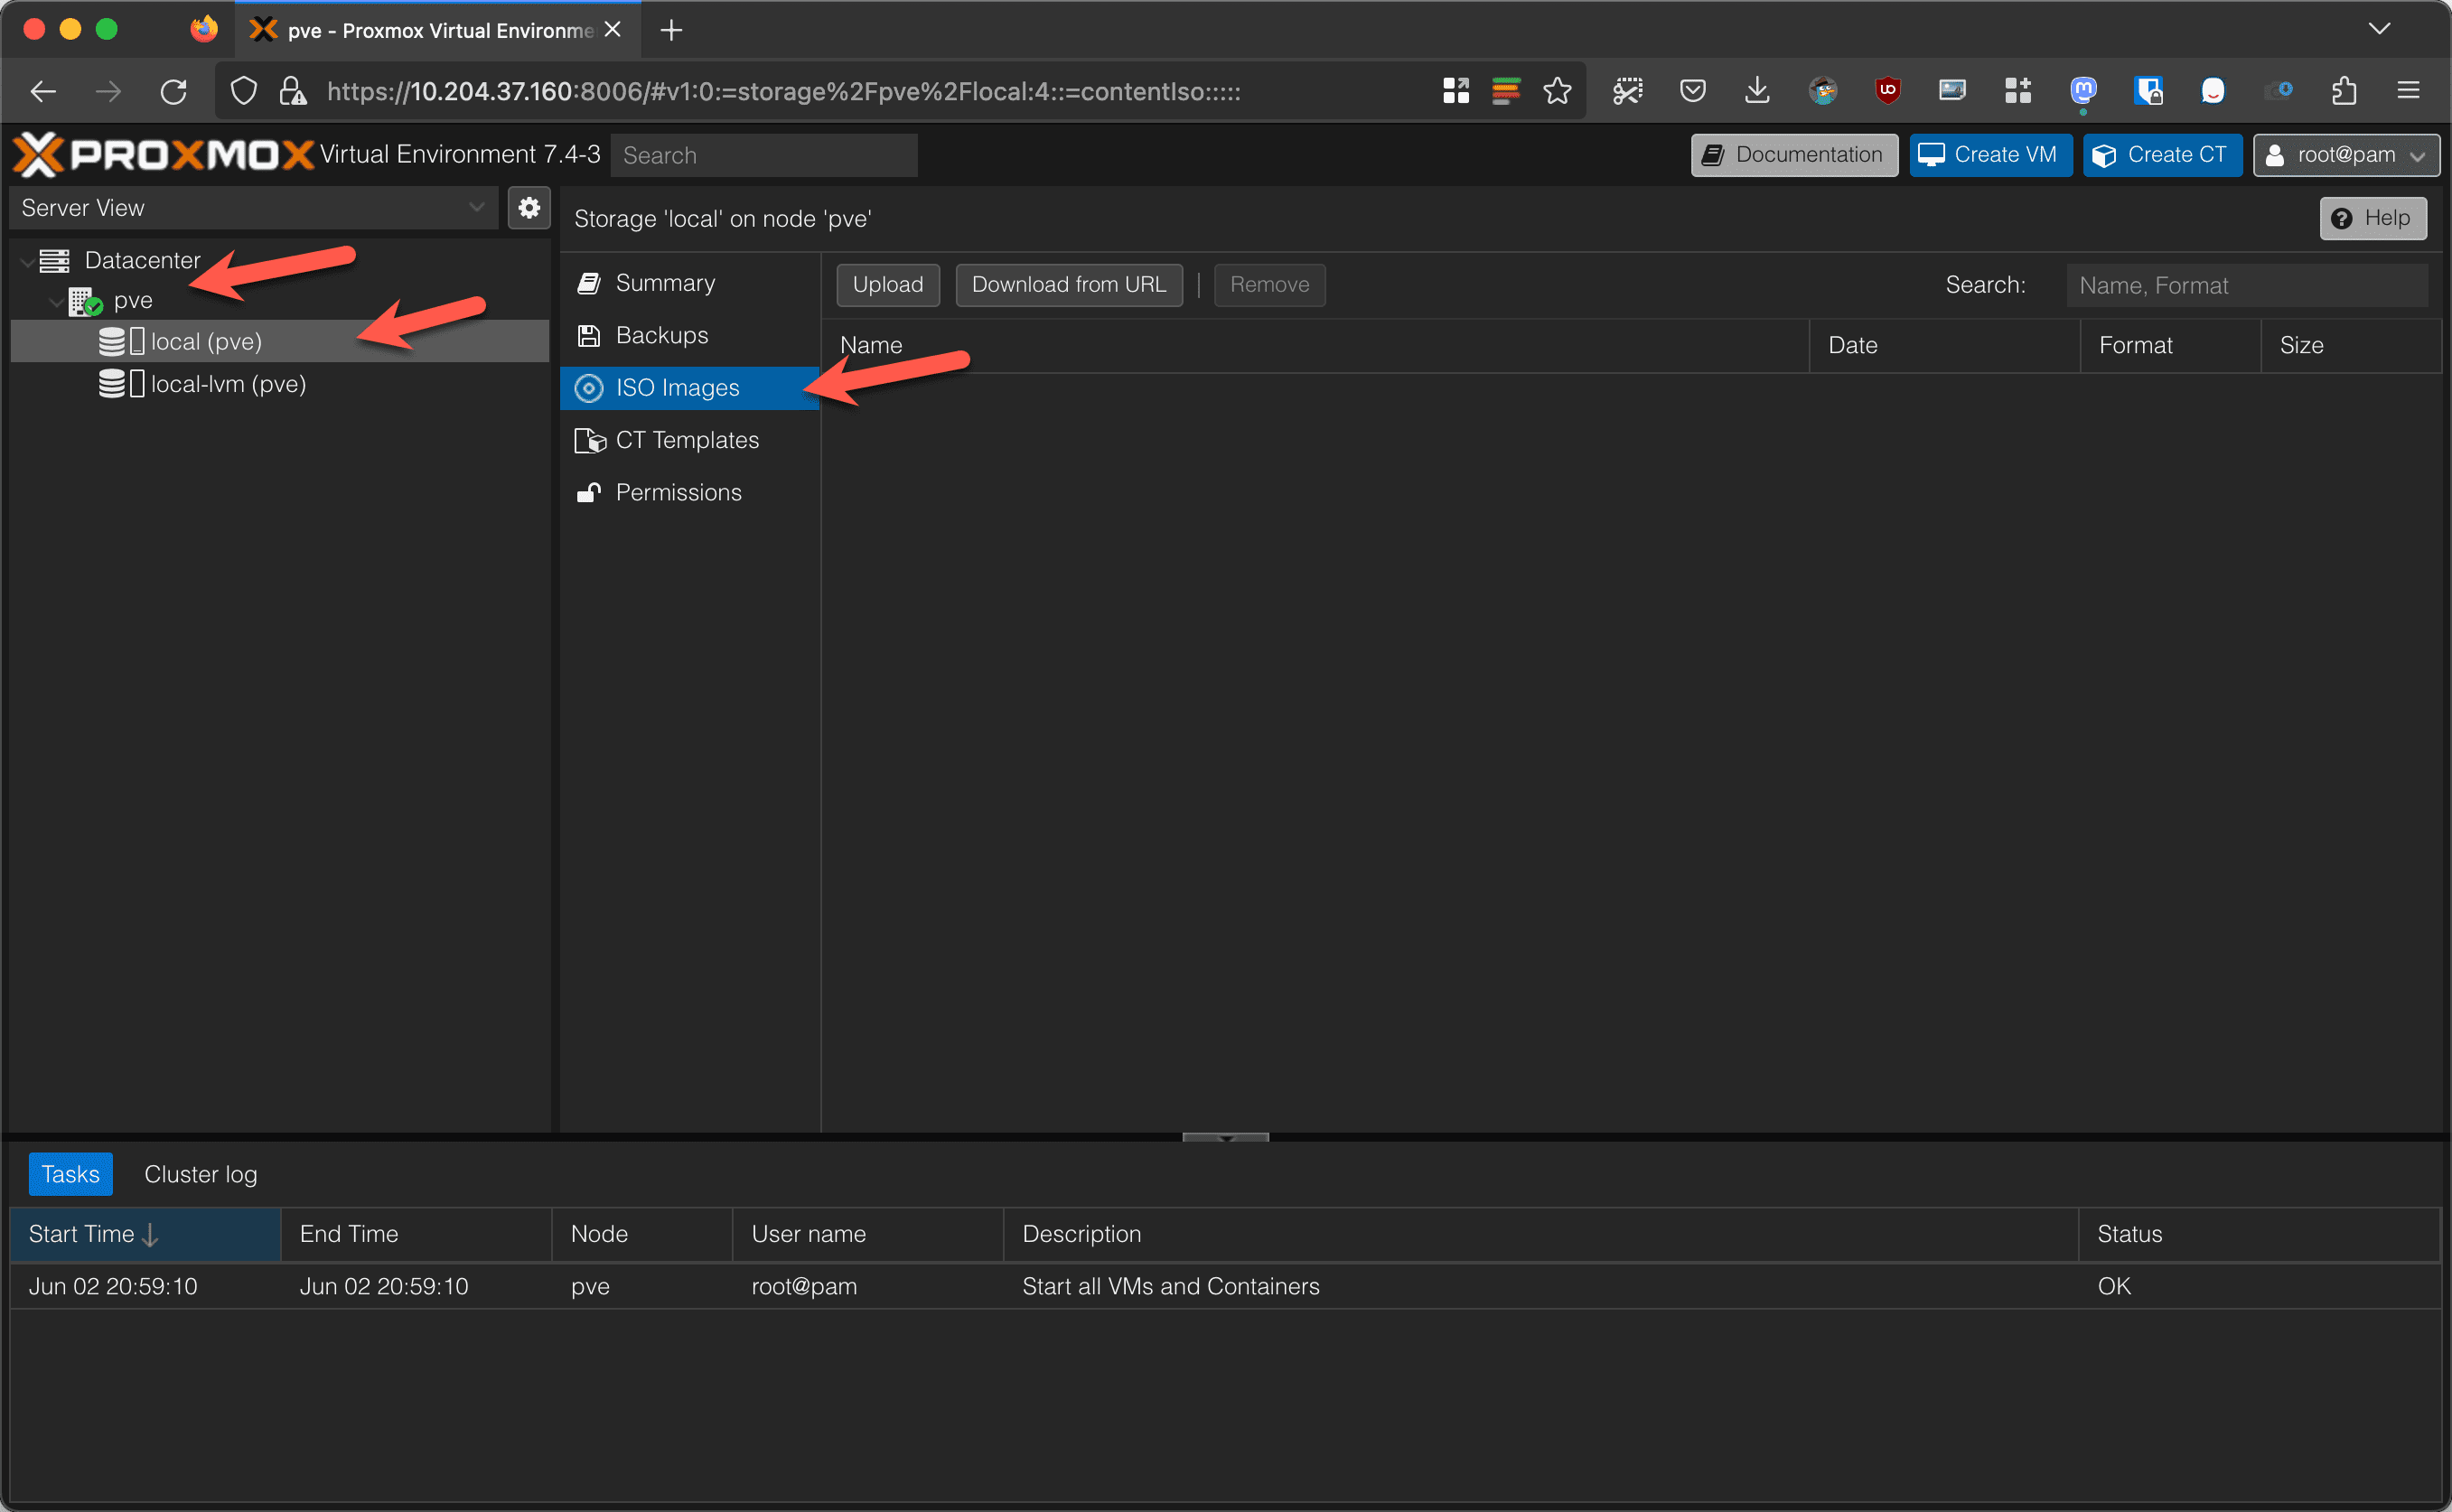
Go to your node, click on the local storage, then ISO Images. From here, click on upload to upload an ISO from your local system. If you click on Download from URL, you can provide an ISO from the Internet and Proxmox will download it directly. I will show you that. I am going to load Ubuntu Desktop directly from Ubuntu.
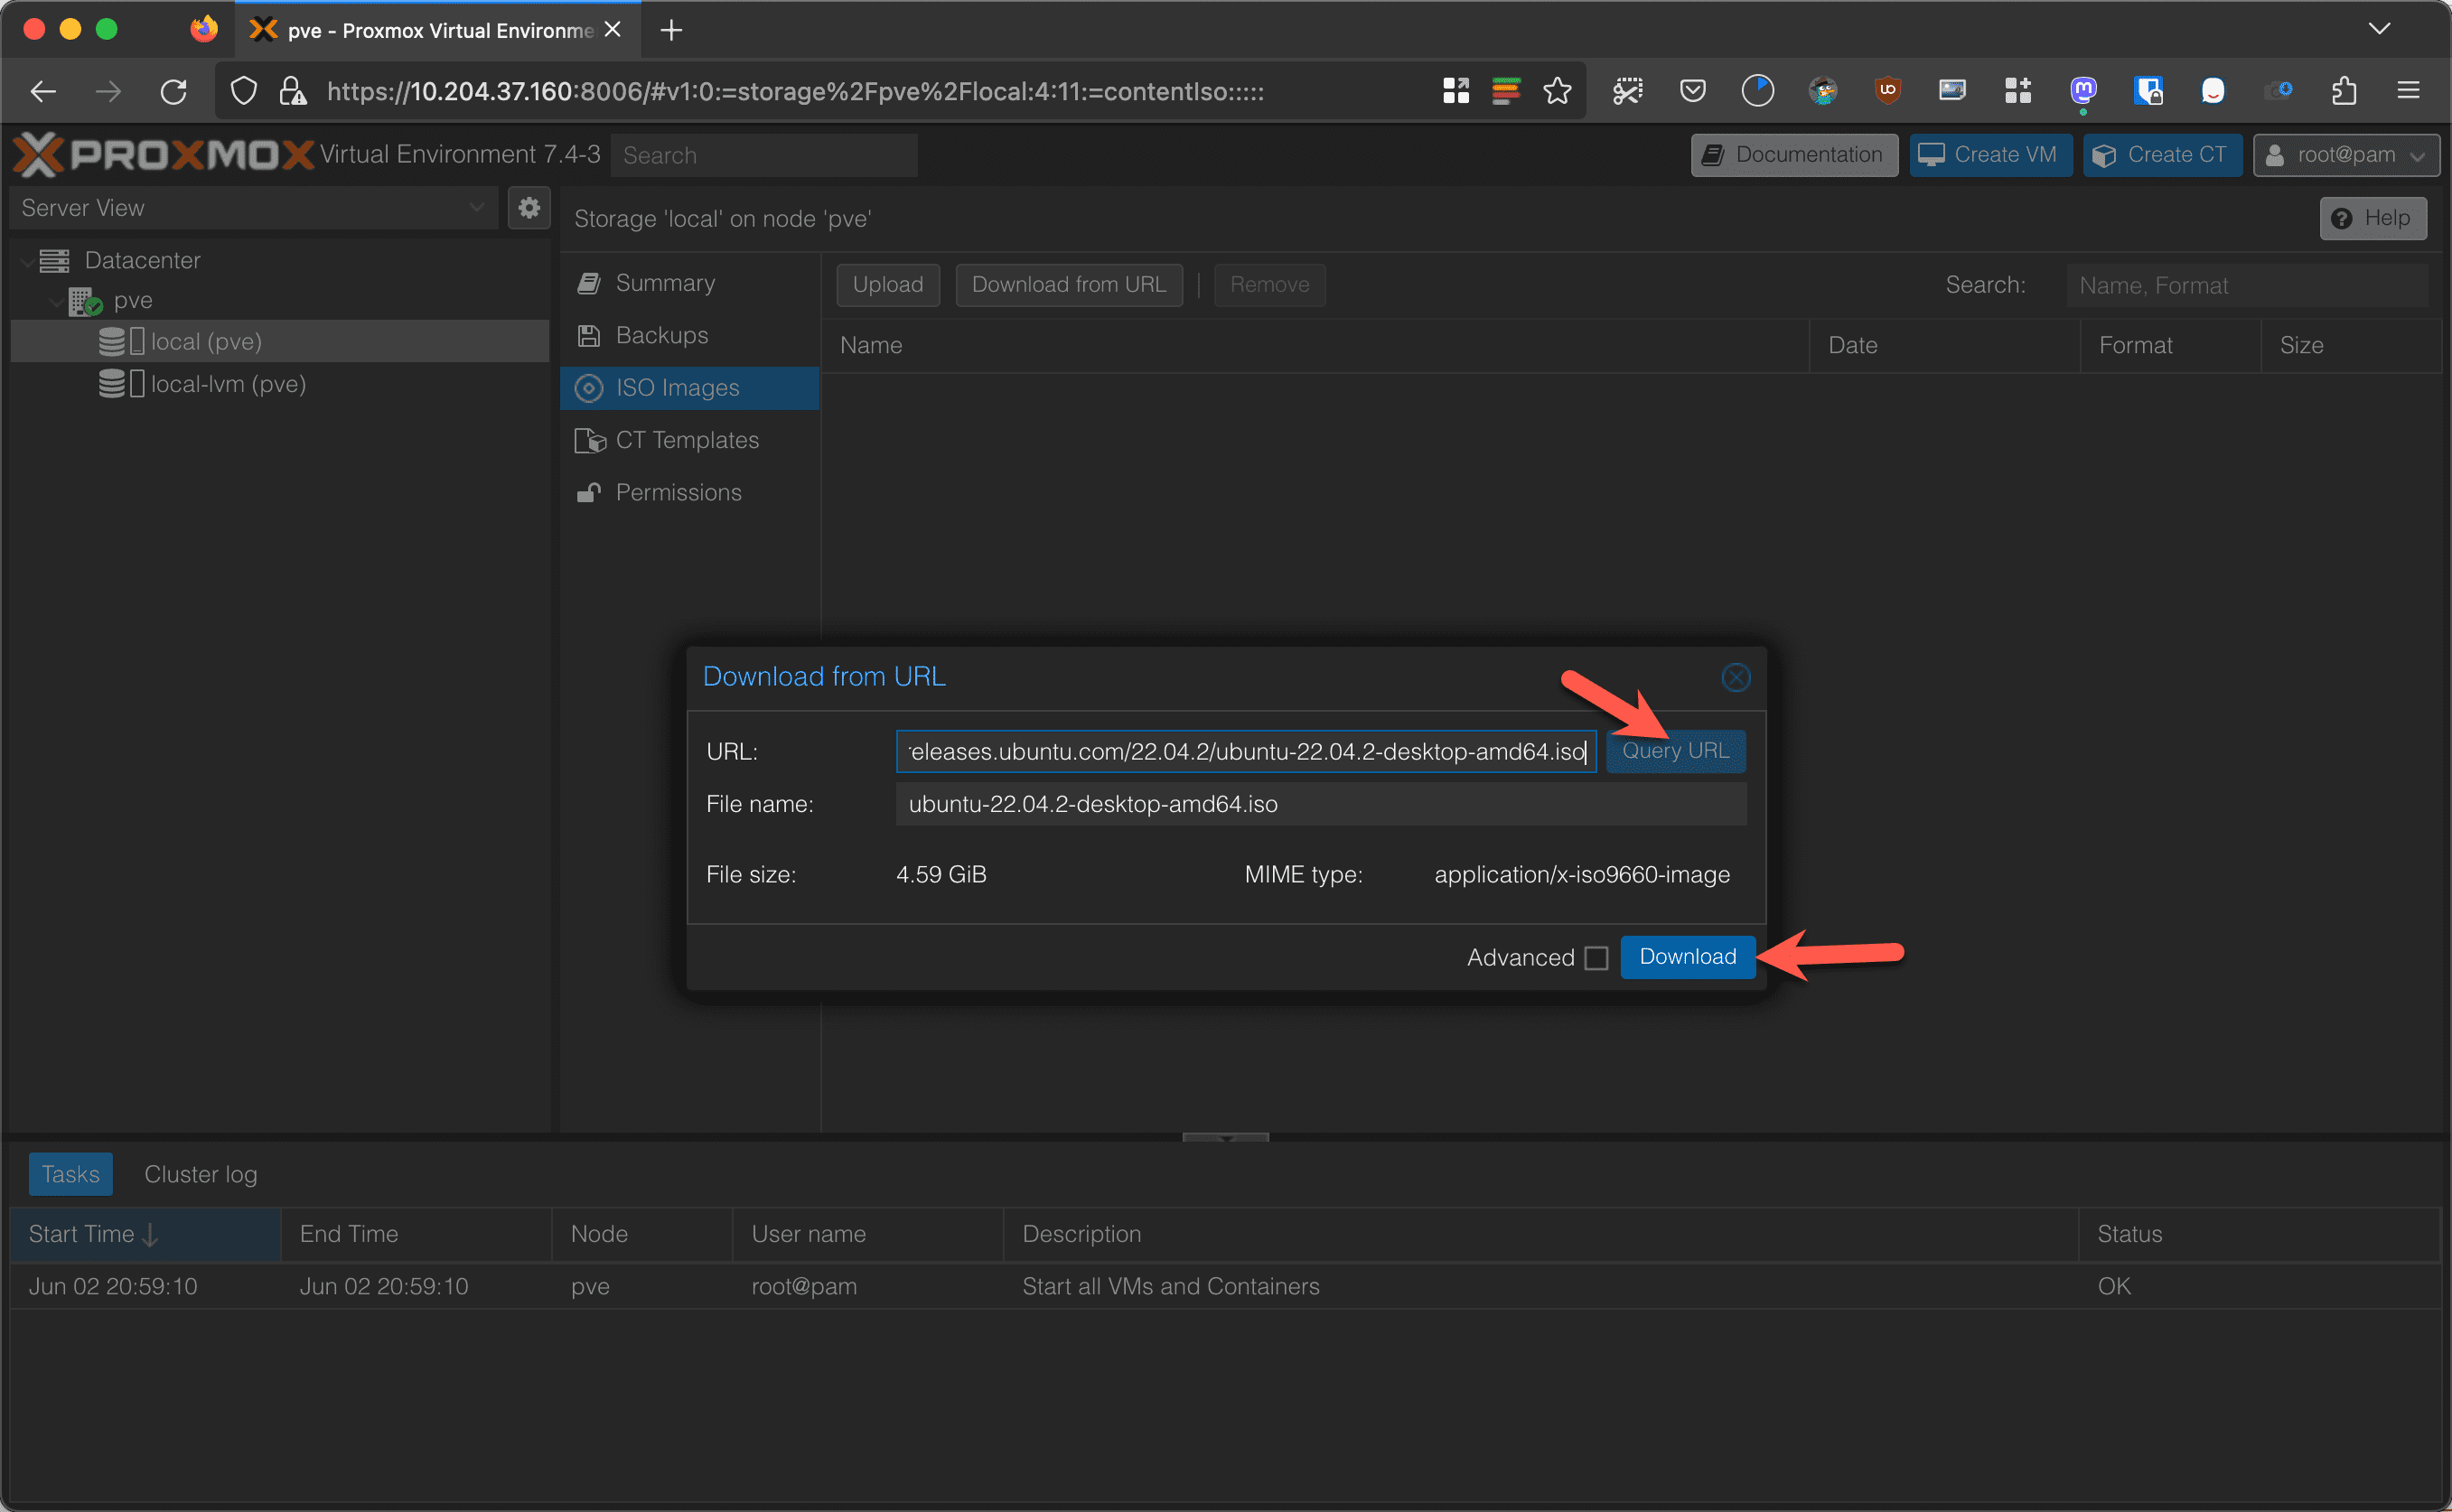
Click on the Download from URL button and then type or paste in the full ISO URL. Click on Query URL. You’ll see the filename populate. You can adjust the filename if you want. Click on Download.
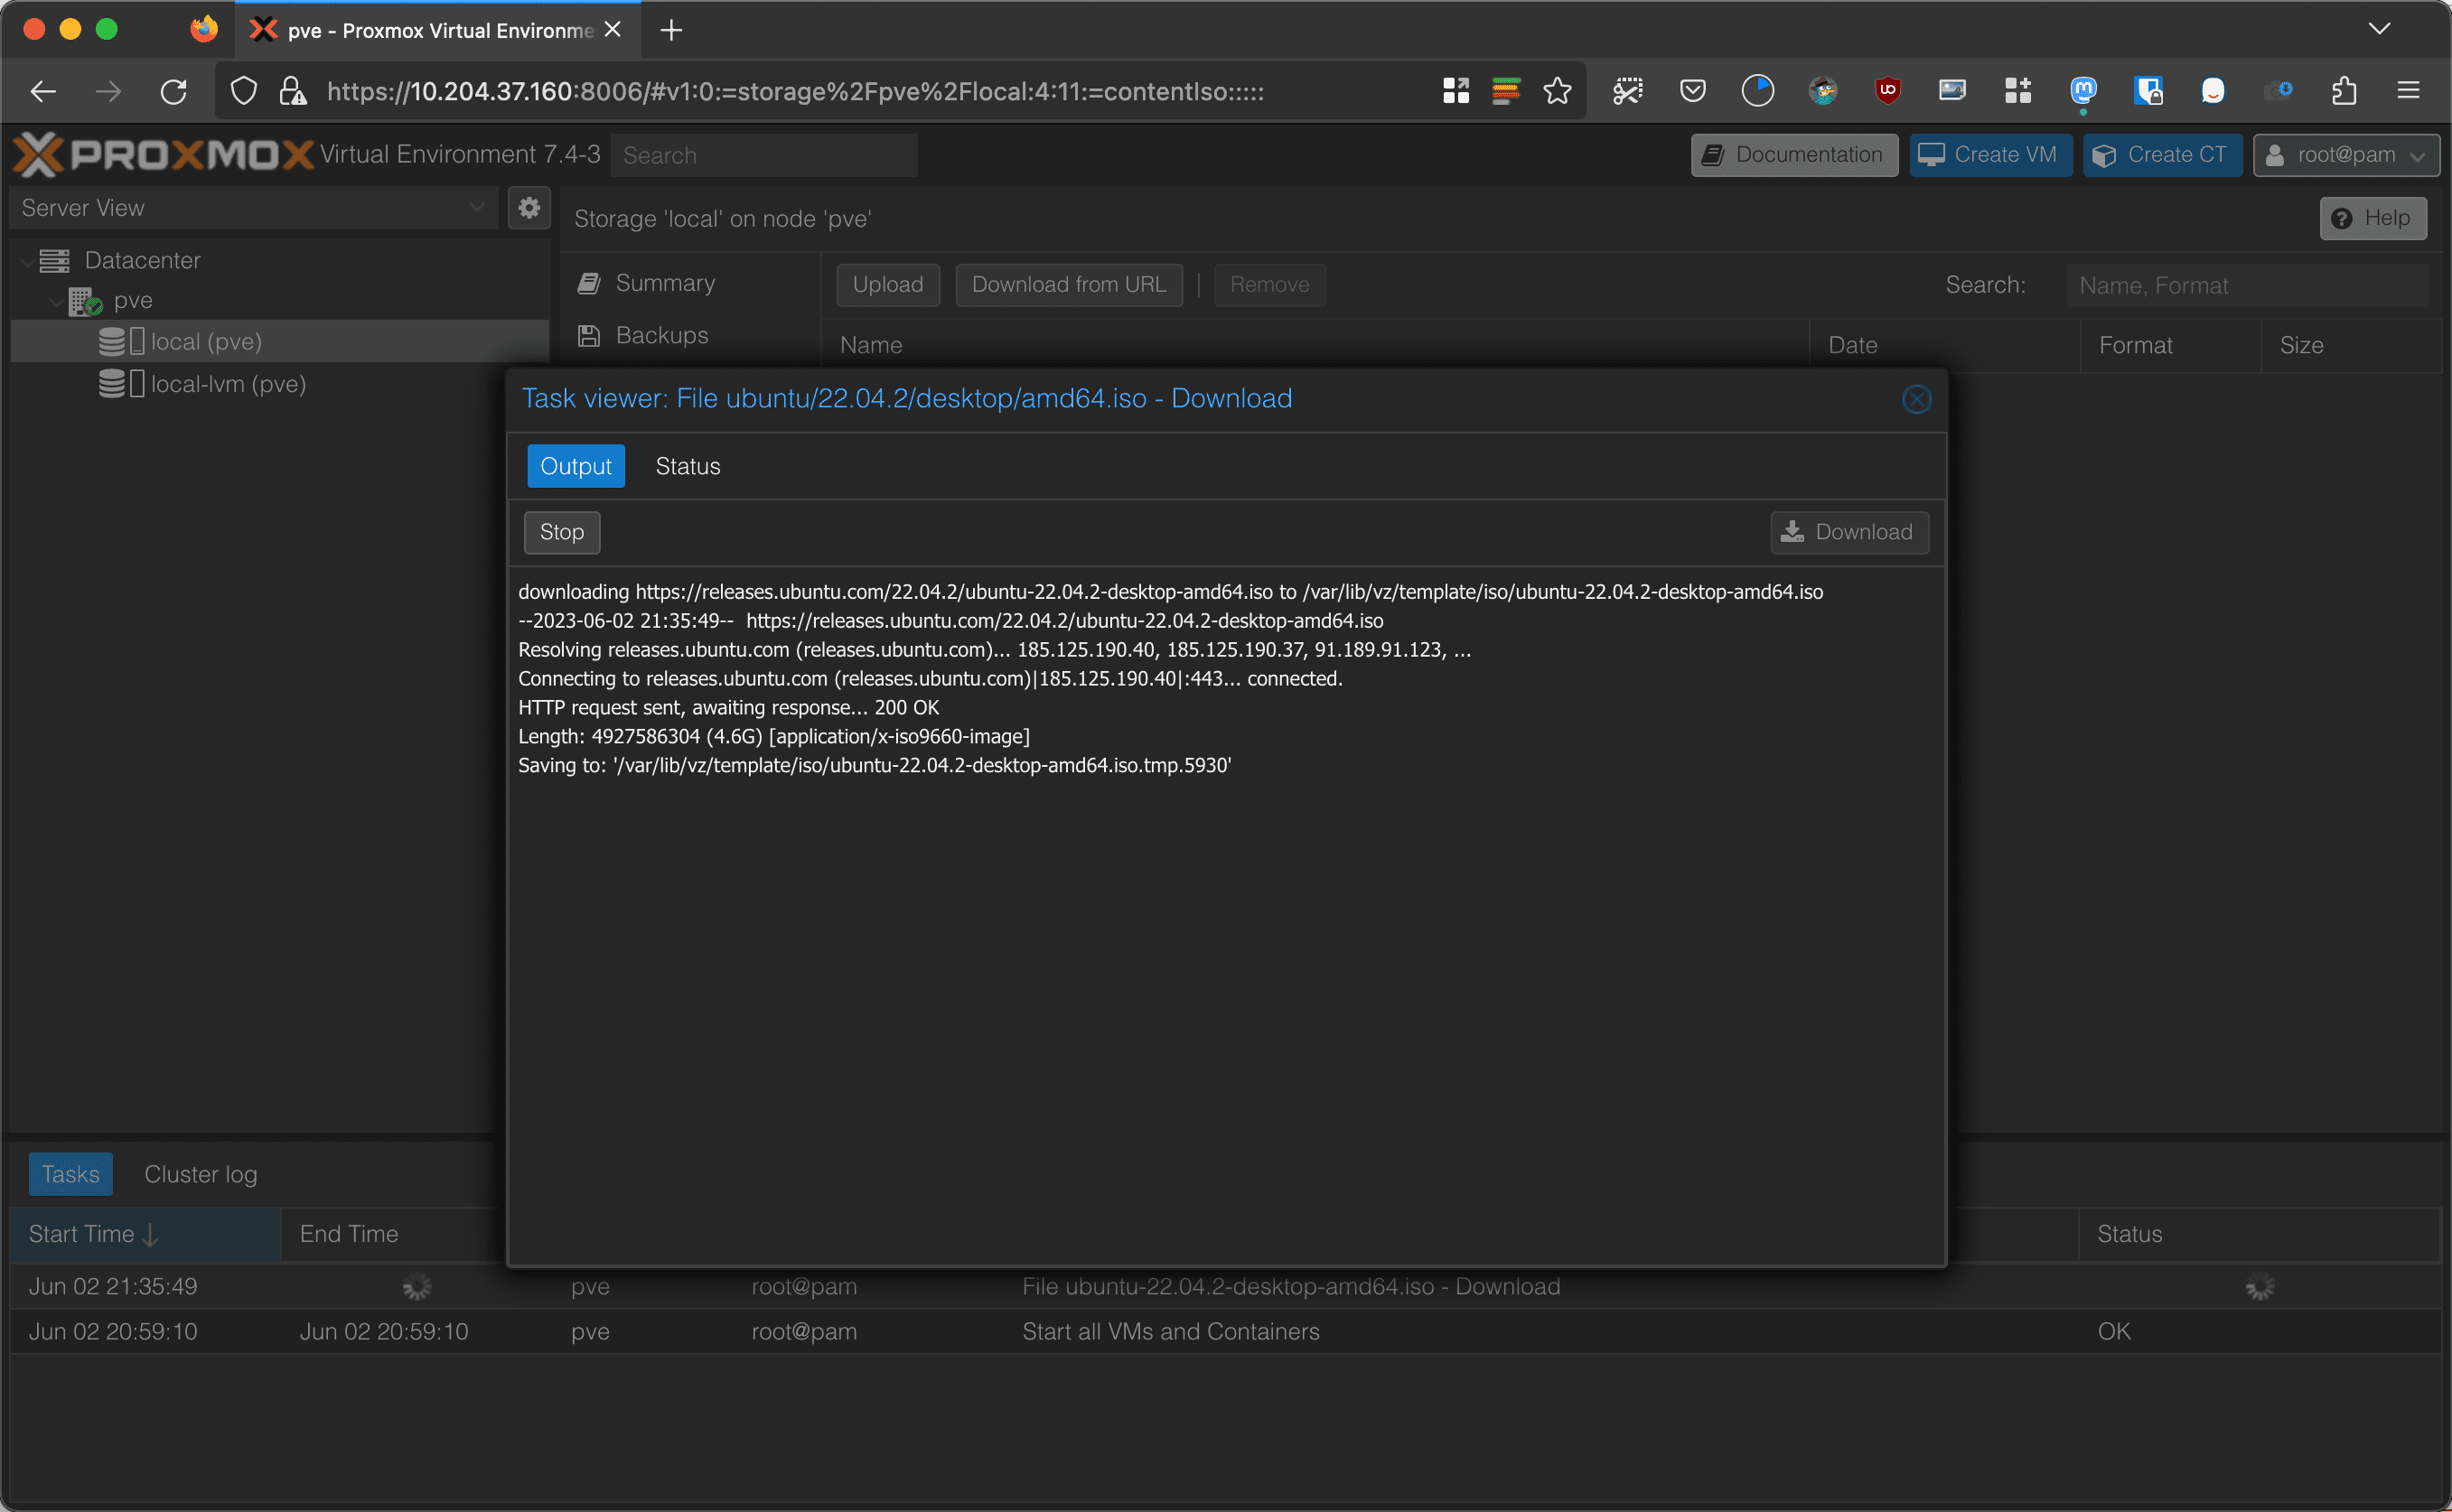
Proxmox will start downloading the ISO directly. Download will depend on the Internet connection and speed of the disk.
Loading LXC templates is even easier.
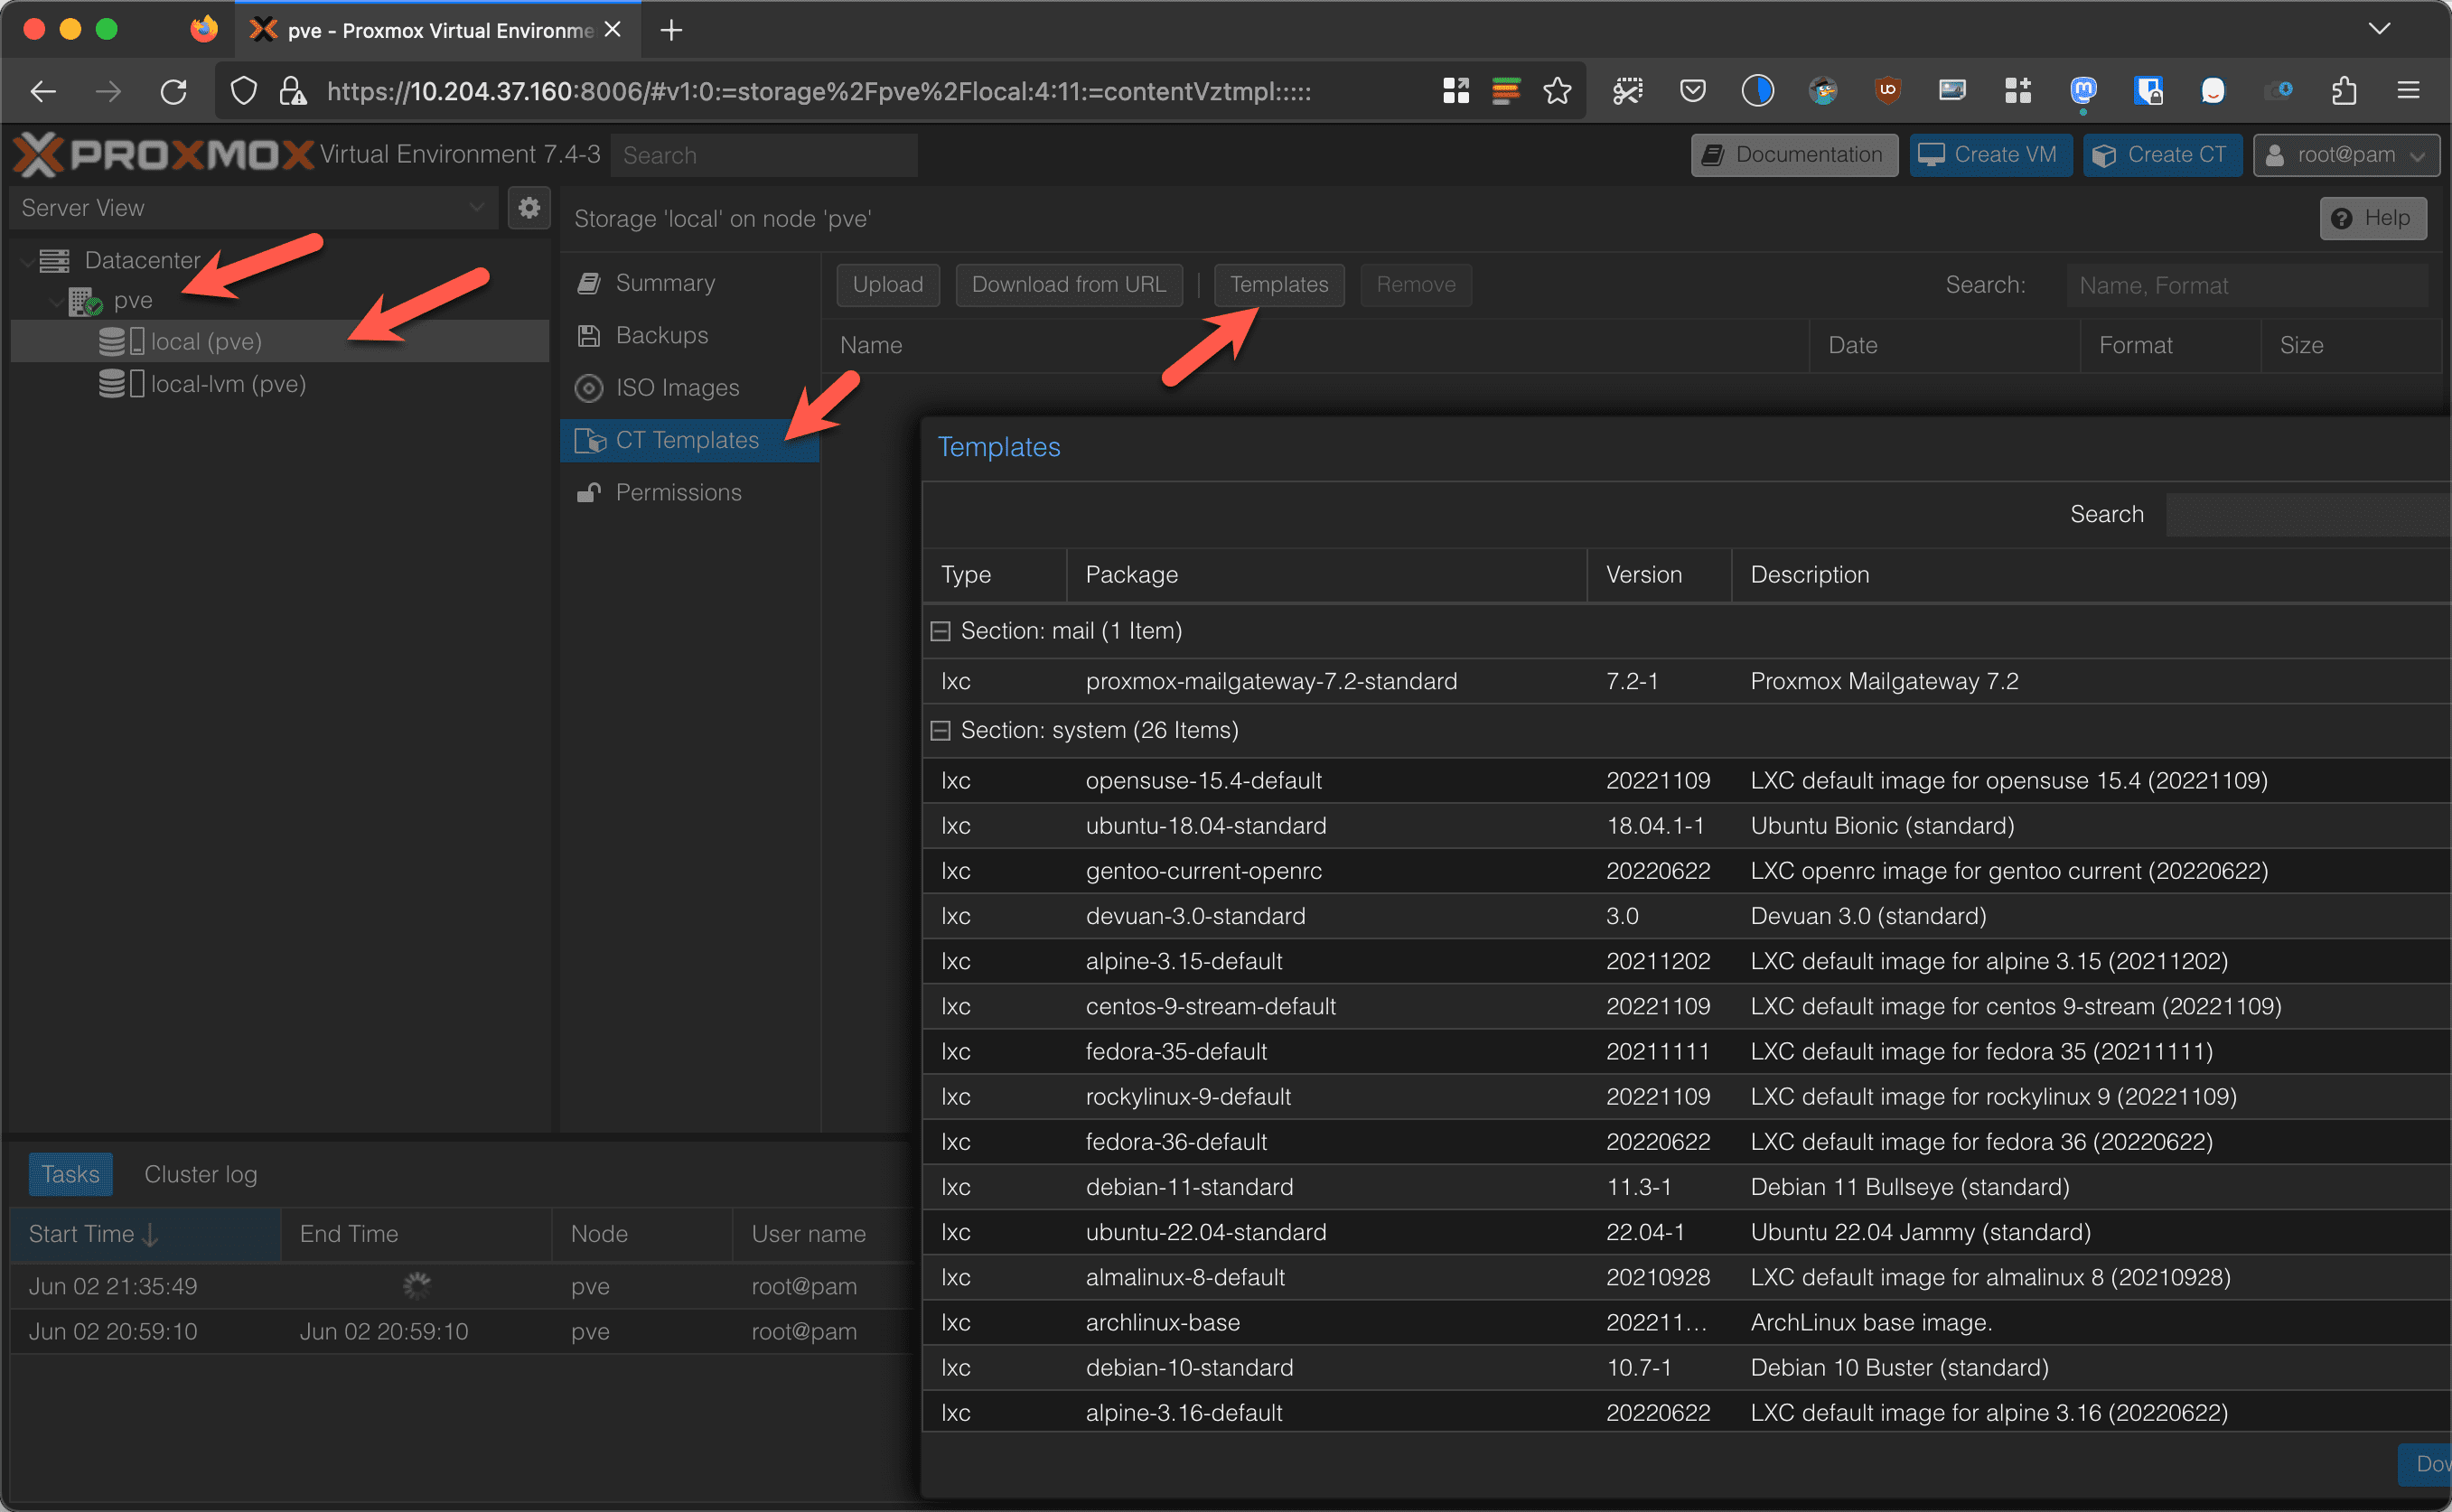
Go to your node, select local, then click on CT Templates and the Templates button. Proxmox will automatically load a bunch of templates for you. You can see there are a ton of different templates. OpenSUSE, Gentoo, Ubuntu, Alpine, CentOS Stream, Rocky Linux, AlmaLinux, Debian, Arch, Fedora. and more!
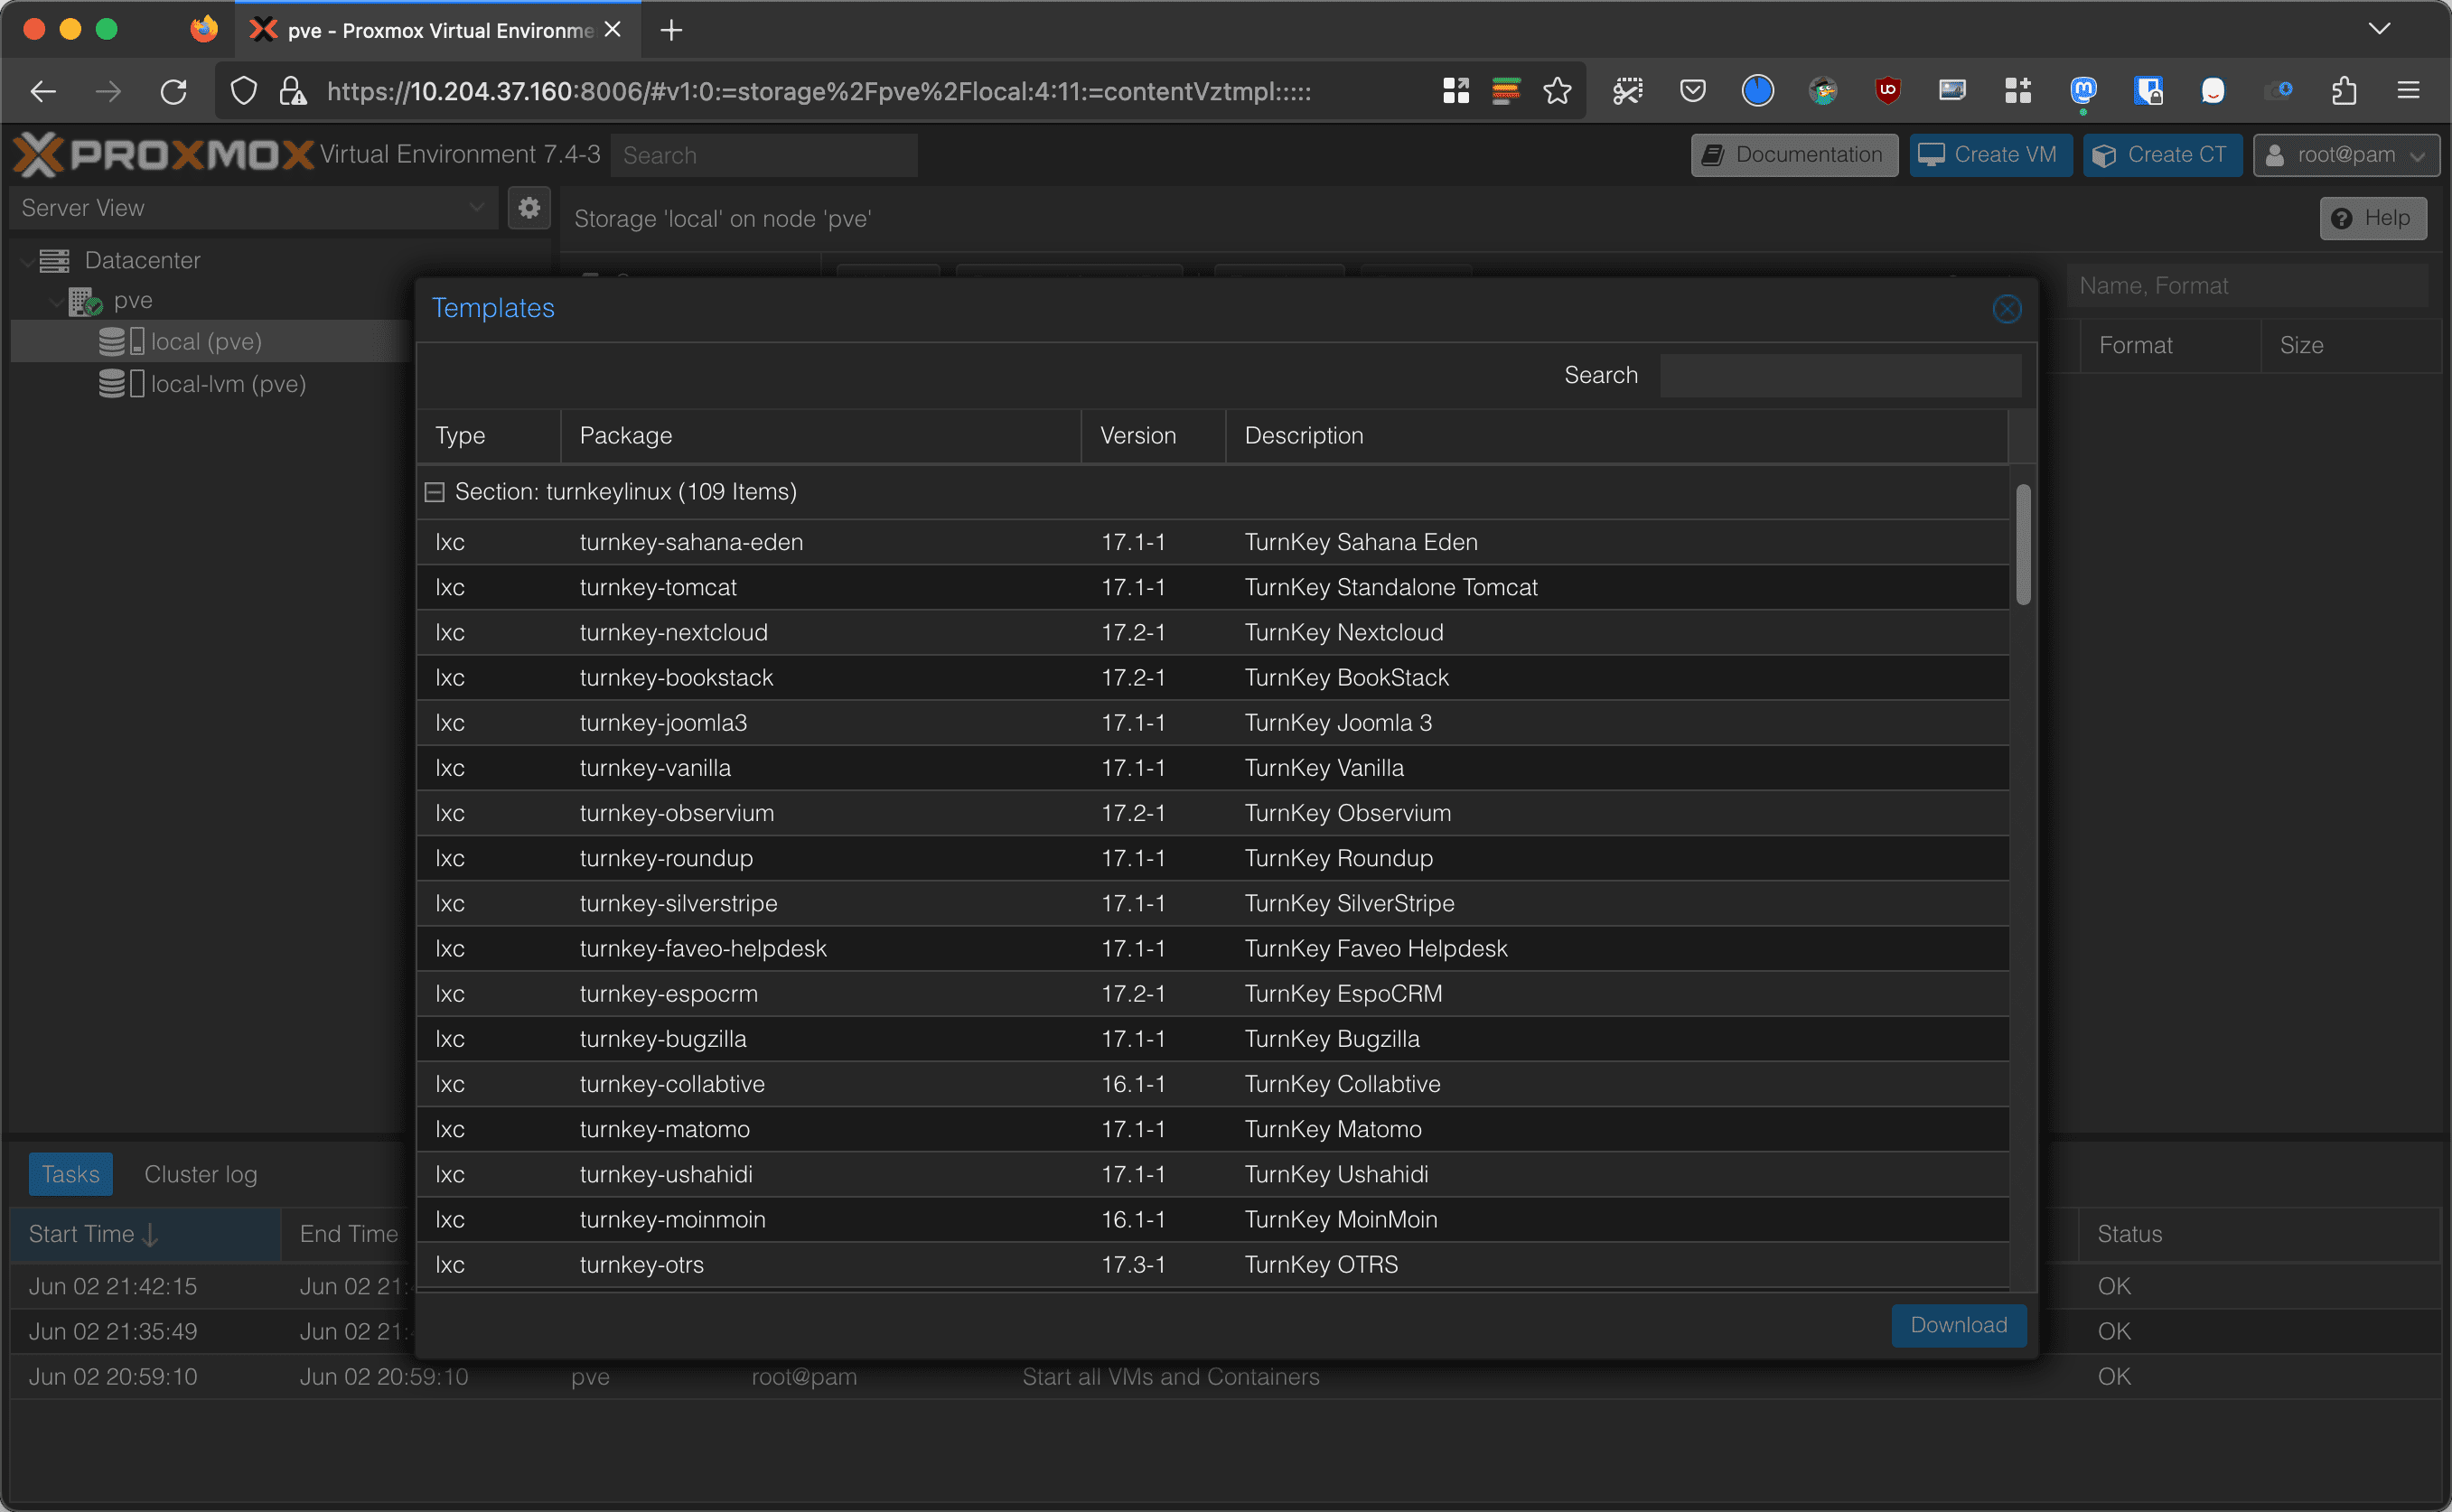
TurnKey Linux templates offer pre-installed applications that are ready to use. These are a great way to quickly get started with applications. As you can tell, there’s 109 currently!
All you have to do is select a template and click on the download button. This will save the template to Proxmox for use.
Now that you have an ISO or two and a container template or two, let’s see how to create a VM and container. We’ll start off with a VM.
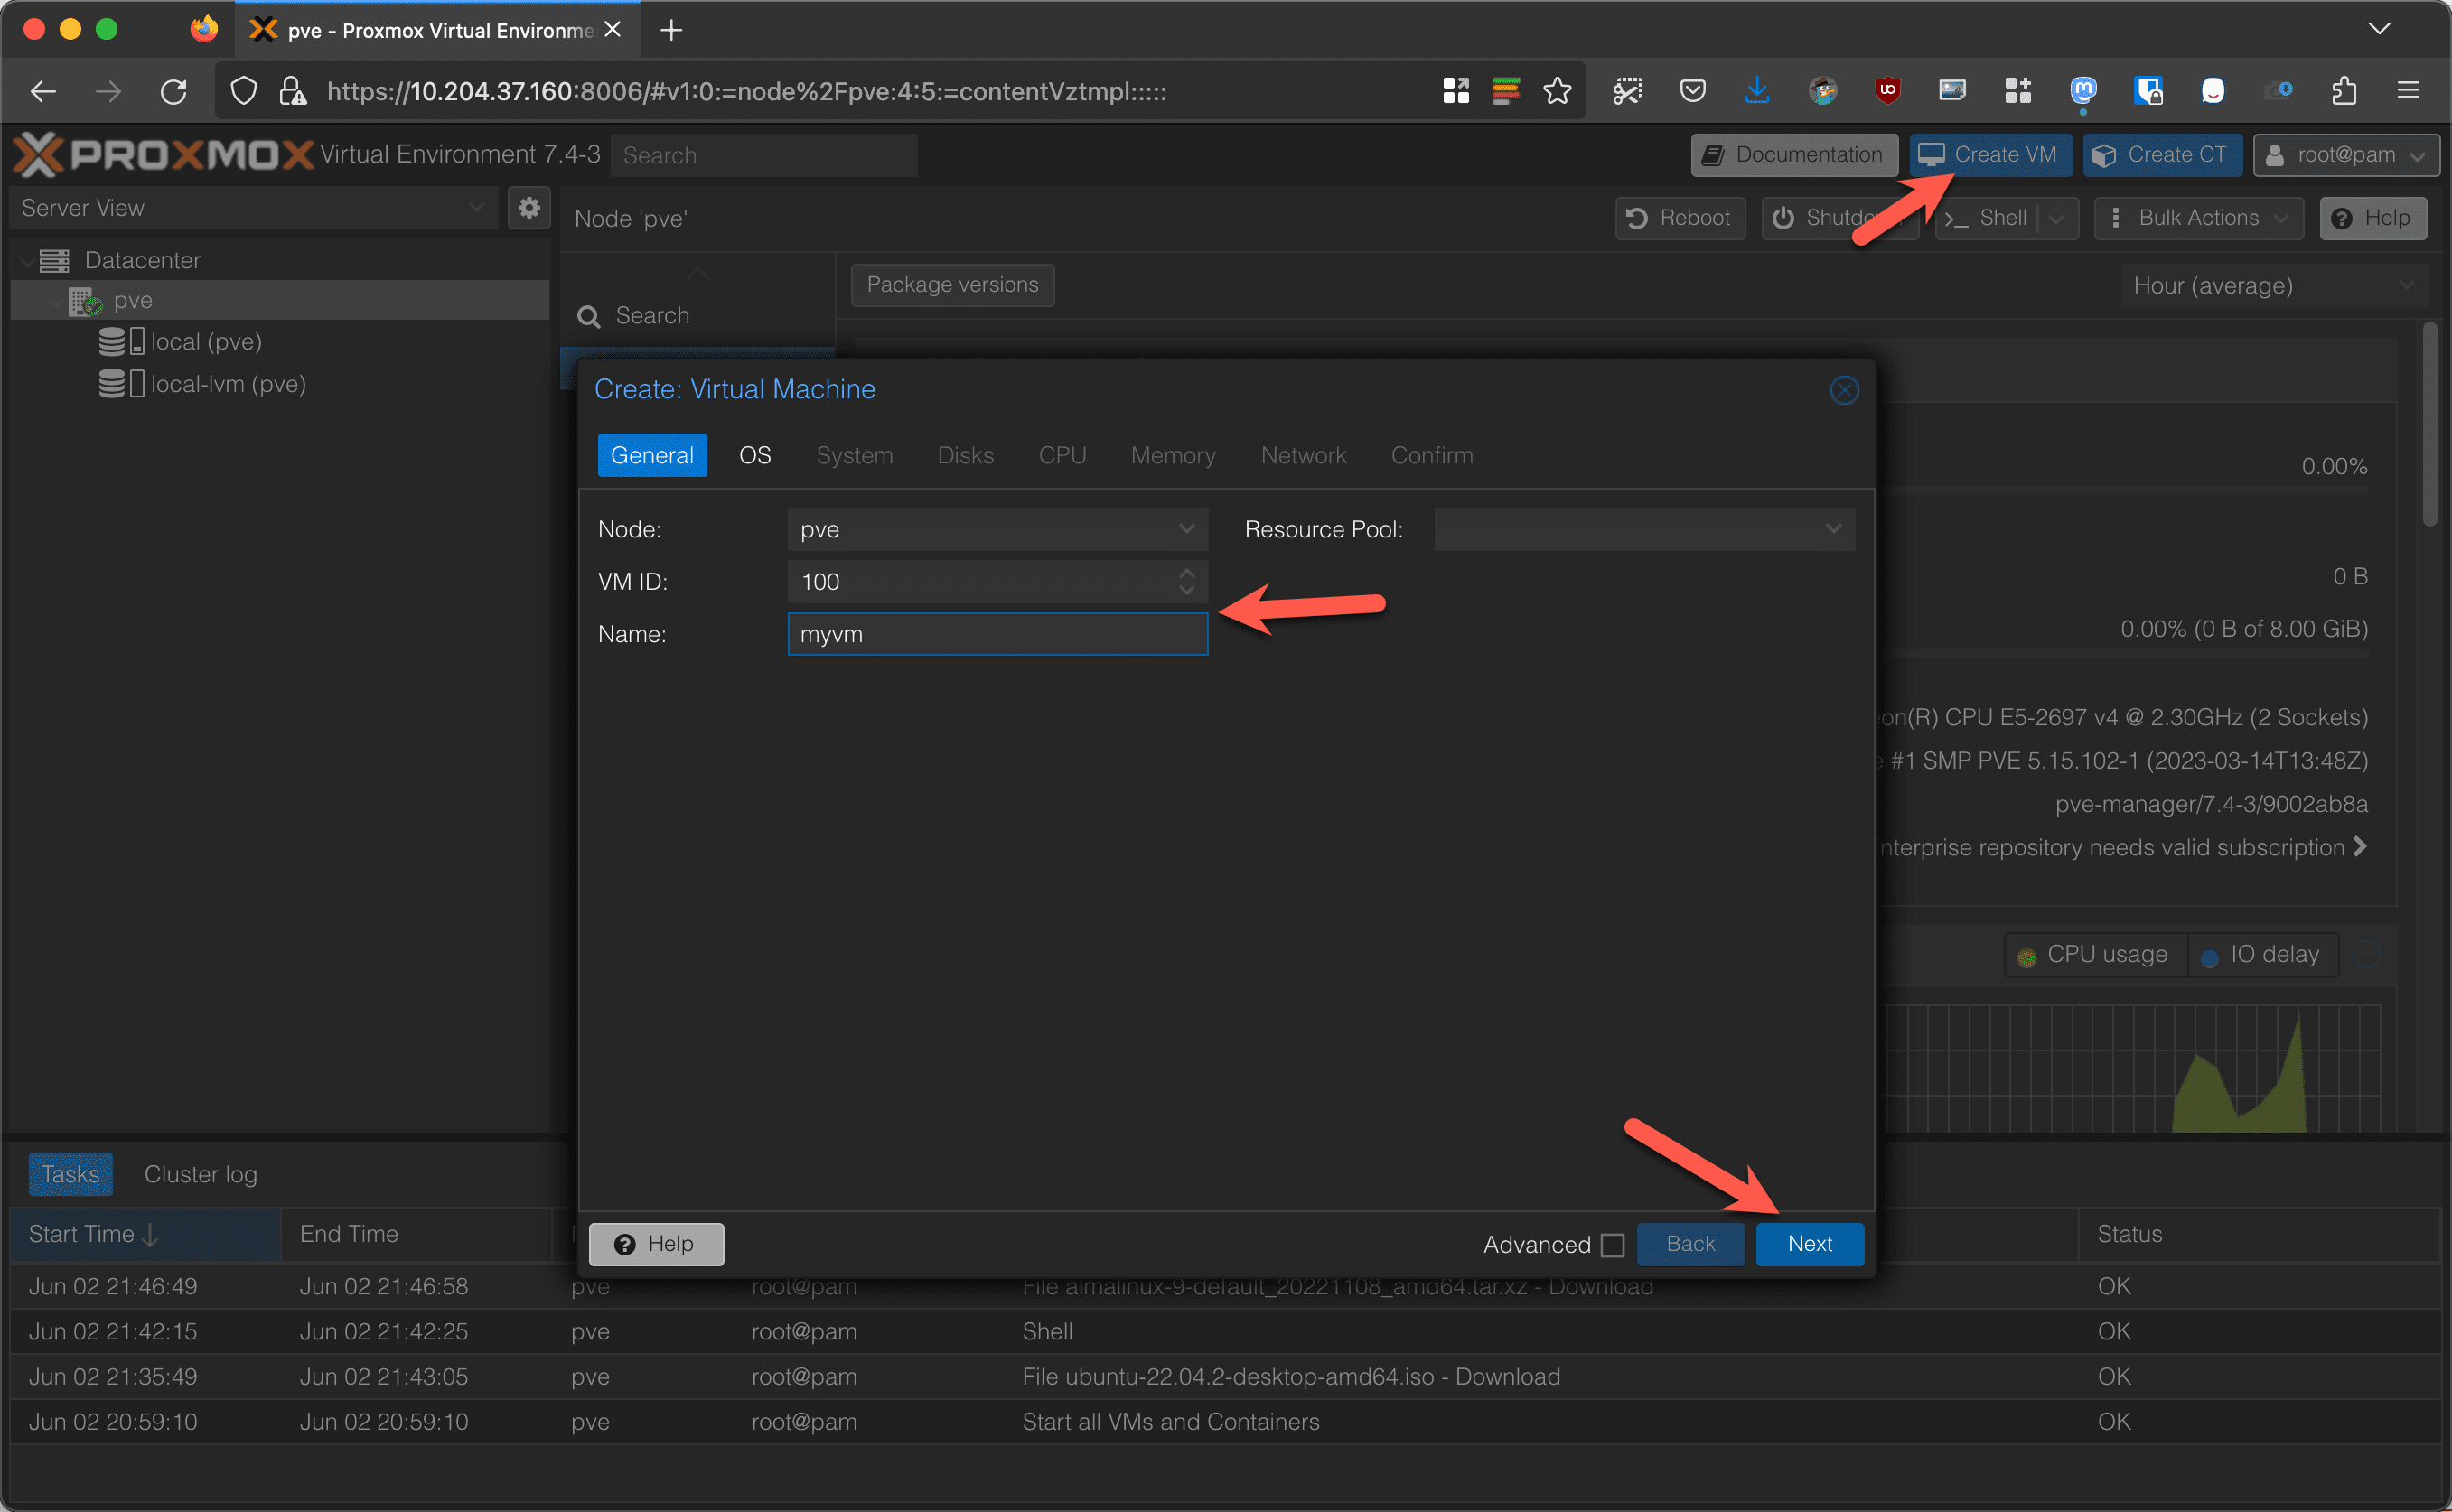
Click on Create VM in the top and then the wizard will open. By default, it will give the VM ID 100. You can change this if you’d like. I like to use 100-199 for core services such as DNS, DHCP, firewalls, etc. 200-299 are internal services like a web server. 300-399 are public-facing (more on this later in our series) such as my public website. In clusters, I’ve seen people use 100-199 for node 1, 200-299 for node 2, etc. The important thing is that this number is unique. The name can be anything you’d want, but it can’t have spaces or special characters other than a dash (-). Click on Next.

On the OS tab, select the local storage and then select your ISO. Under Guest OS, select the OS type and version. This is important, especially with Windows guests! Click on Next.
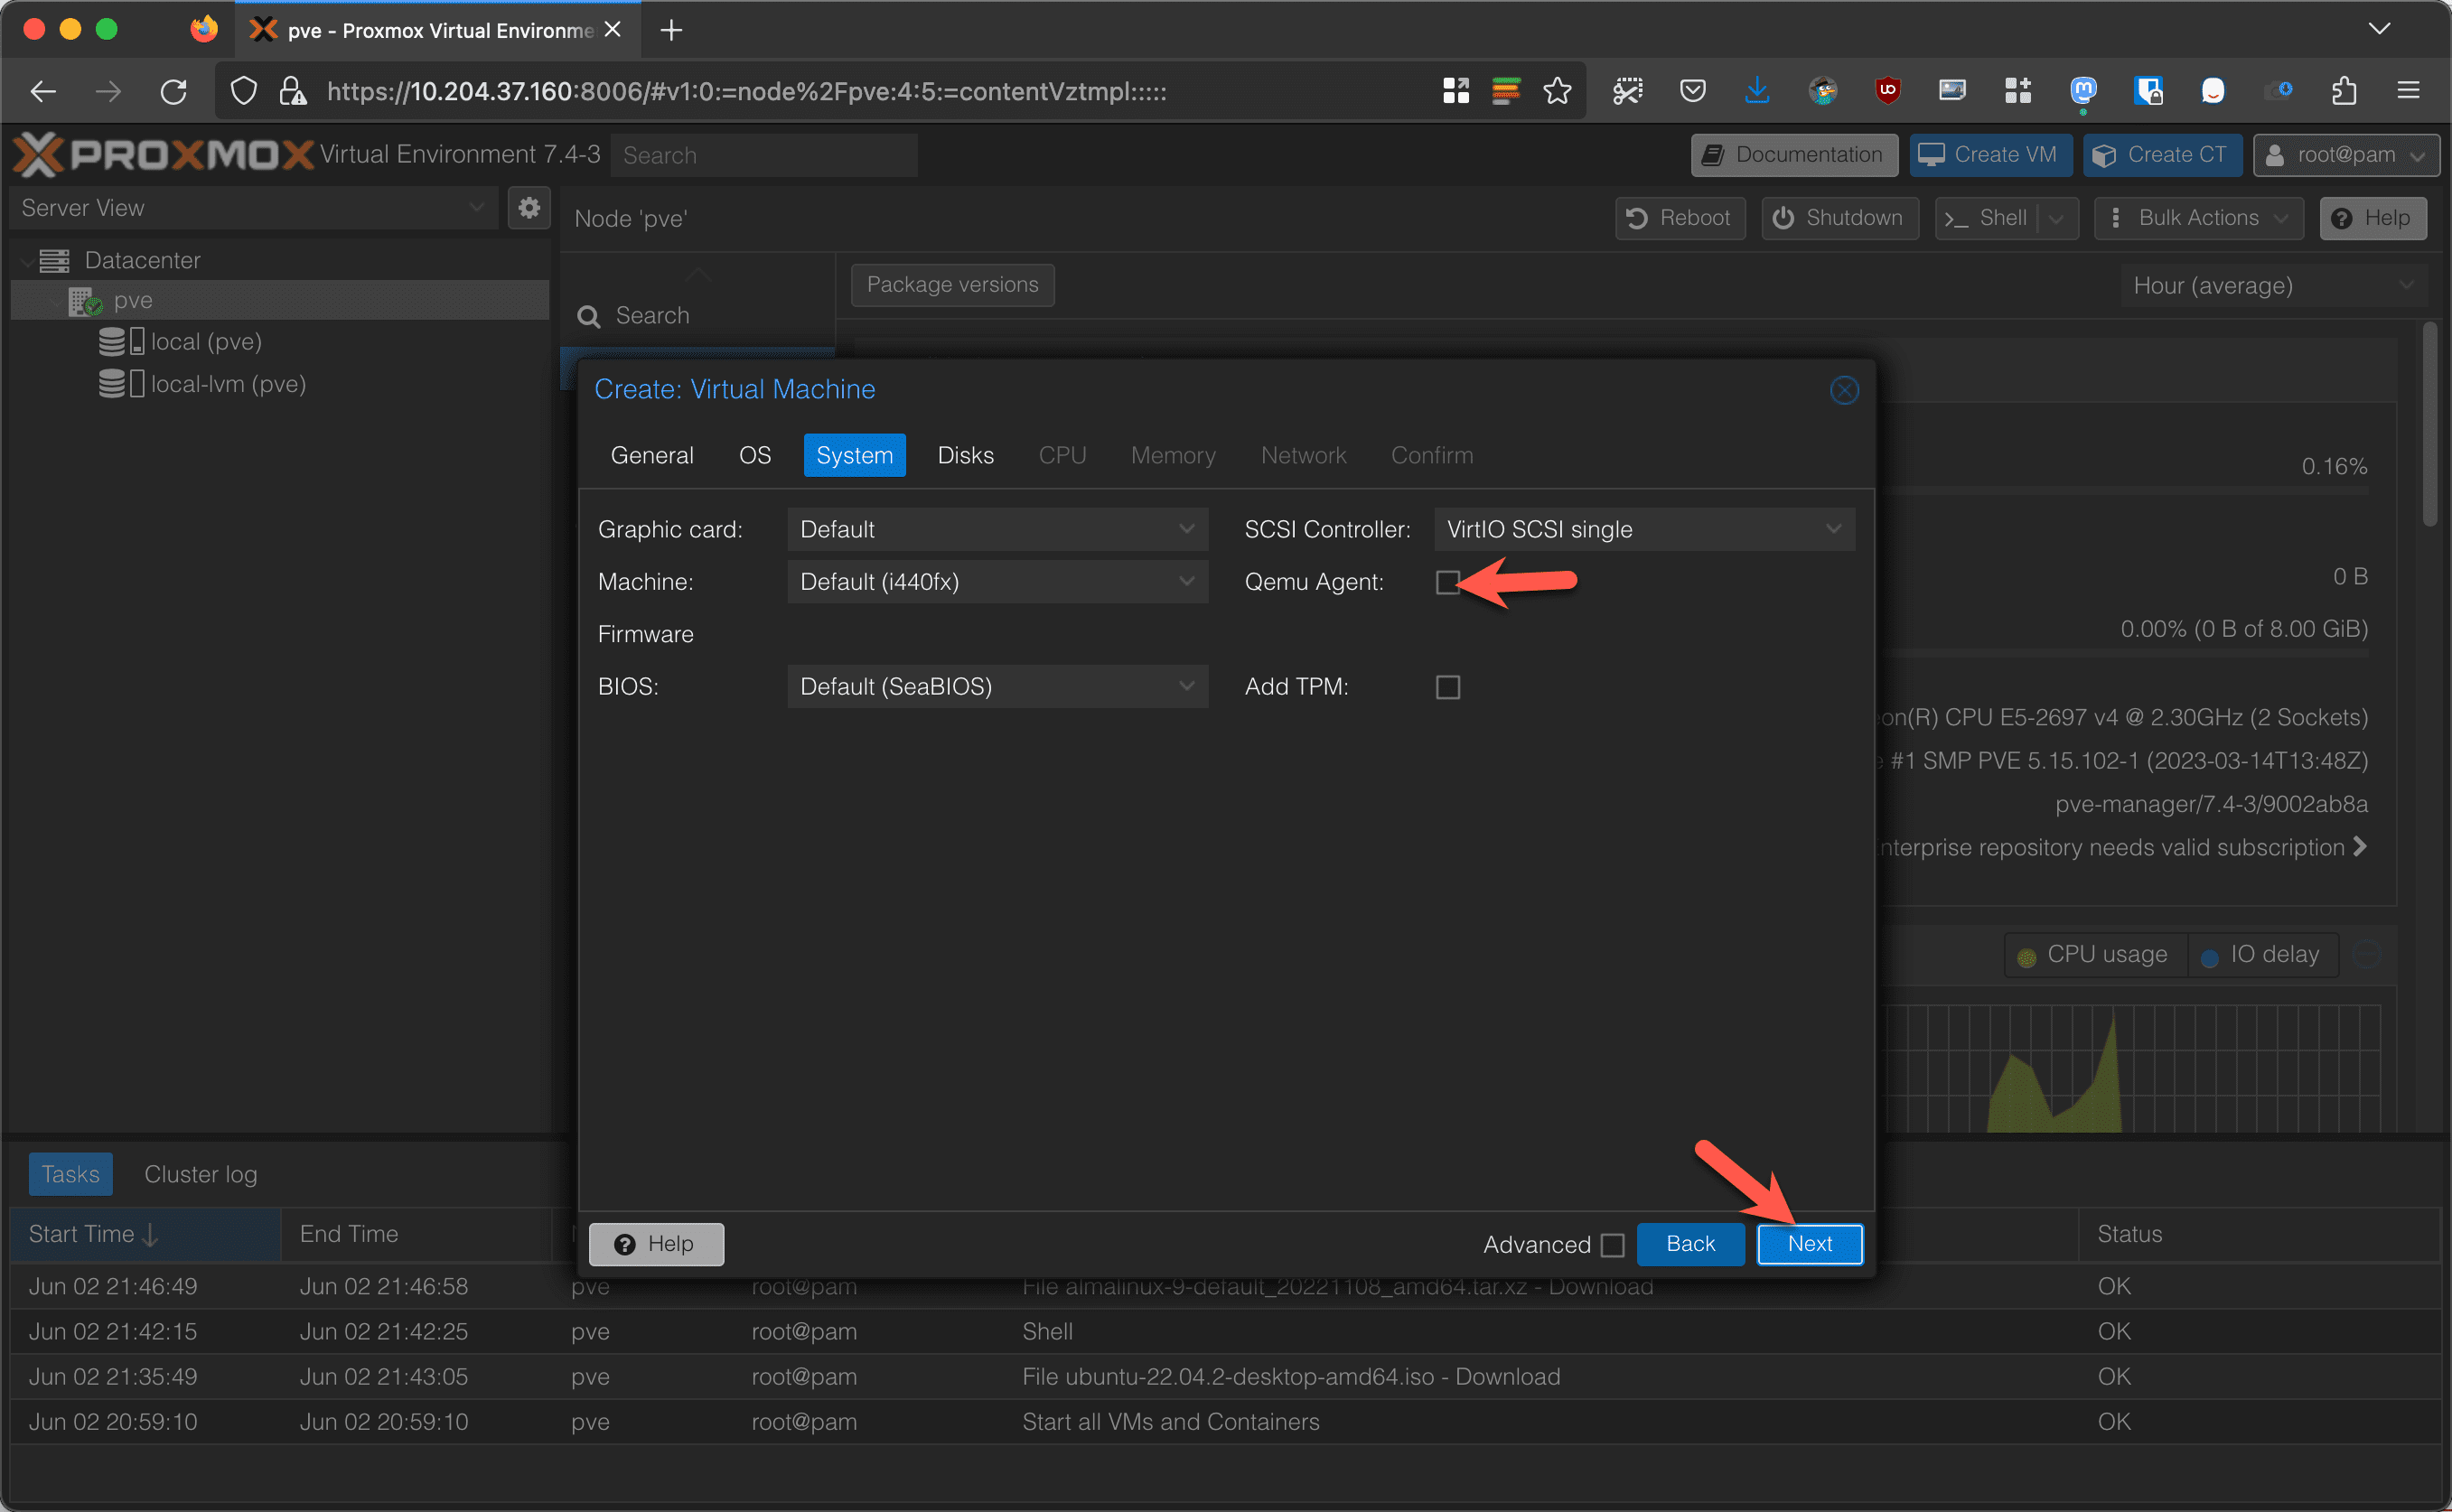
Under System, I recommend enabling the Qemu Agent option. You can leave all other settings default. Important note for Windows 11 and Windows Server 2022, you will have to use UEFI BIOS and TPM 2.0.
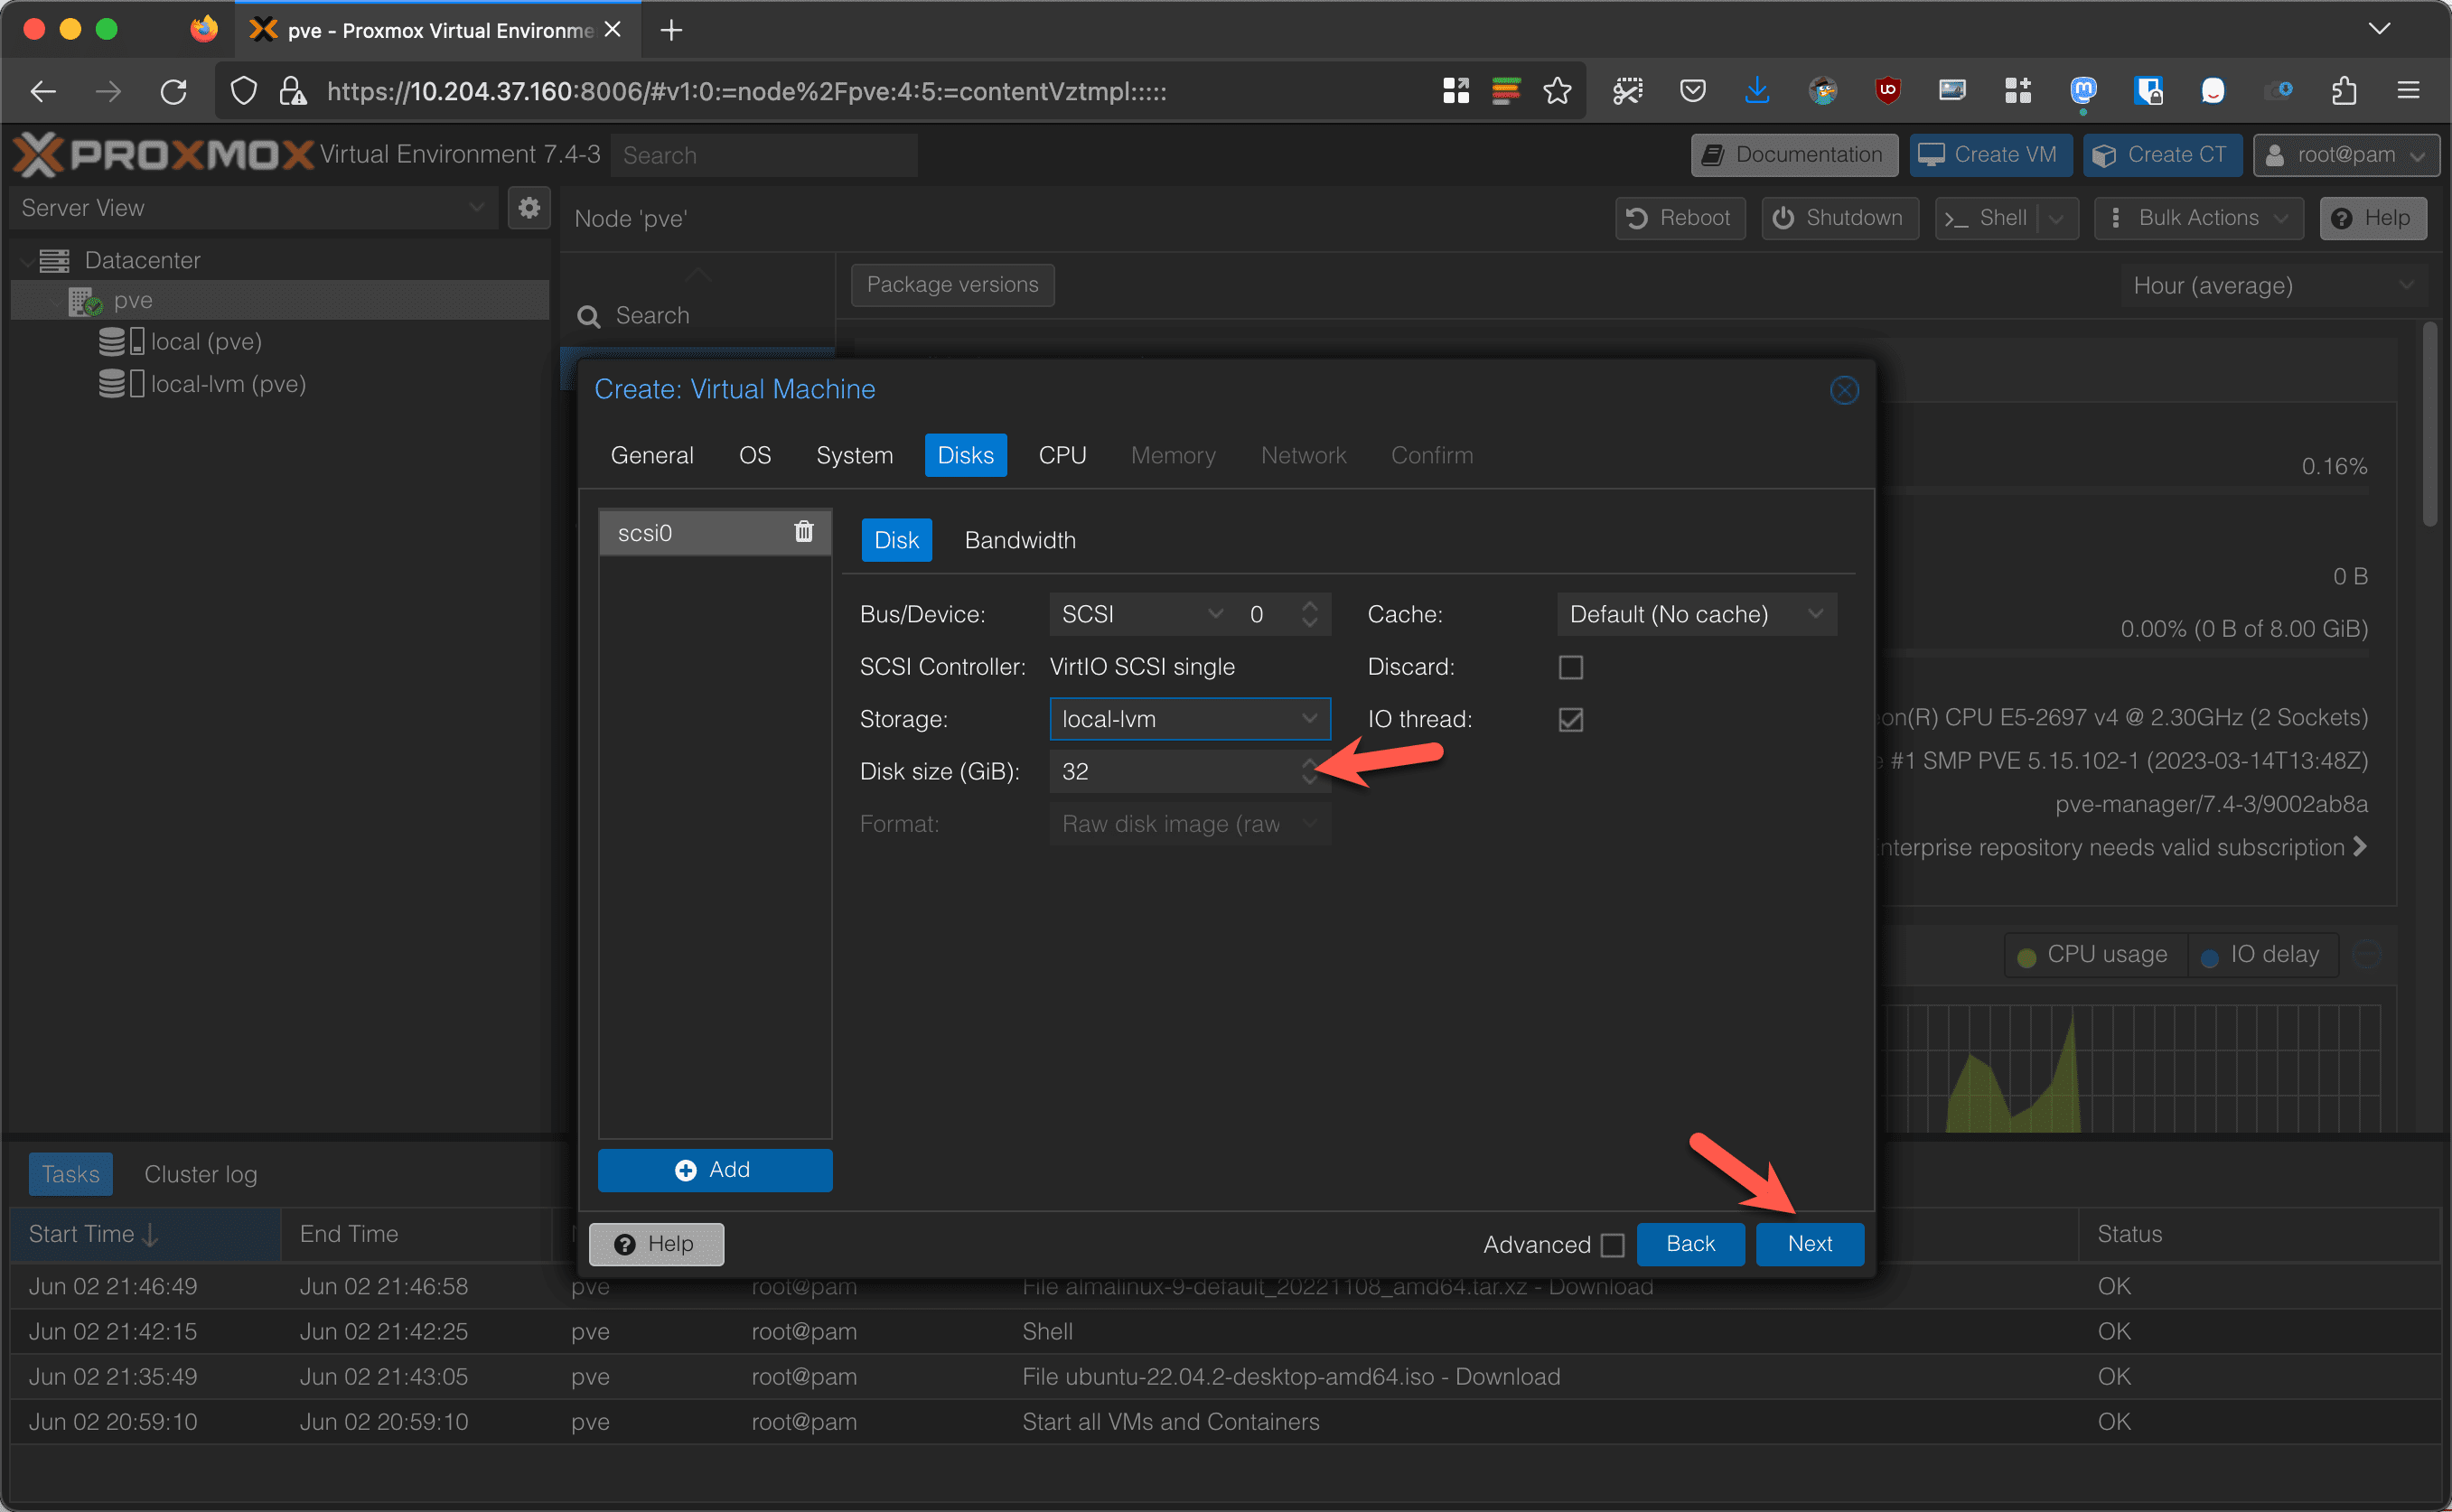
On the Disks tab, you can add your storage. Adjust your disk size and click on Next.

On the CPU tab, add cores and adjust the type. You can typically leave the type as default, but if you plan to use CentOS Stream 9, Red Hat Enterprise Linux 9, AlmaLinux 9, or Rocky Linux 9, you will need to set this to Host.
Sockets are virtual CPU sockets. For example, a dual CPU server would have 2 physical sockets. Cores are the cores per CPU in each socket. However when it comes to virtualization, there really is no difference between a single 8-core CPU and 2 CPU sockets with 4-cores each or 8 CPU sockets with 1-core each. This option is useful for business situations where you might have a software license that is based on the number of CPU sockets and/or cores. For example, if you have software licensed for 1 socket and unlimited cores, you could add more cores to one socket.
Something else to note is that Proxmox will let you add more cores and sockets than you phsically have to a VM. For example, if my server has 4 cores on 1 socket, Proxmox will let me add 24 cores and 24 sockets to the VM. The VM will see this and attempt to use it. You can lock up your host system this way! You can also over-provision VMs. For instance, you can have 5 VMs with 4 cores each even if you only have a total of 4 cores. Just know Proxmox will throttle and queue.
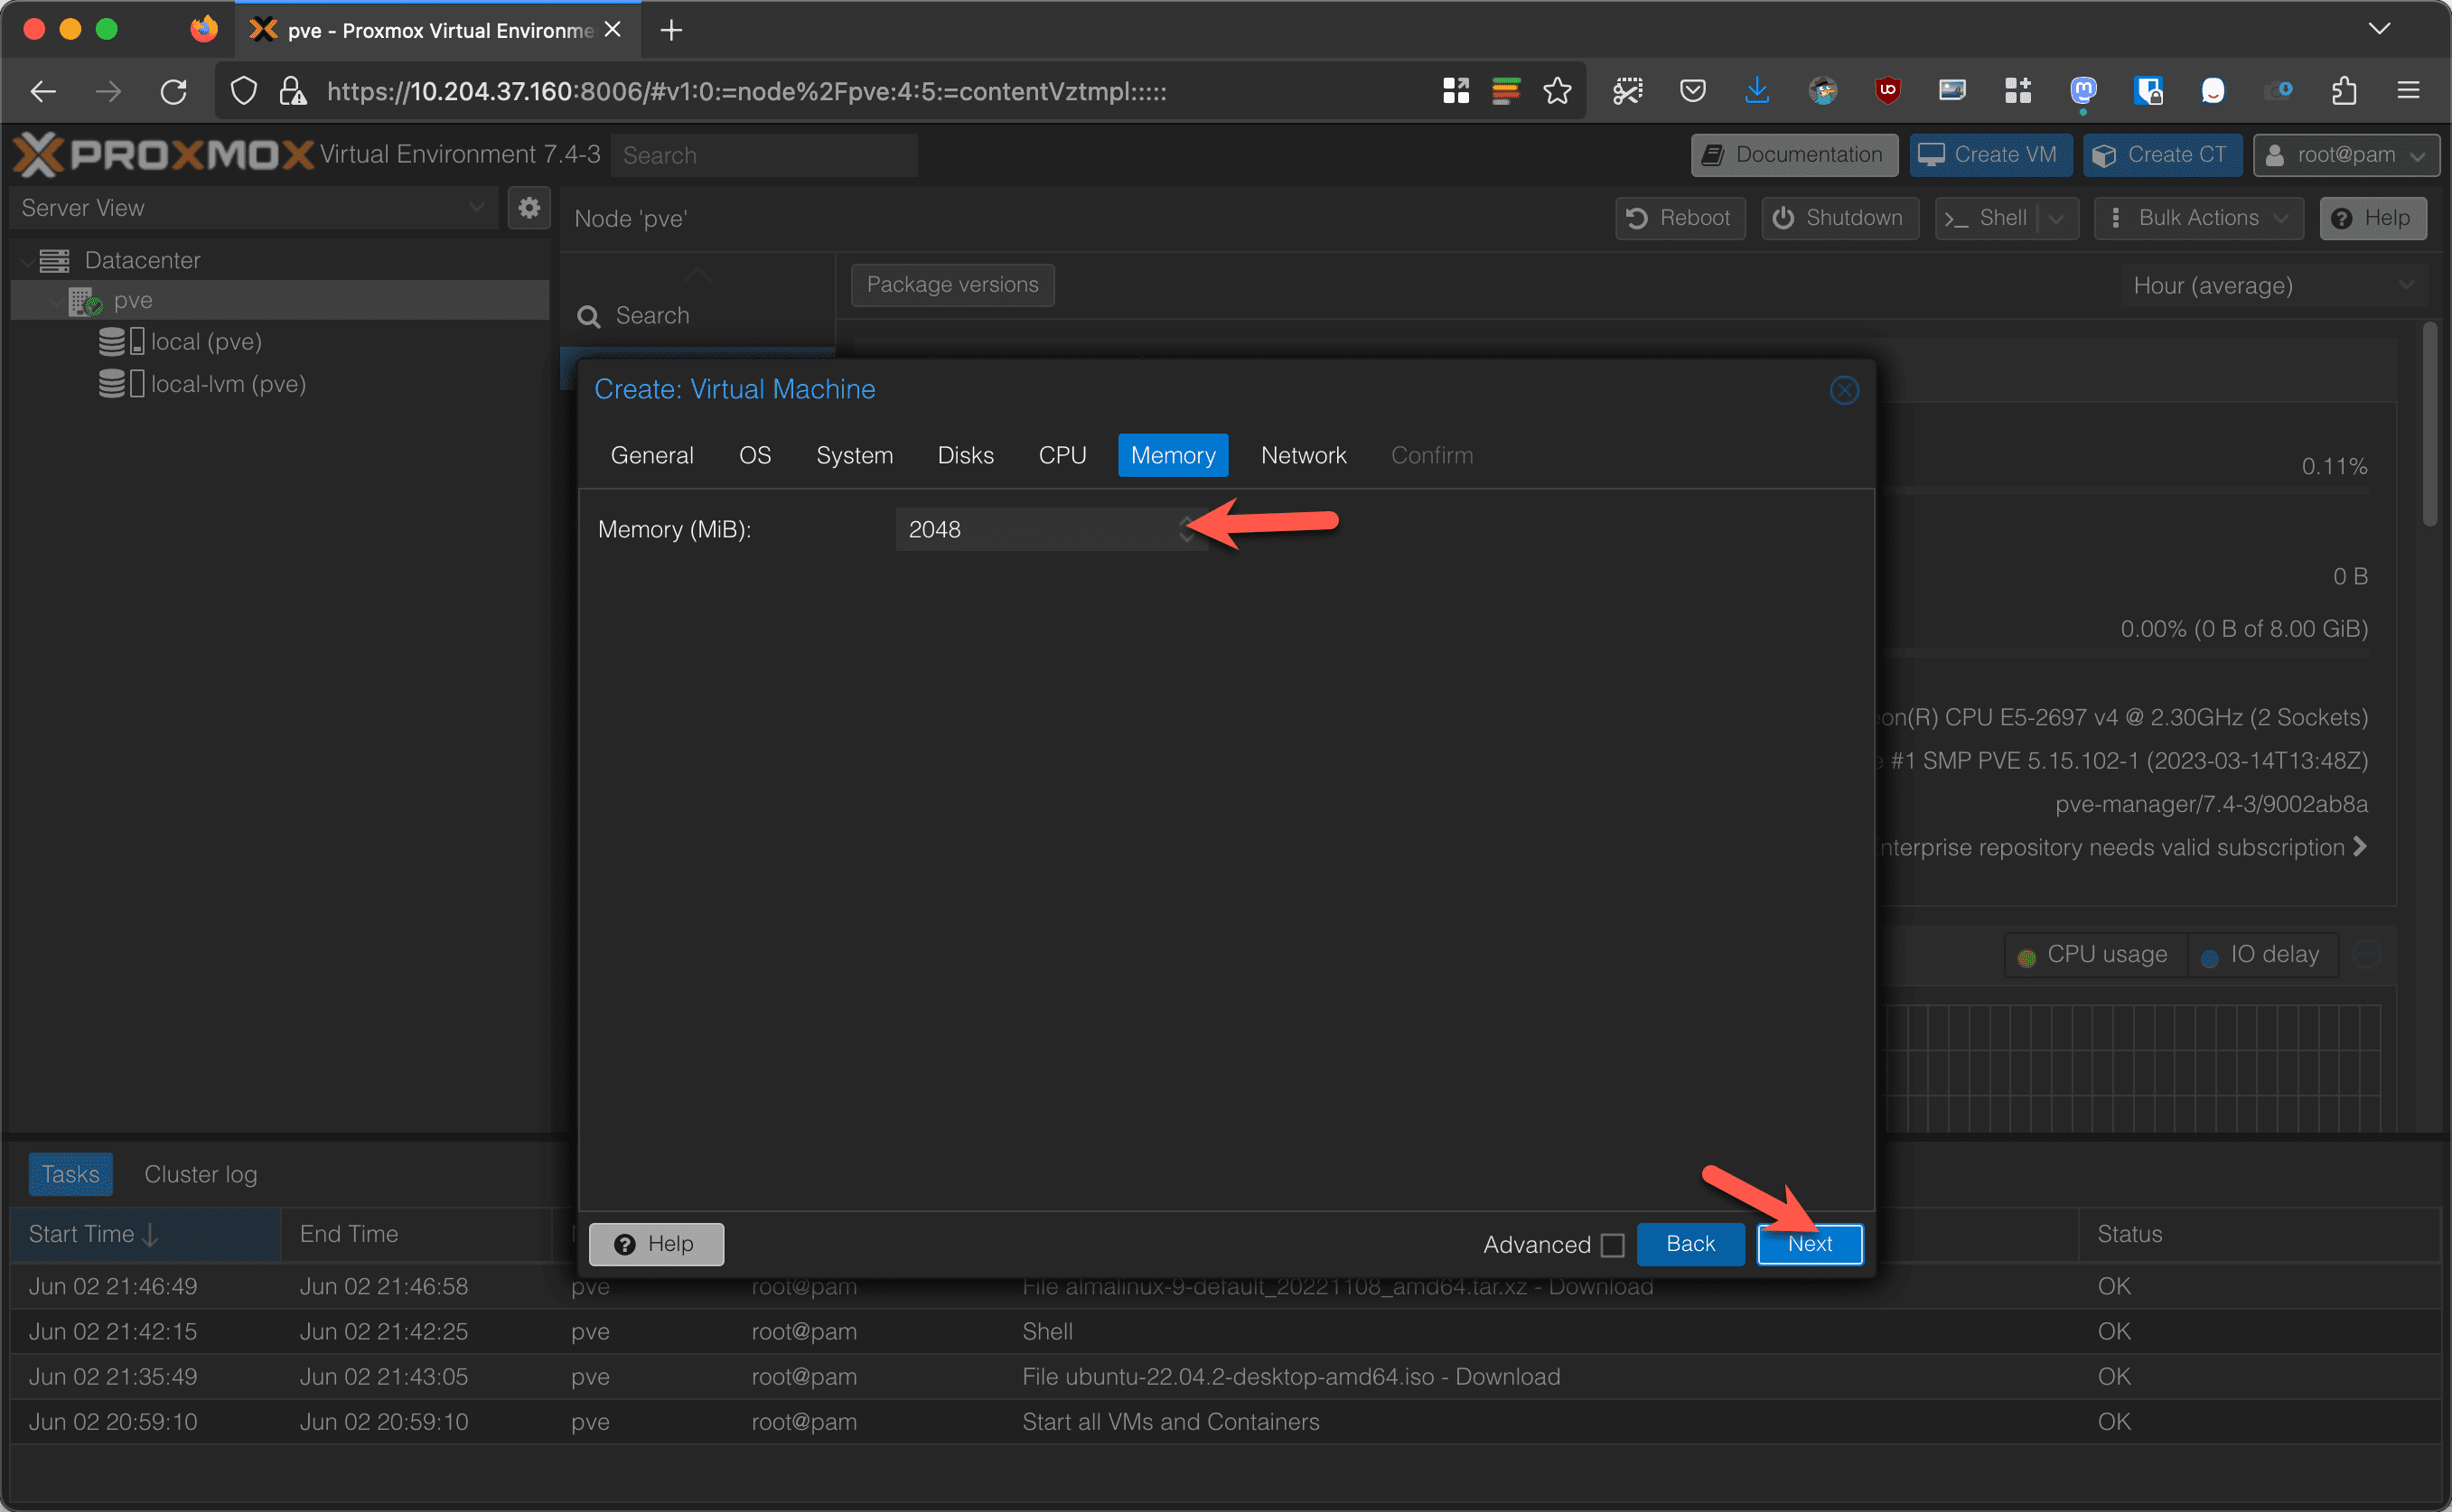
Now give your VM some RAM. This is in megabytes. 1024 = 1 GB, 2048 = 2 GB, etc.
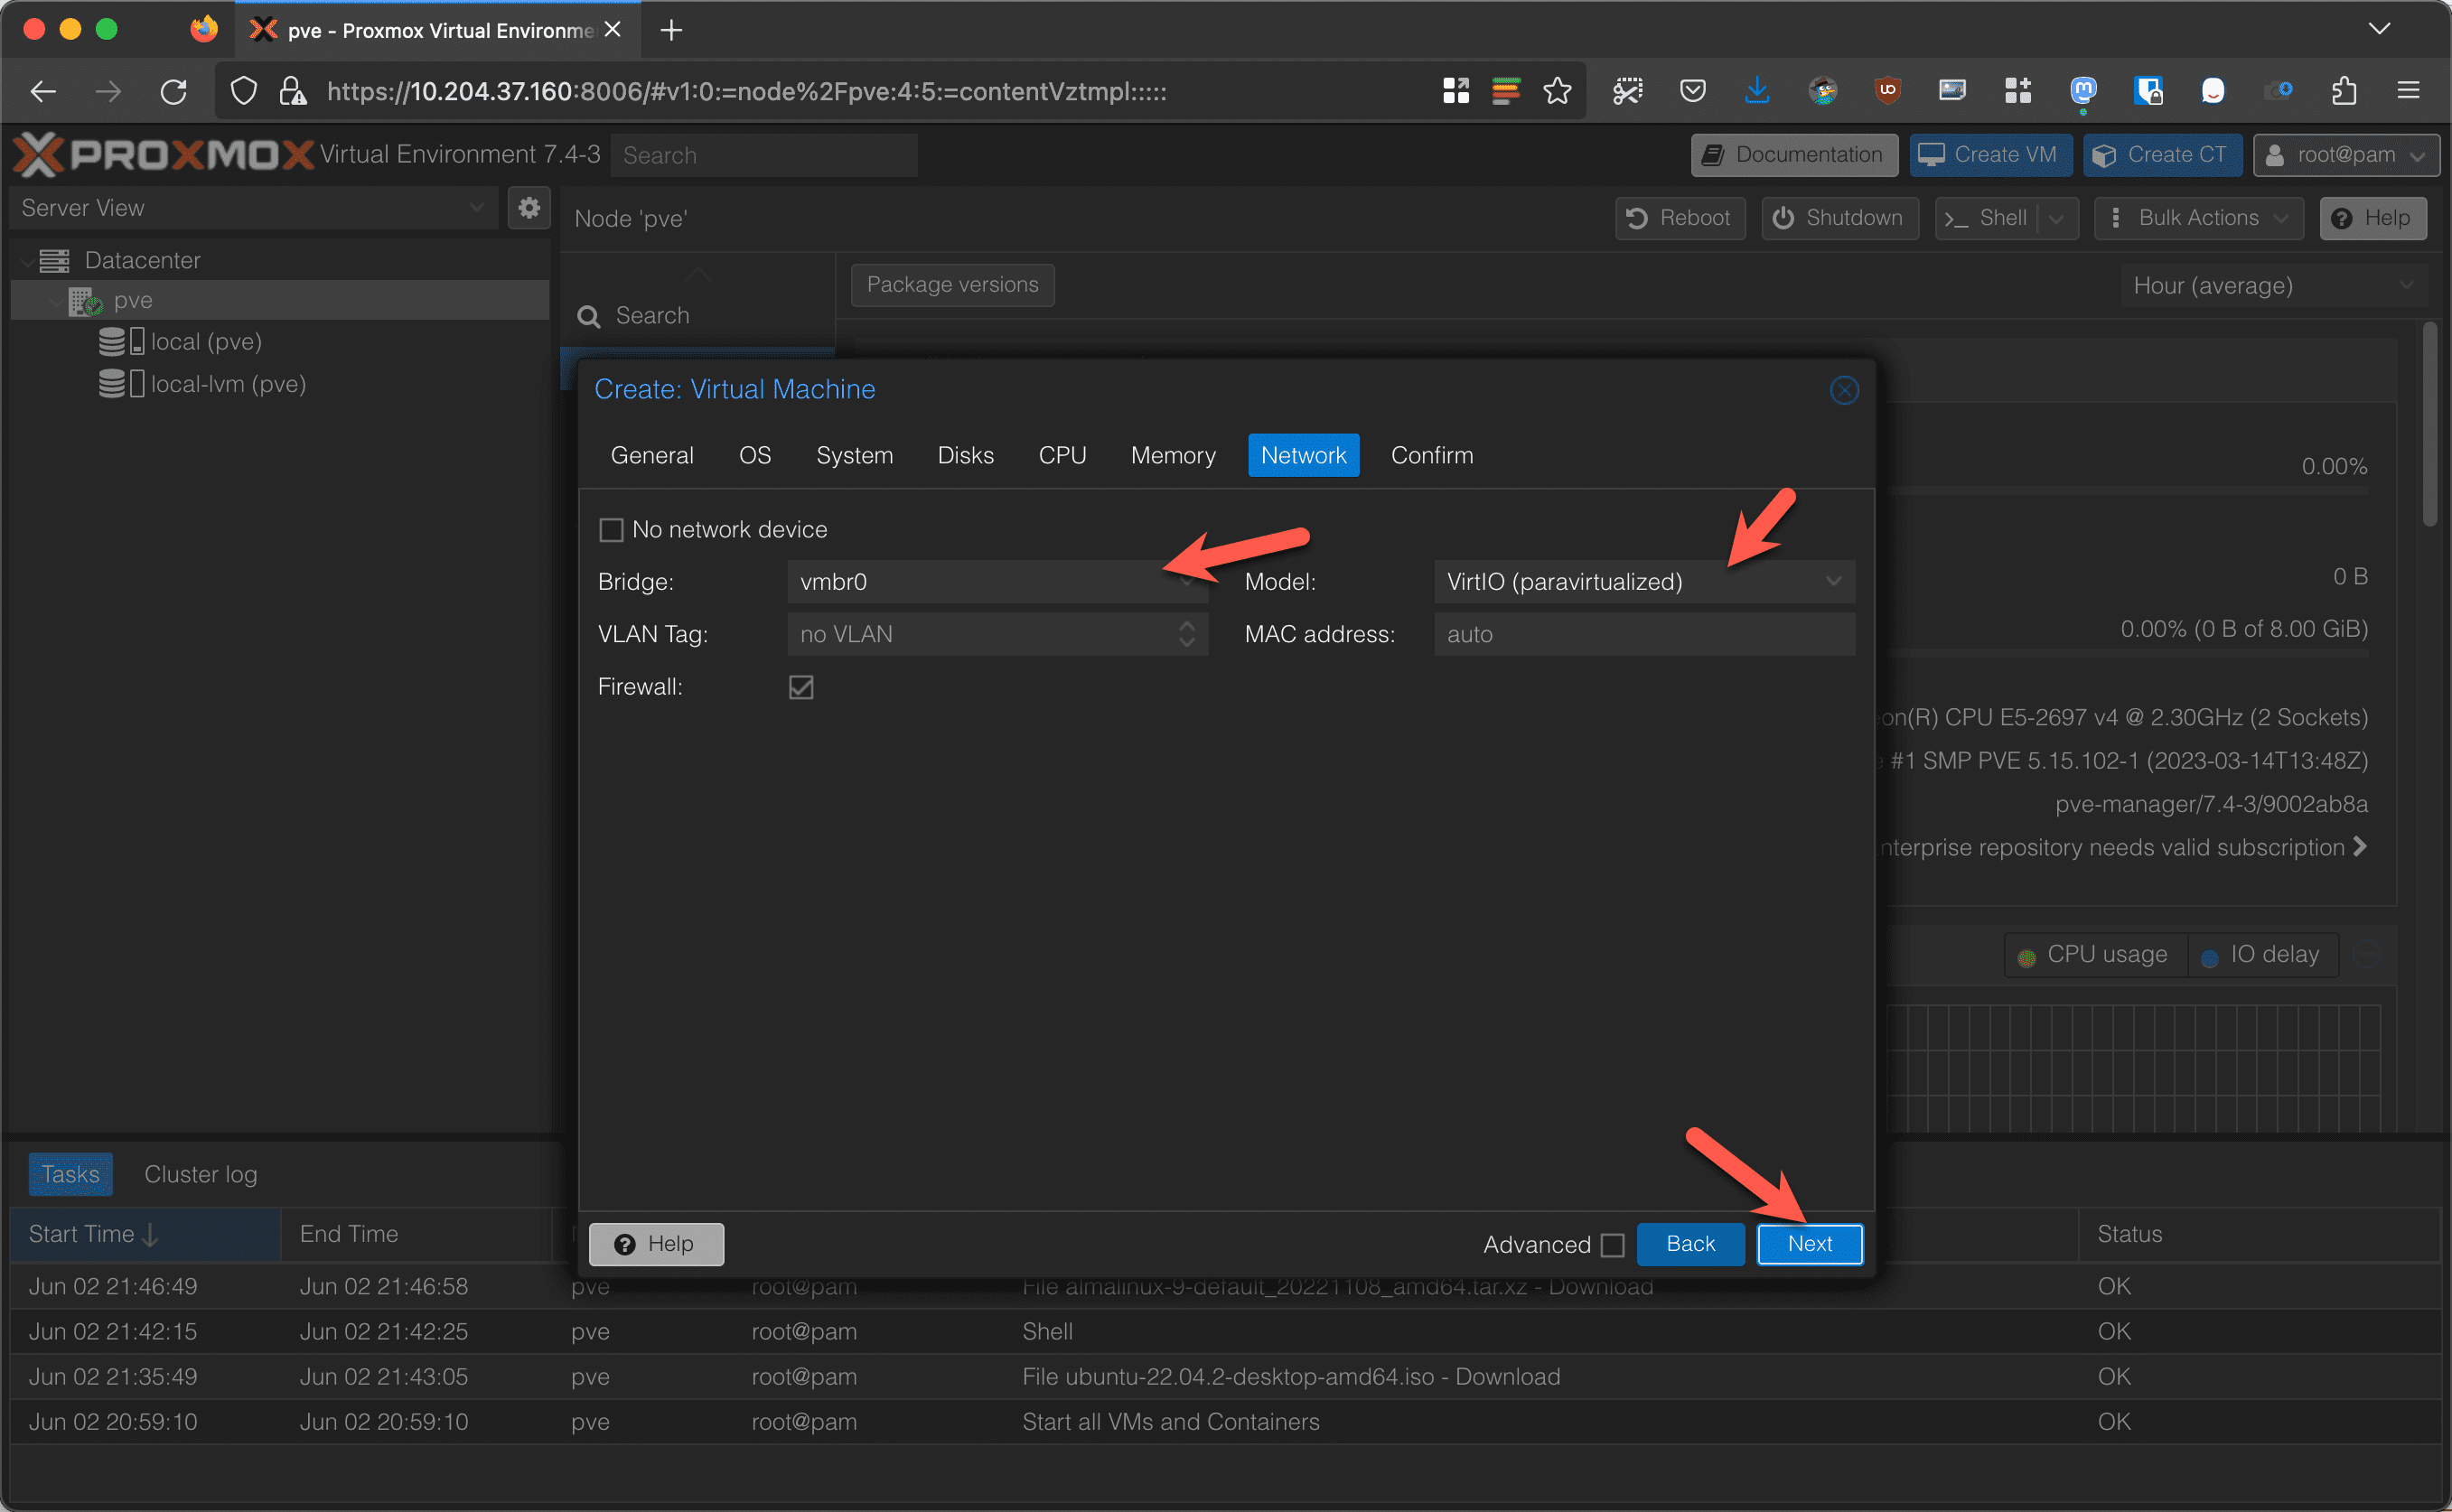
Now configure your networking. Set the primary bridge – if you have only one NIC, this should be vmbr0 by default. Model should be VirtIO unless you’re using Windows then this should be Intel. Click on Next to go to the confirmation screen. Then click on Finish.
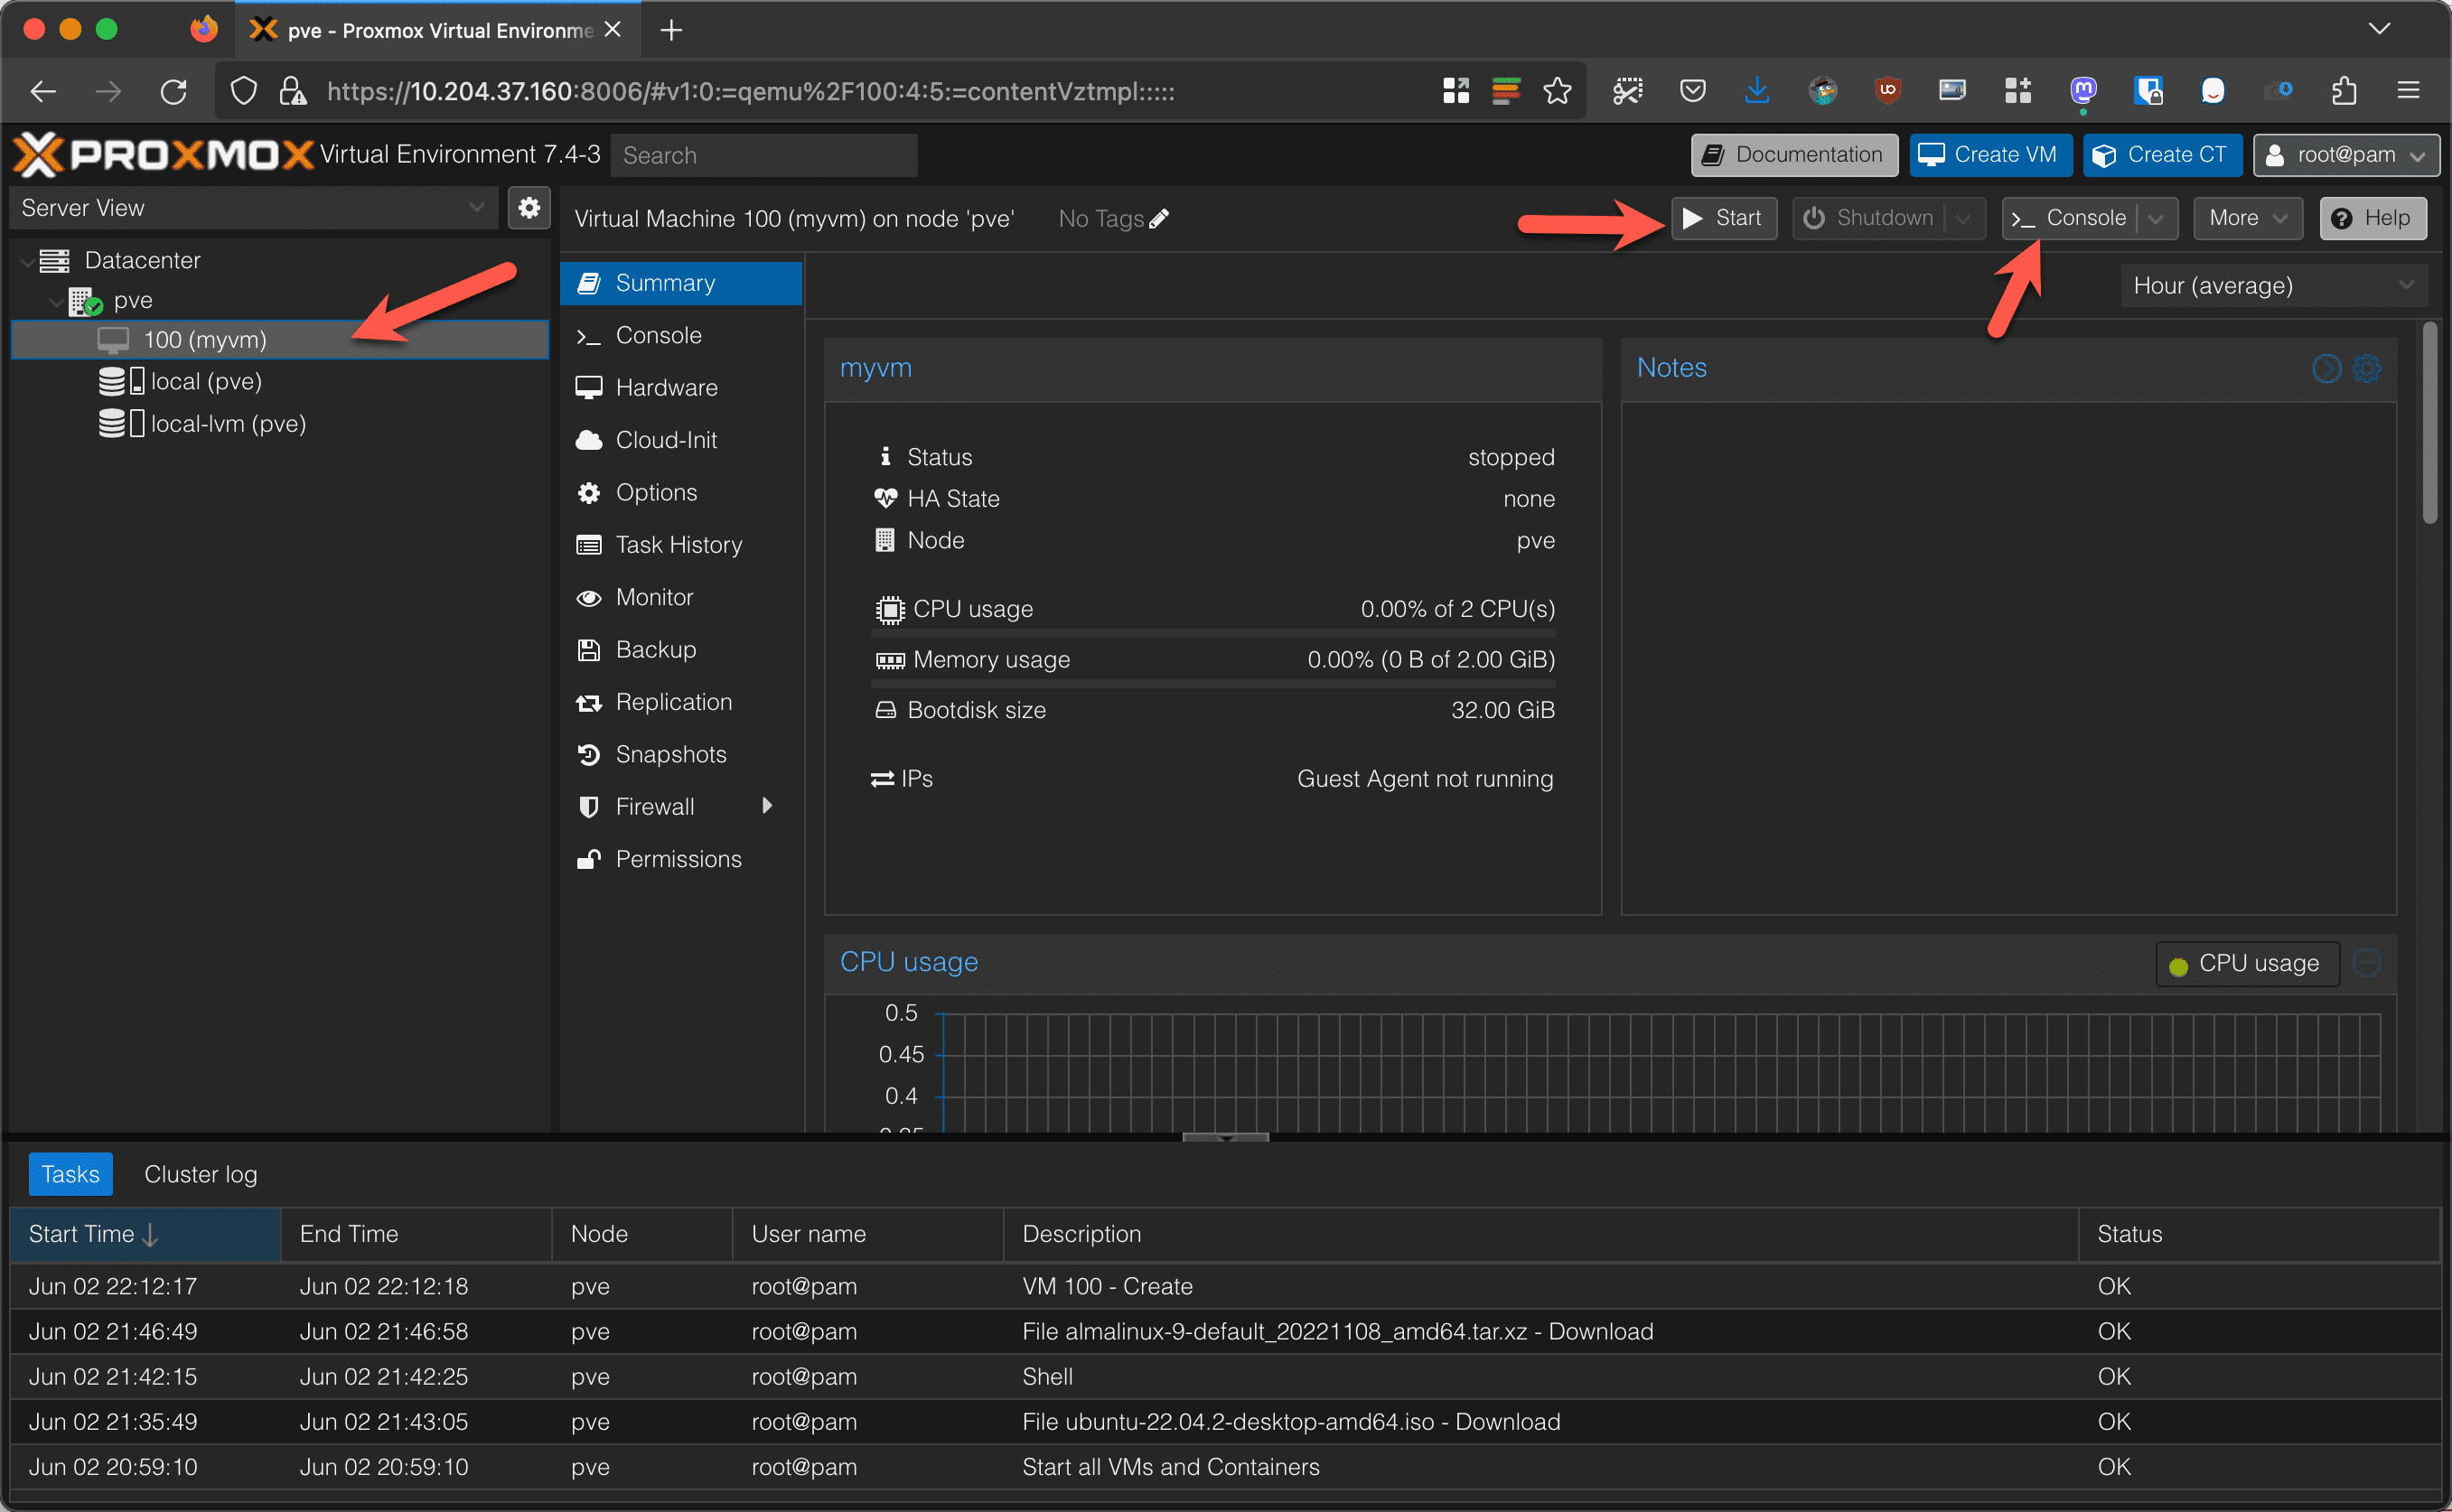
After you create your VM, you’ll see it show up in the side menu. Click on it and then click the Start button to power it on. Finally, click on the Console button so you can install and configure your VM.

And there you go! A KVM-based VM! Now let’s do a container.
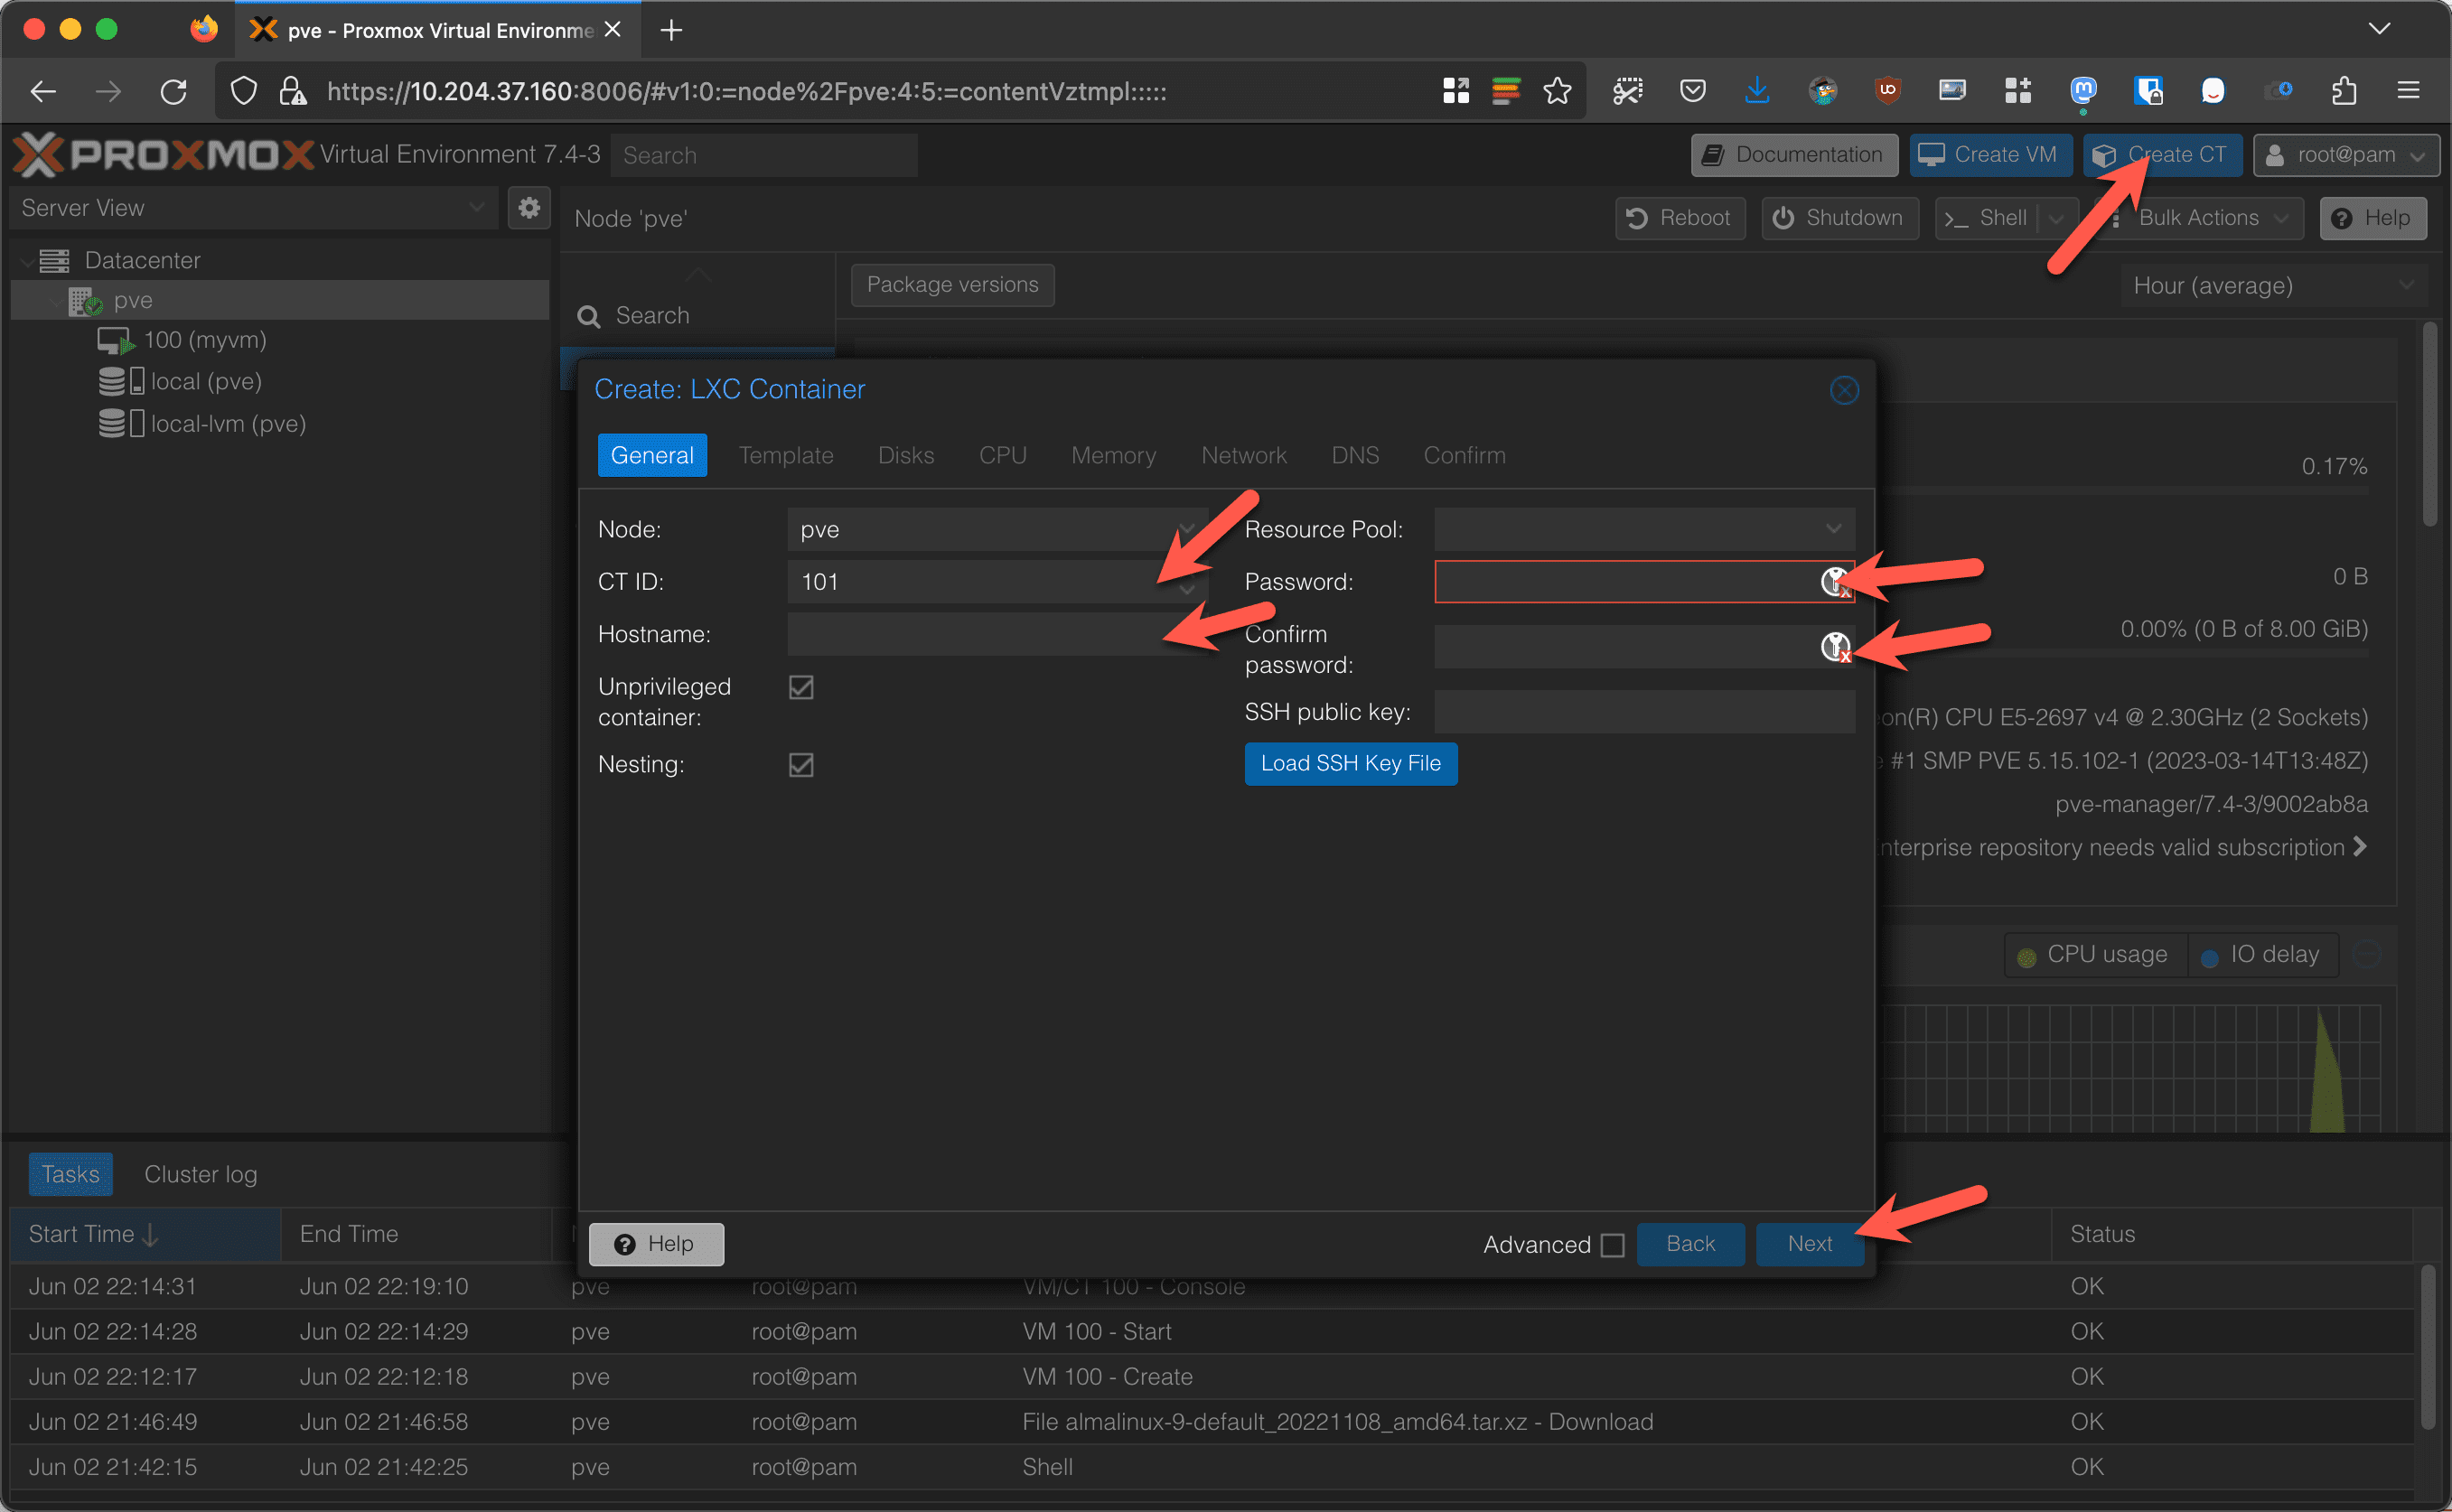
Just like creating a VM, click the Create CT button. Then adjust your ID, give your CT a name which will be the hostname. Add a password or SSH key and click next.
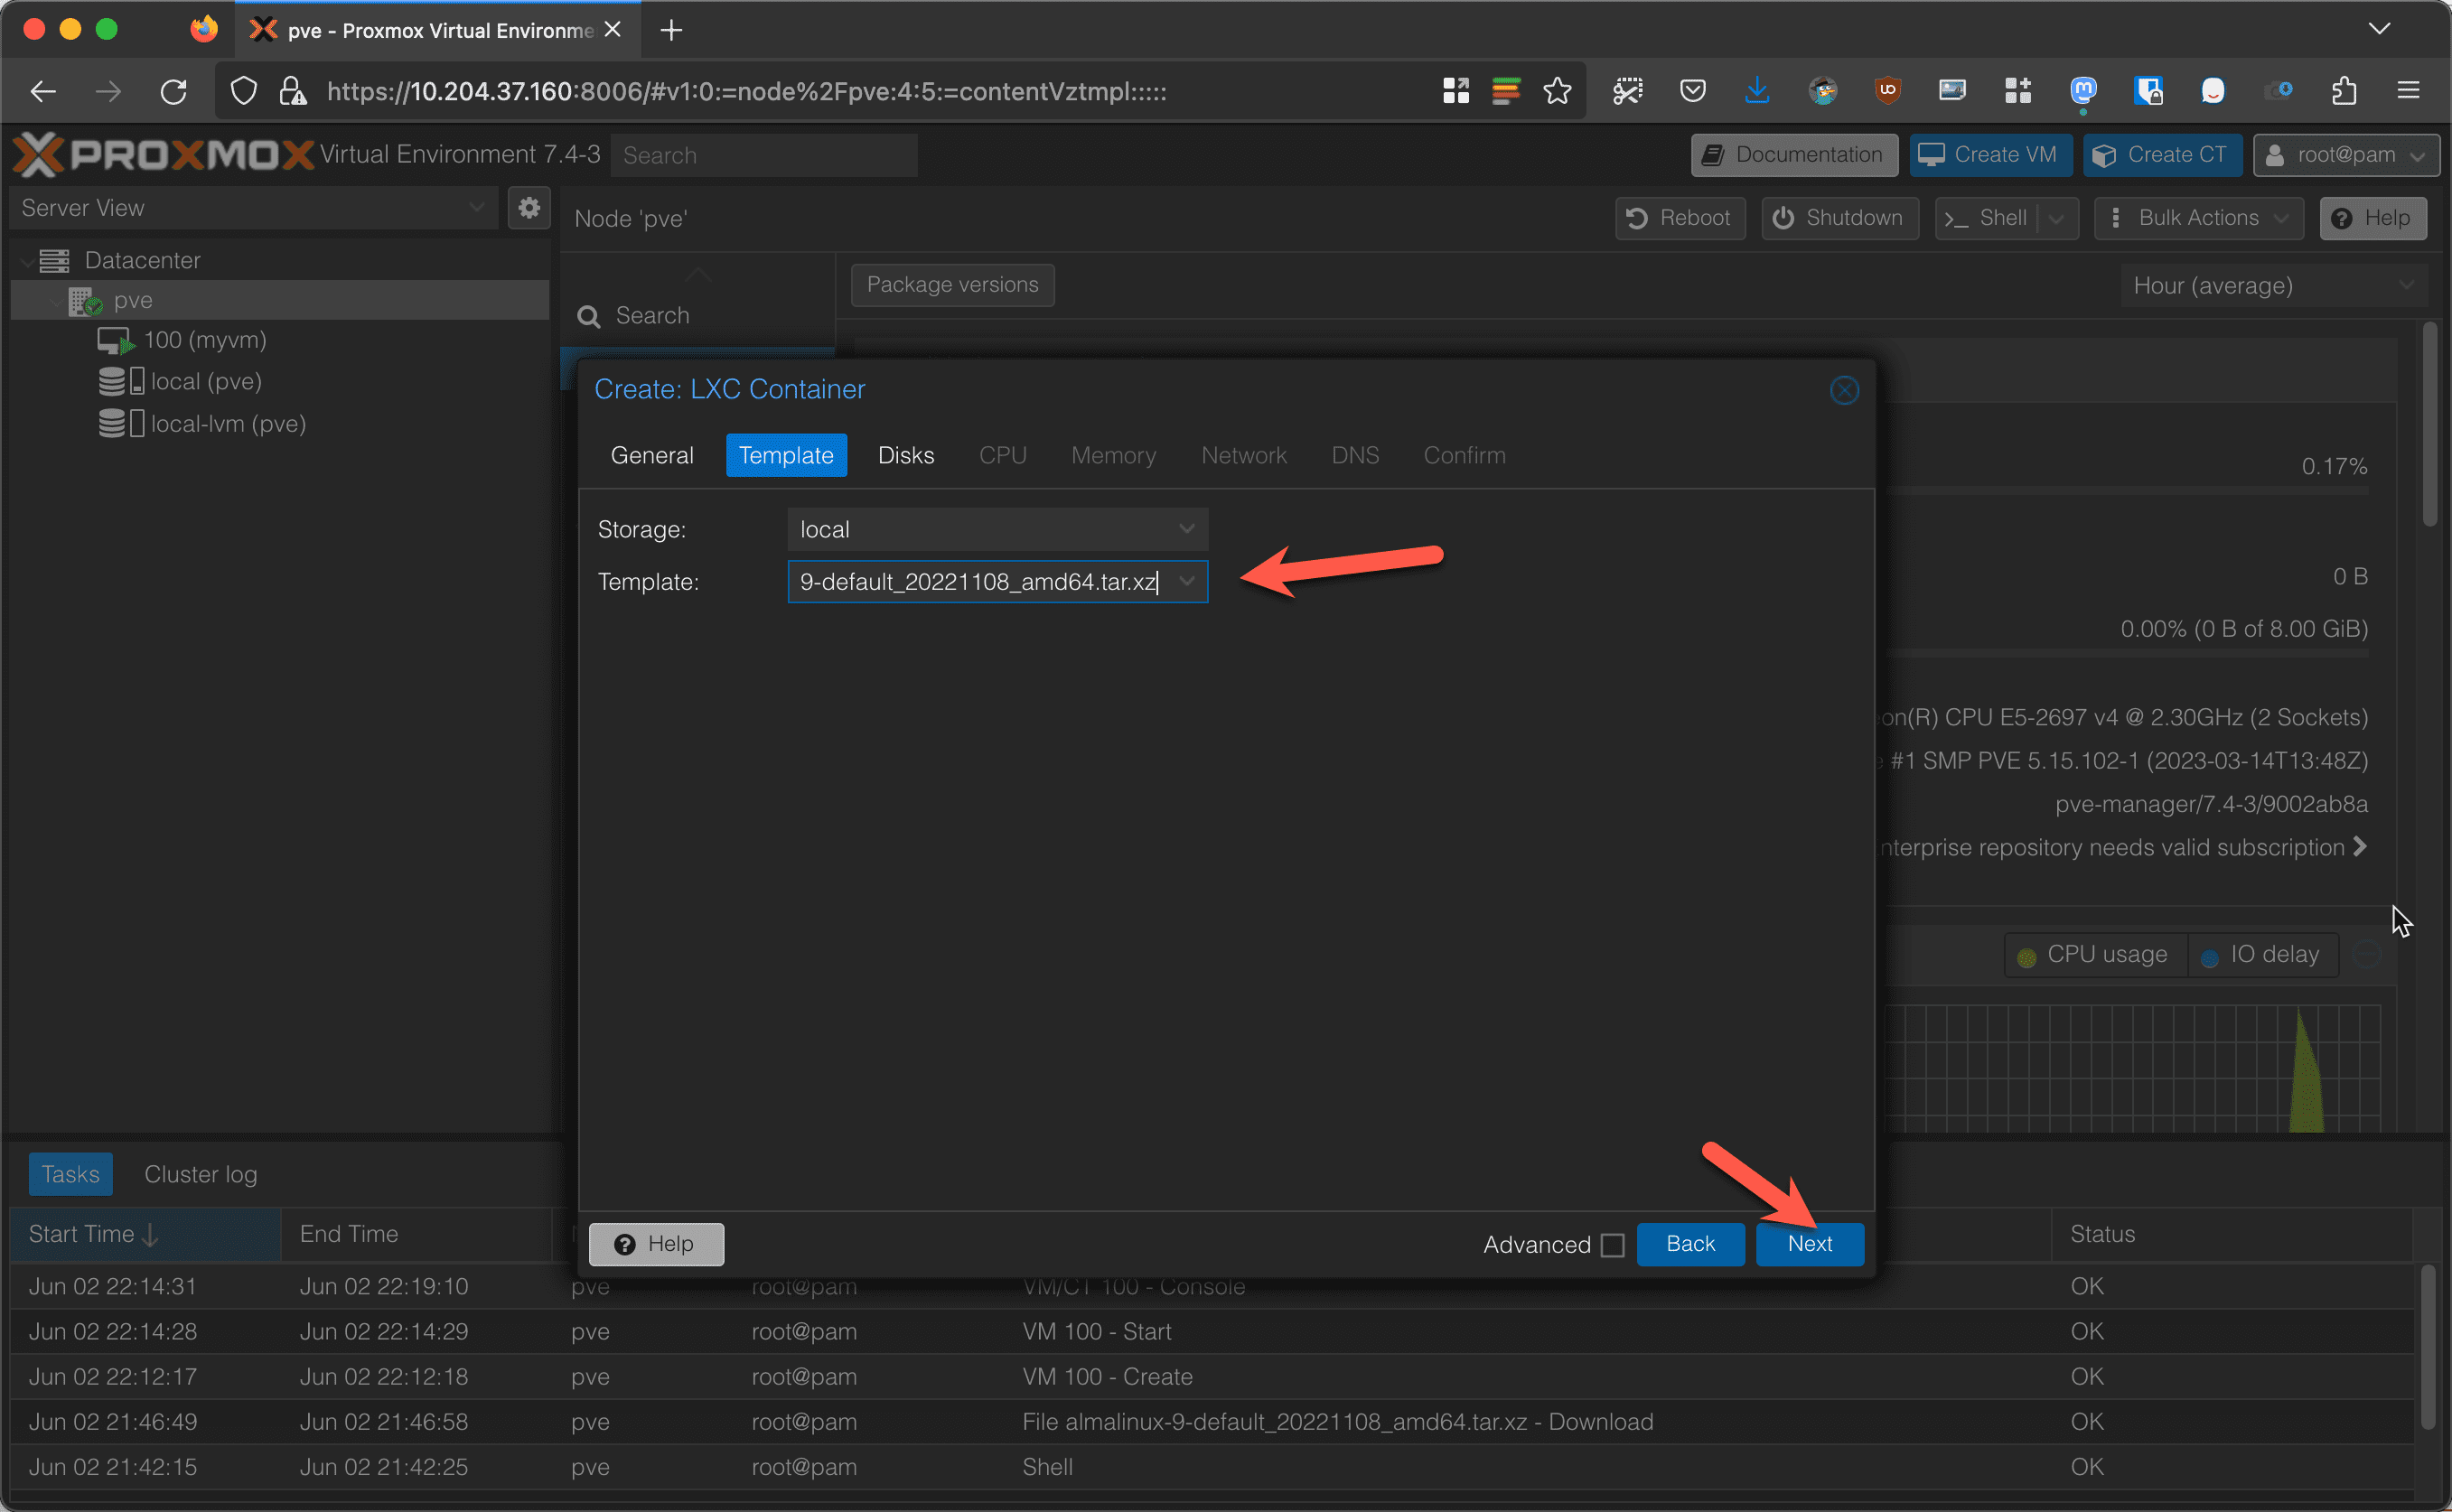
Select your template and then click on Next.
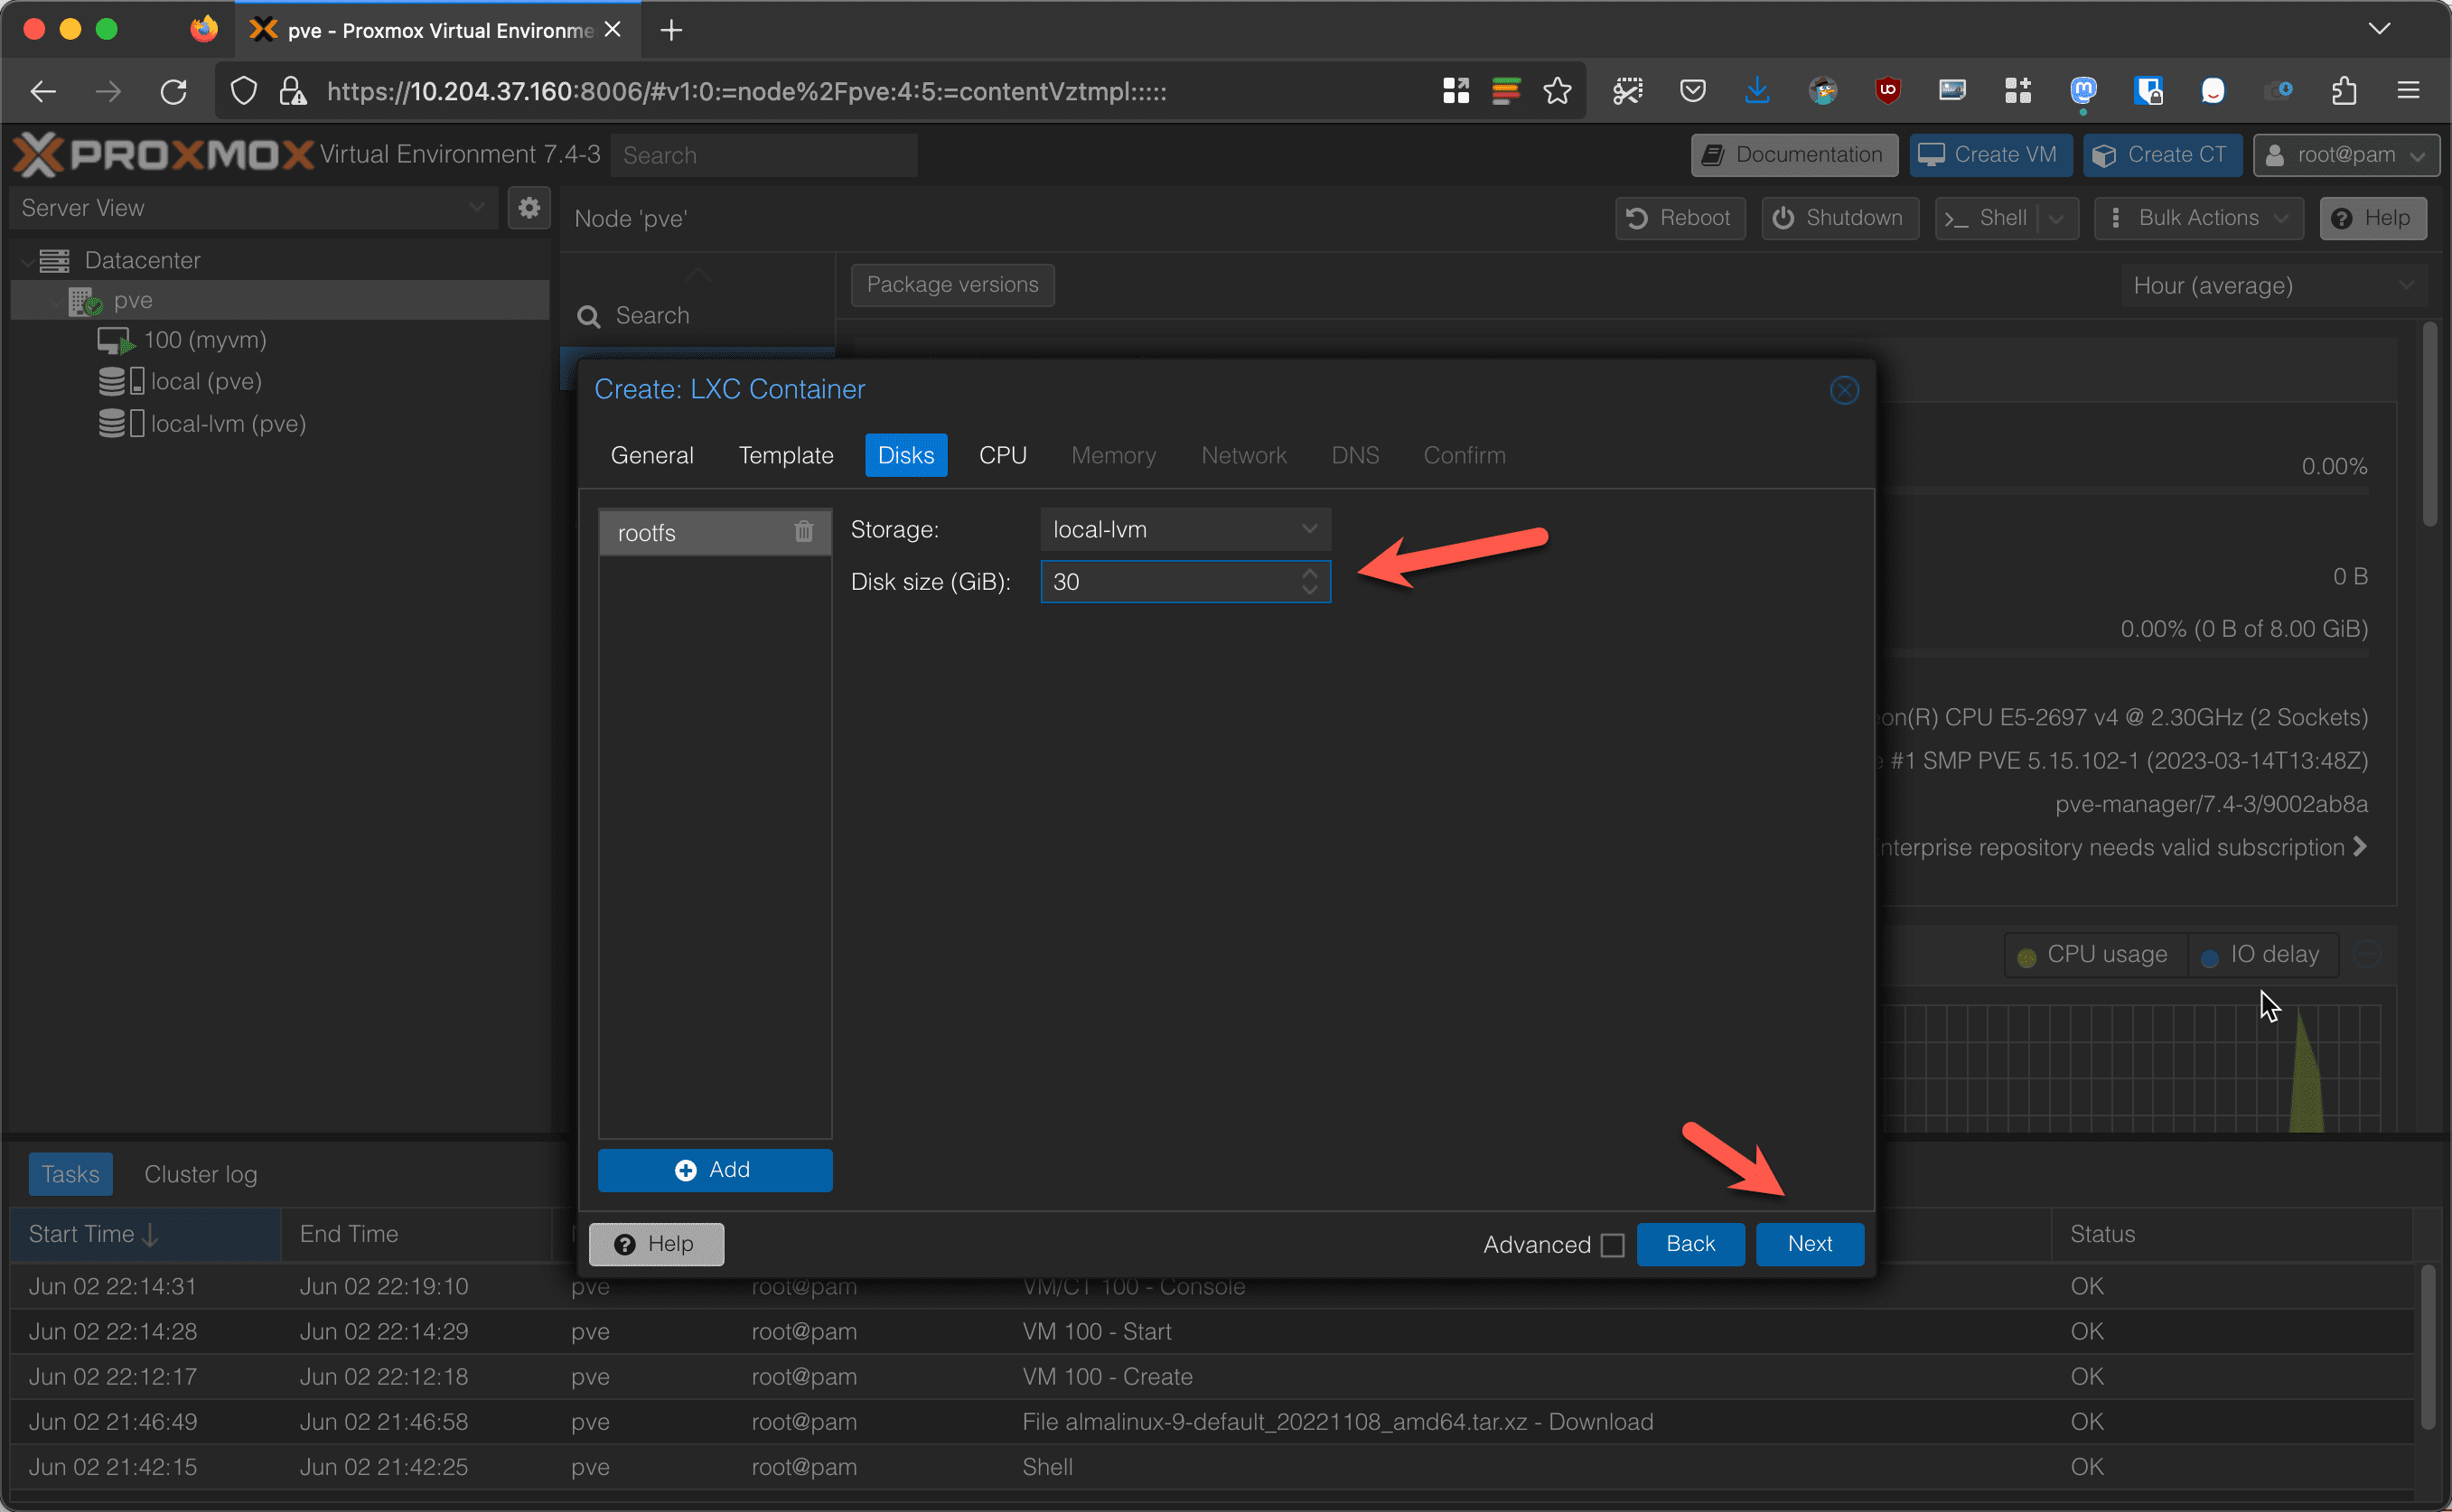
On the Disks tab, add a disk and adjust the storage. You’ll need significantly less storage than you do for a KVM VM, but leave yourself enough space for your data. Click on Next.
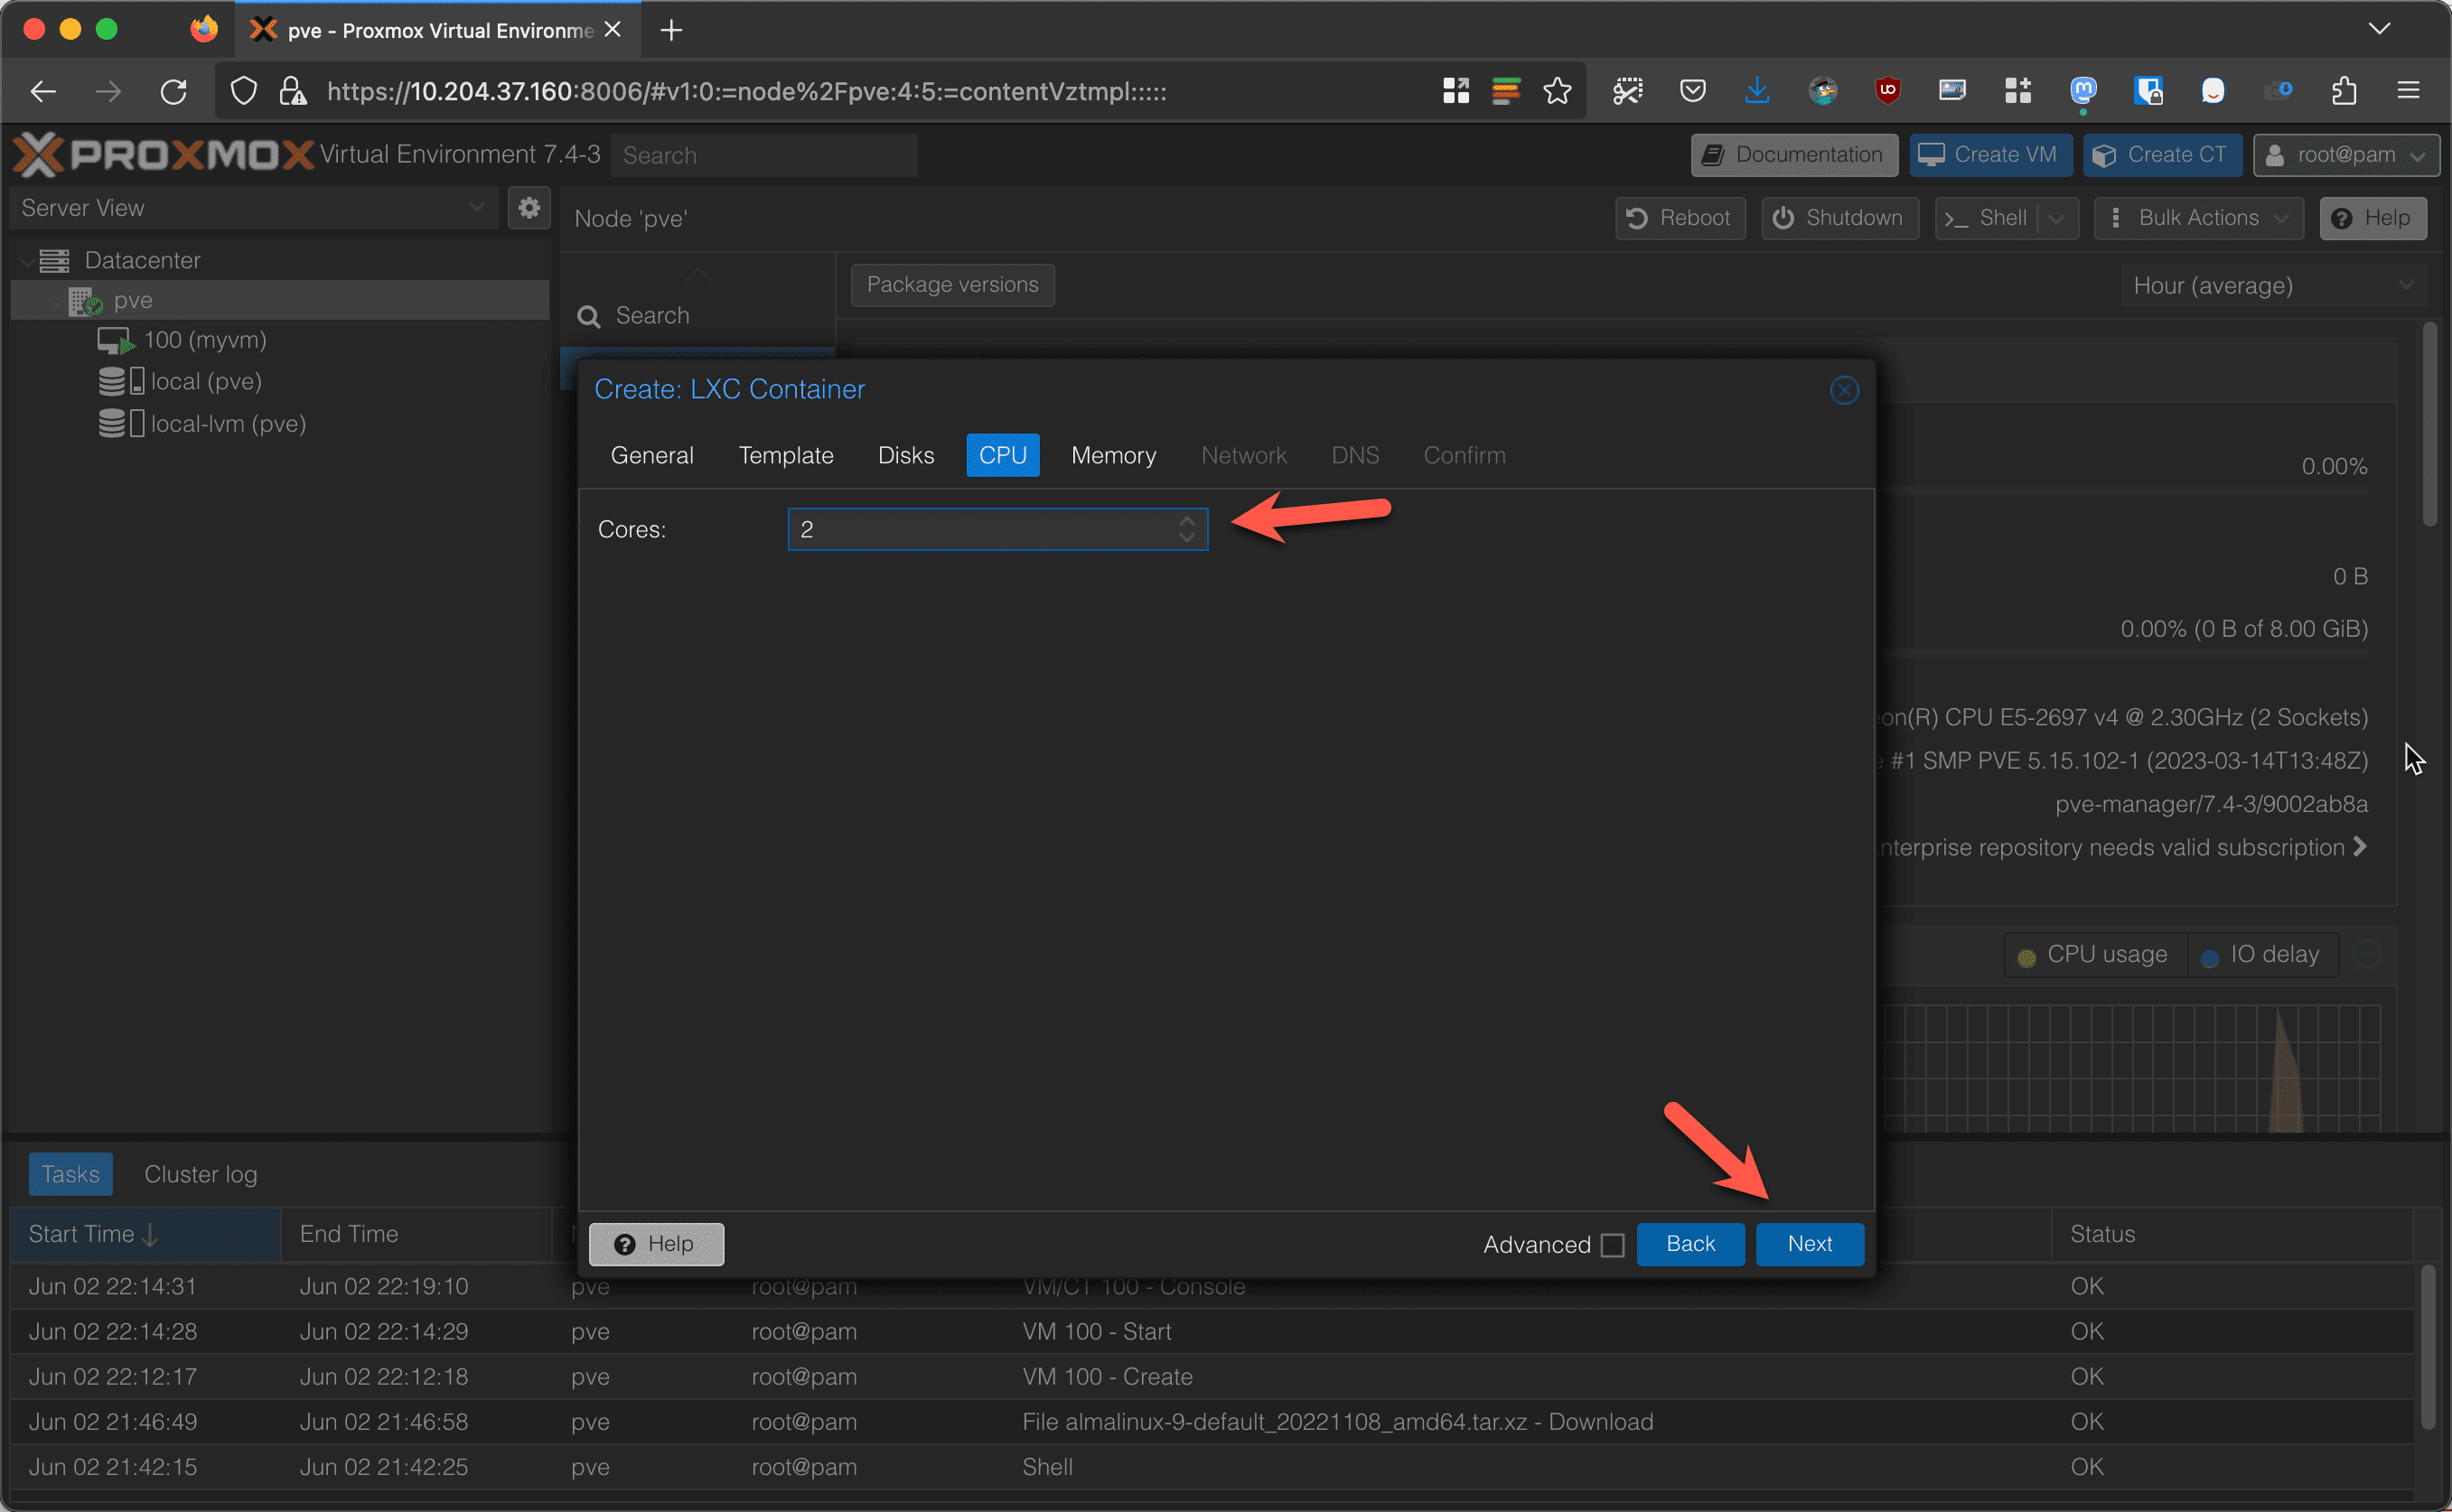
Adjust your CPU cores and click on Next.
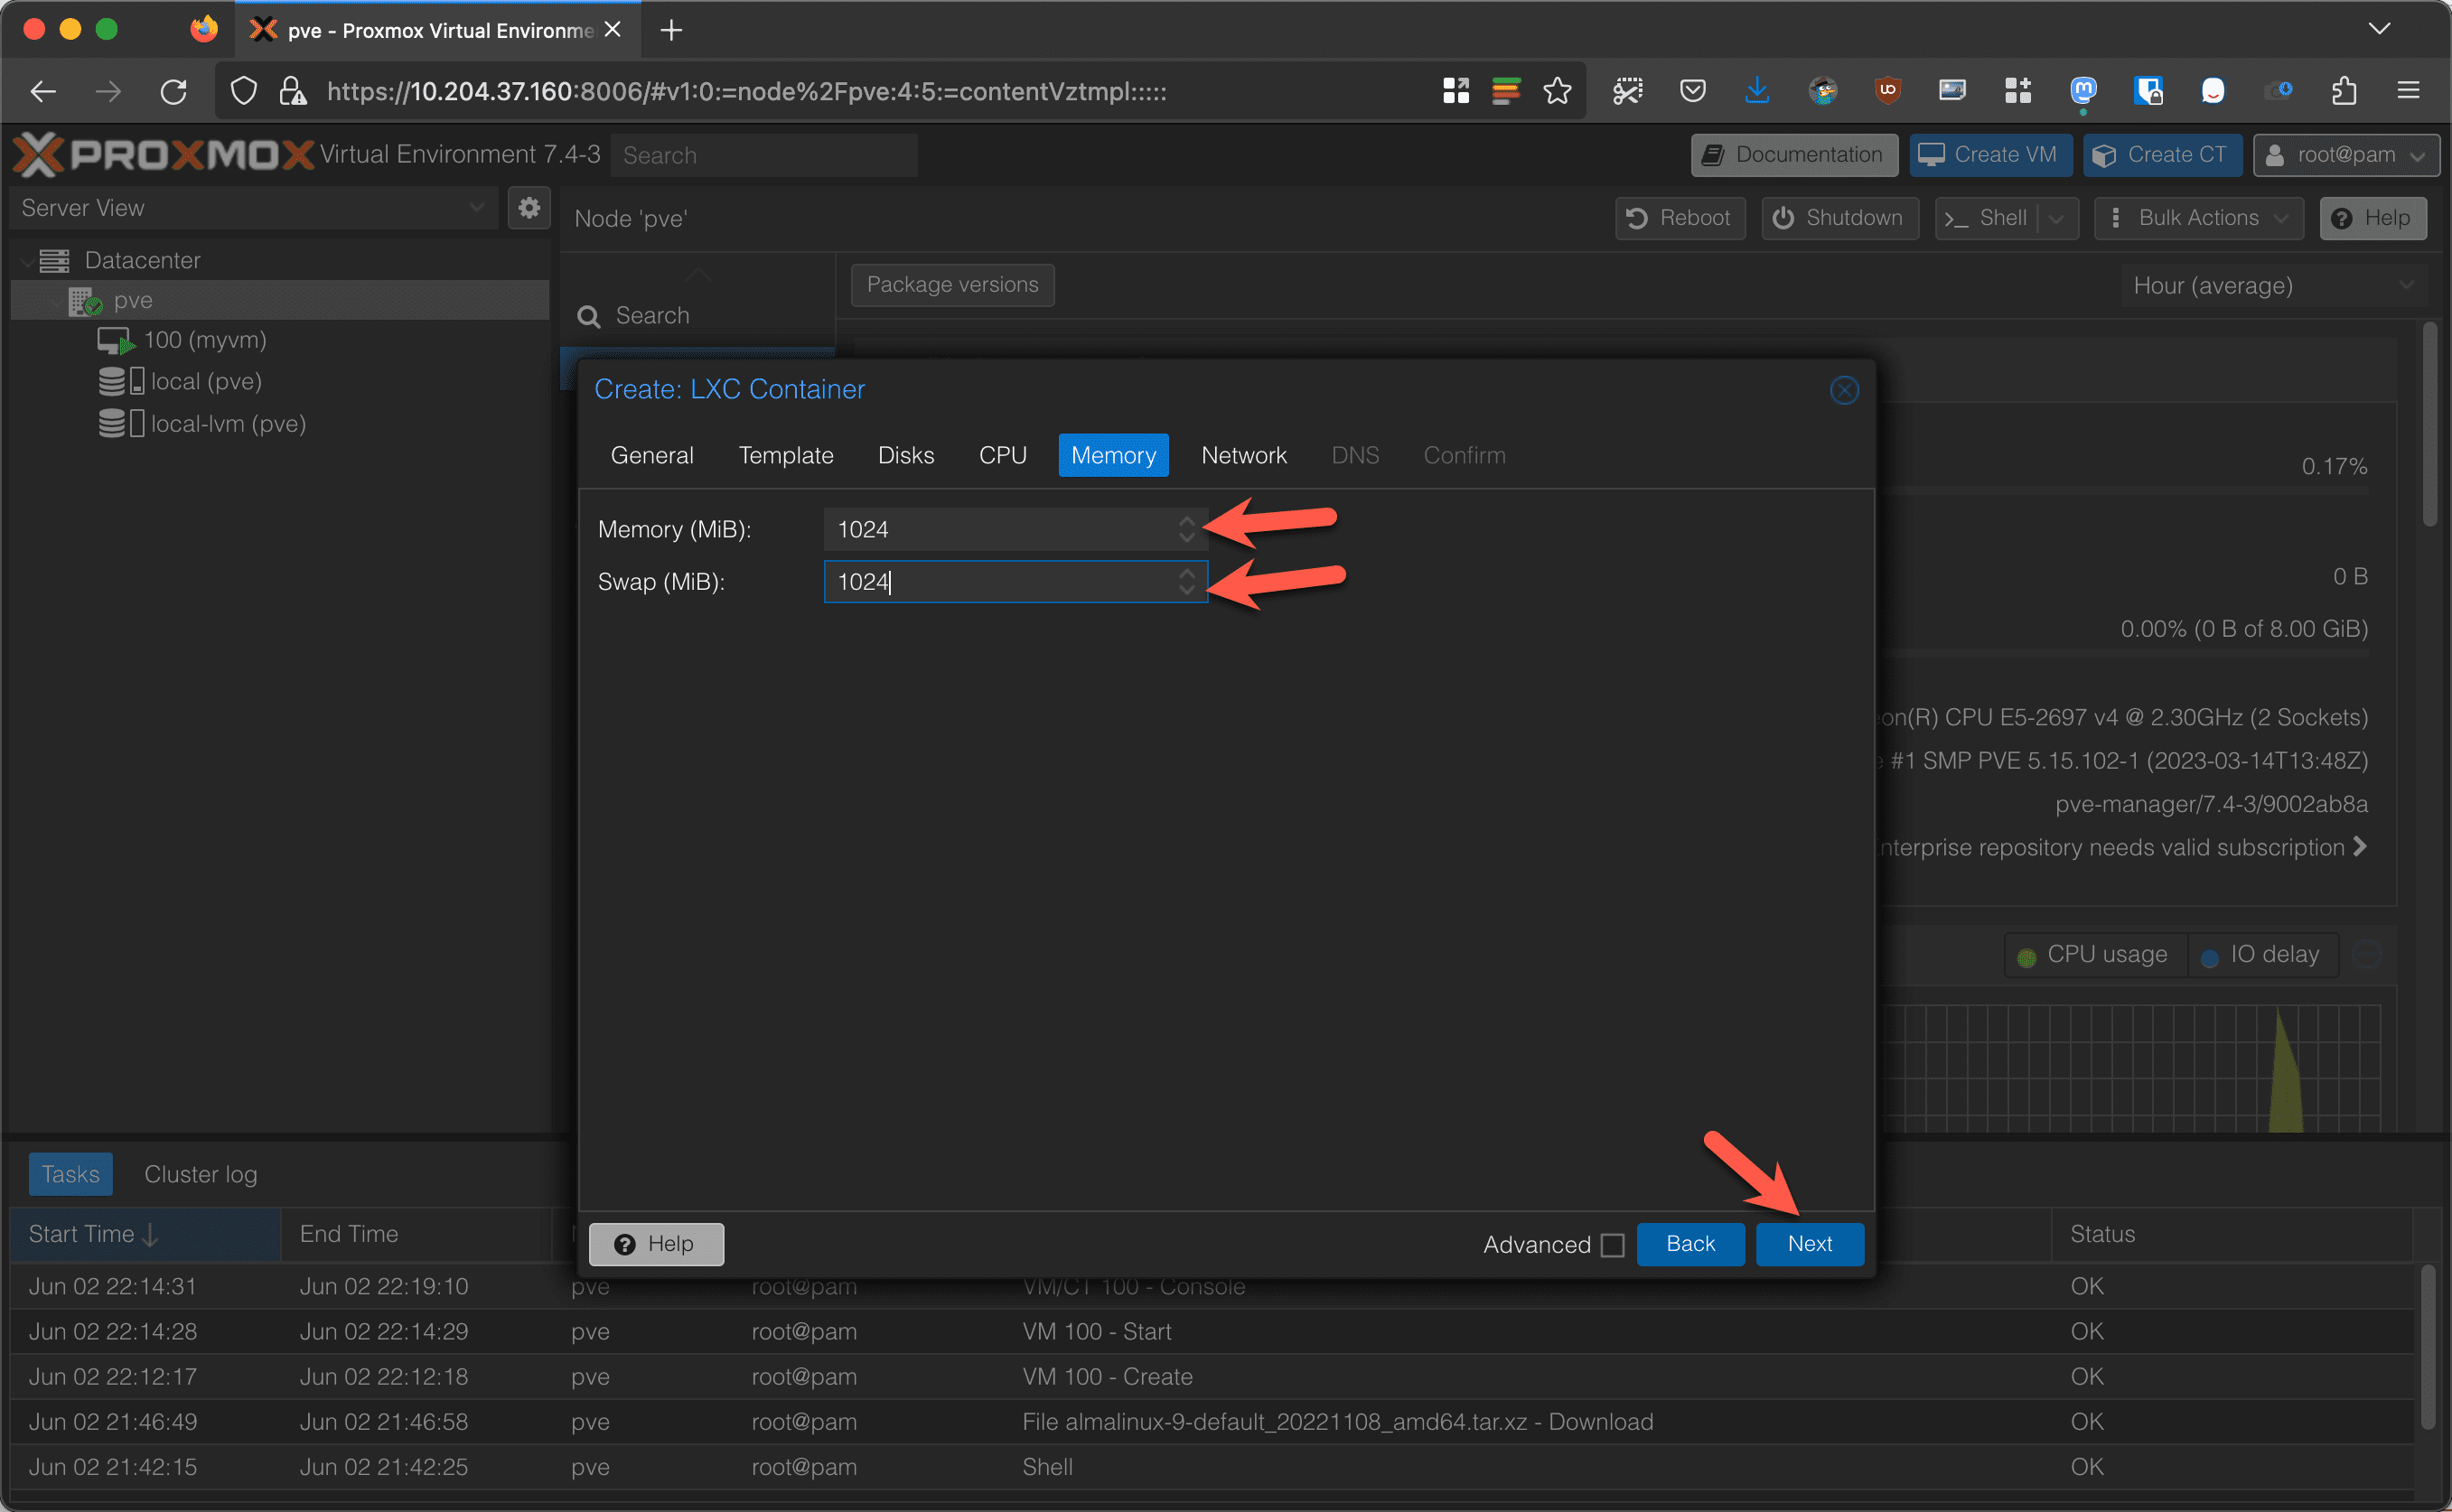
Adjust your RAM and SWAP. Again, you’ll need significantly less, but adjust this value based on the application(s) you plan to run in your container. Click on Next.
 On the Network tab, adjust your network settings. You can select a DHCP or static IP address from here. Click on Next.
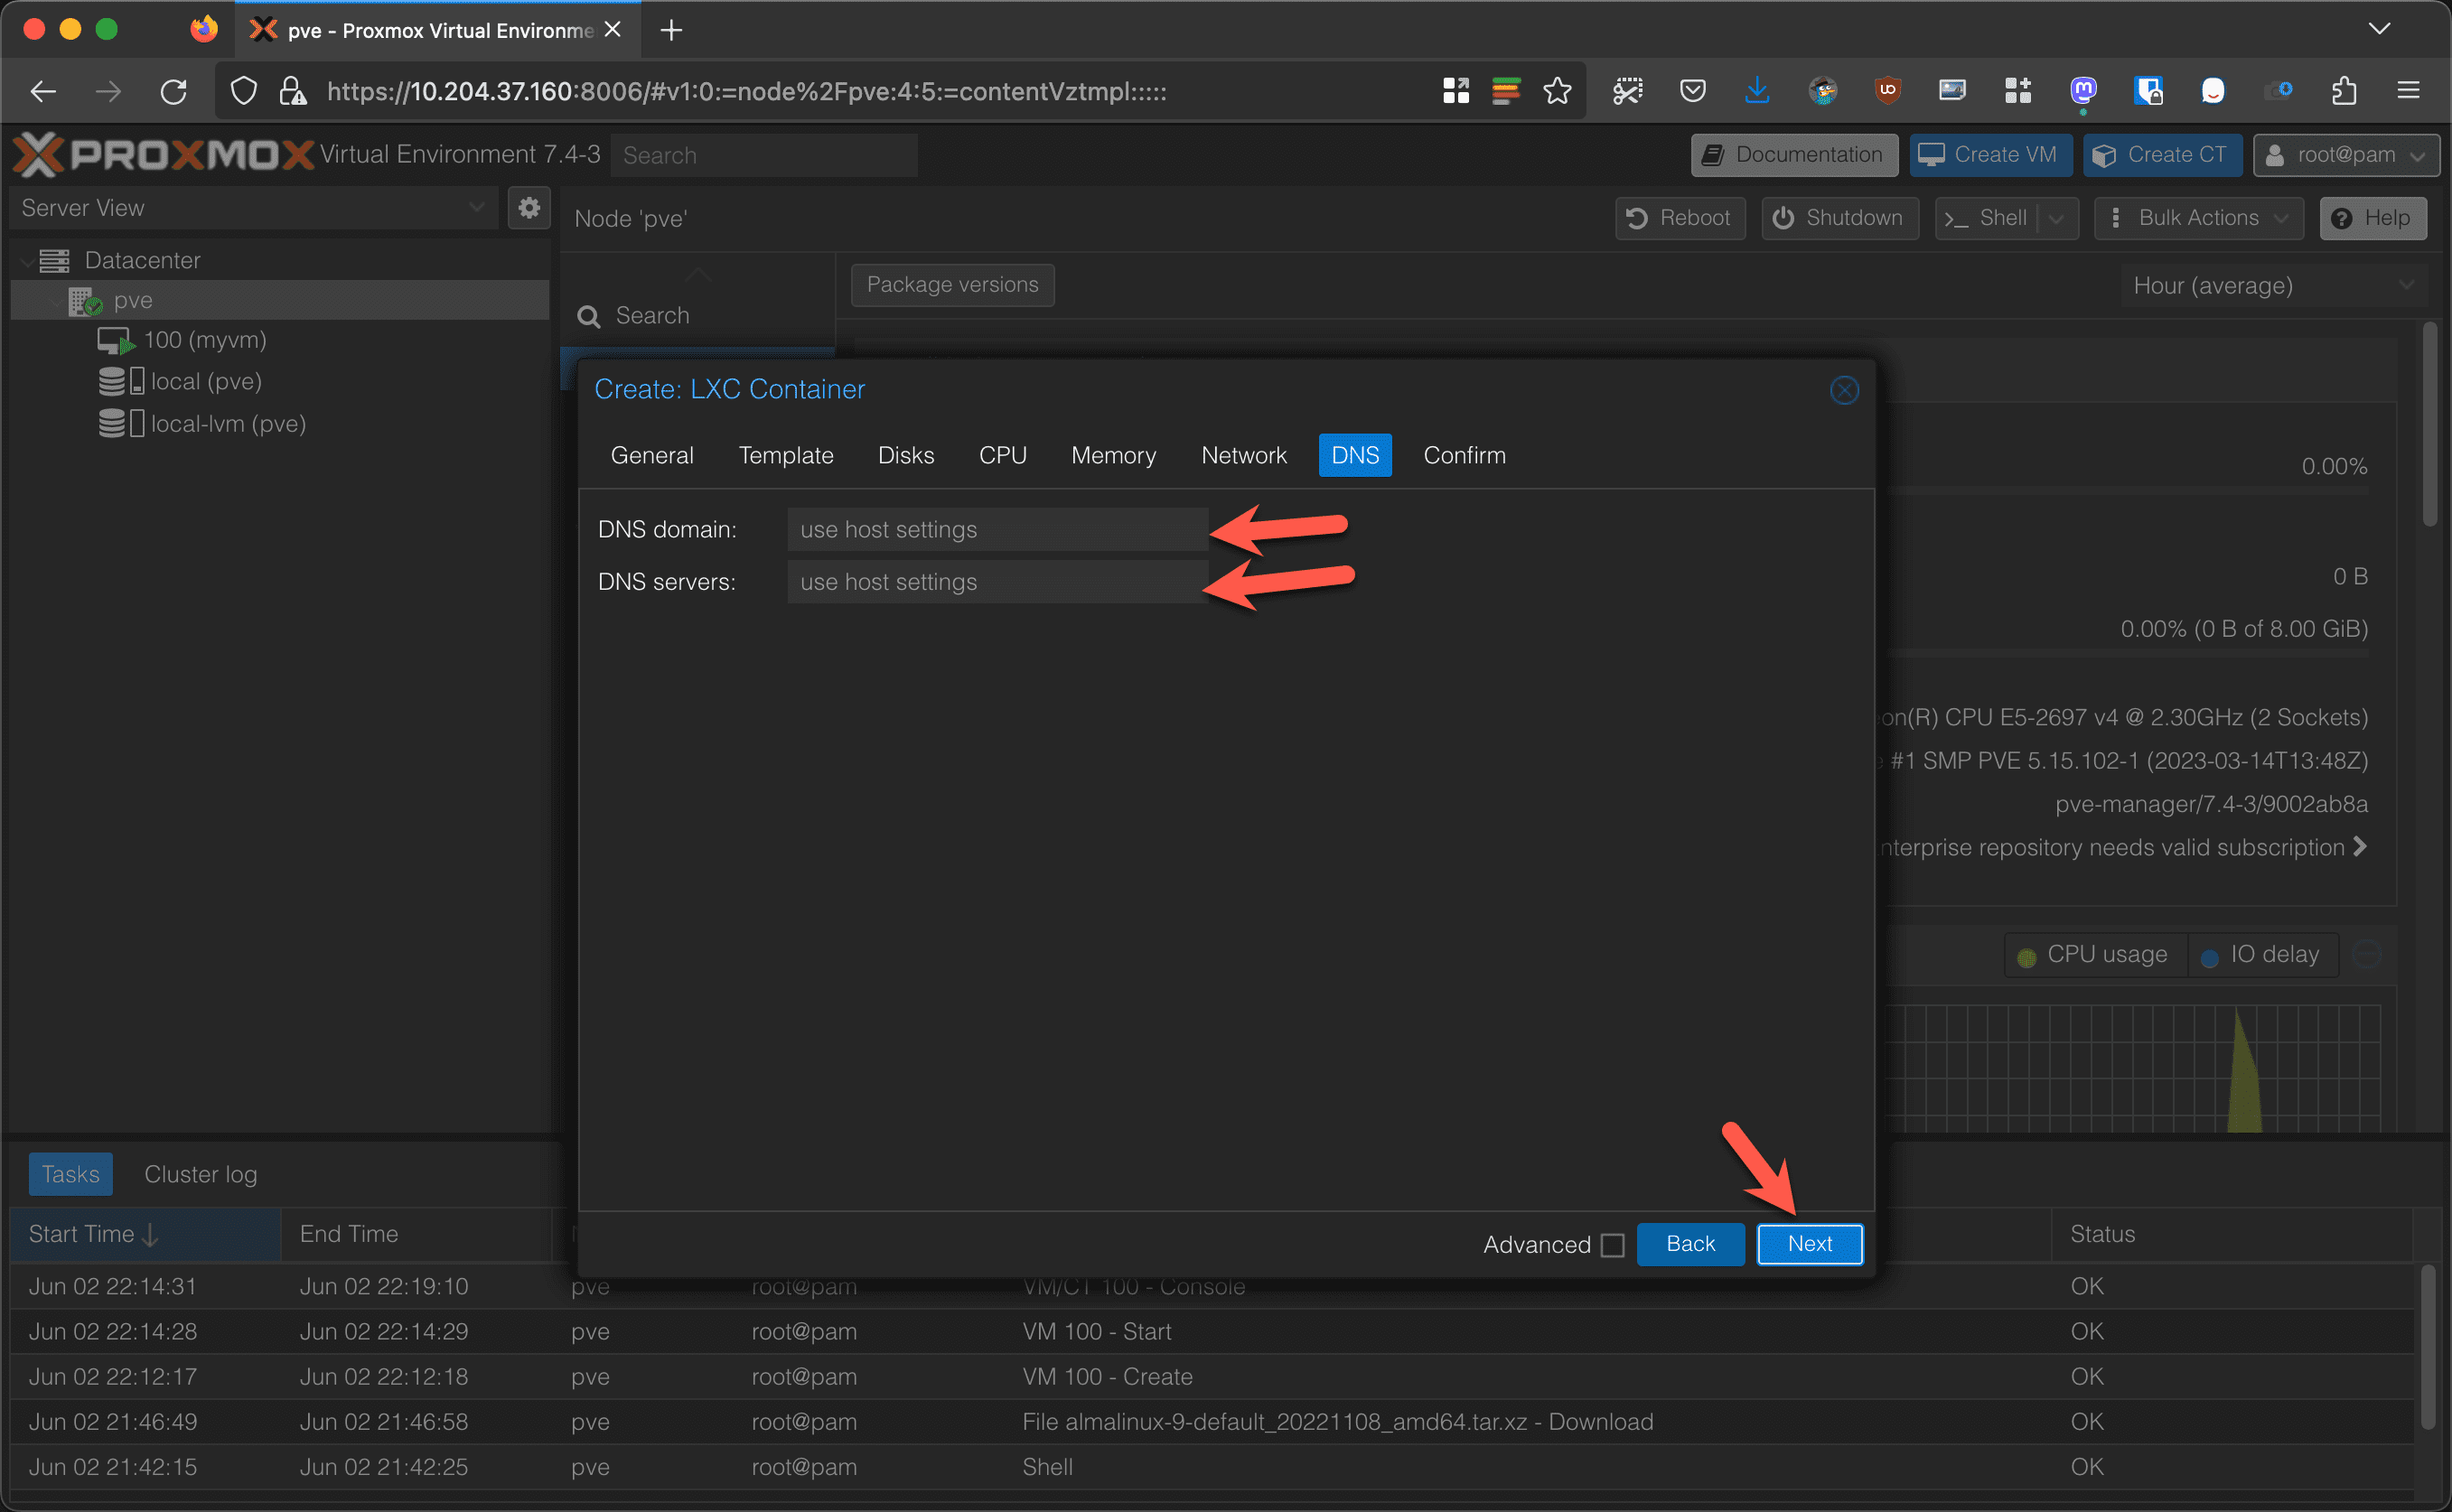
Set your DNS settings. If you leave these blank, the container will use the host’s network settings. Click on Next. Confirm your options and then click on Finish.
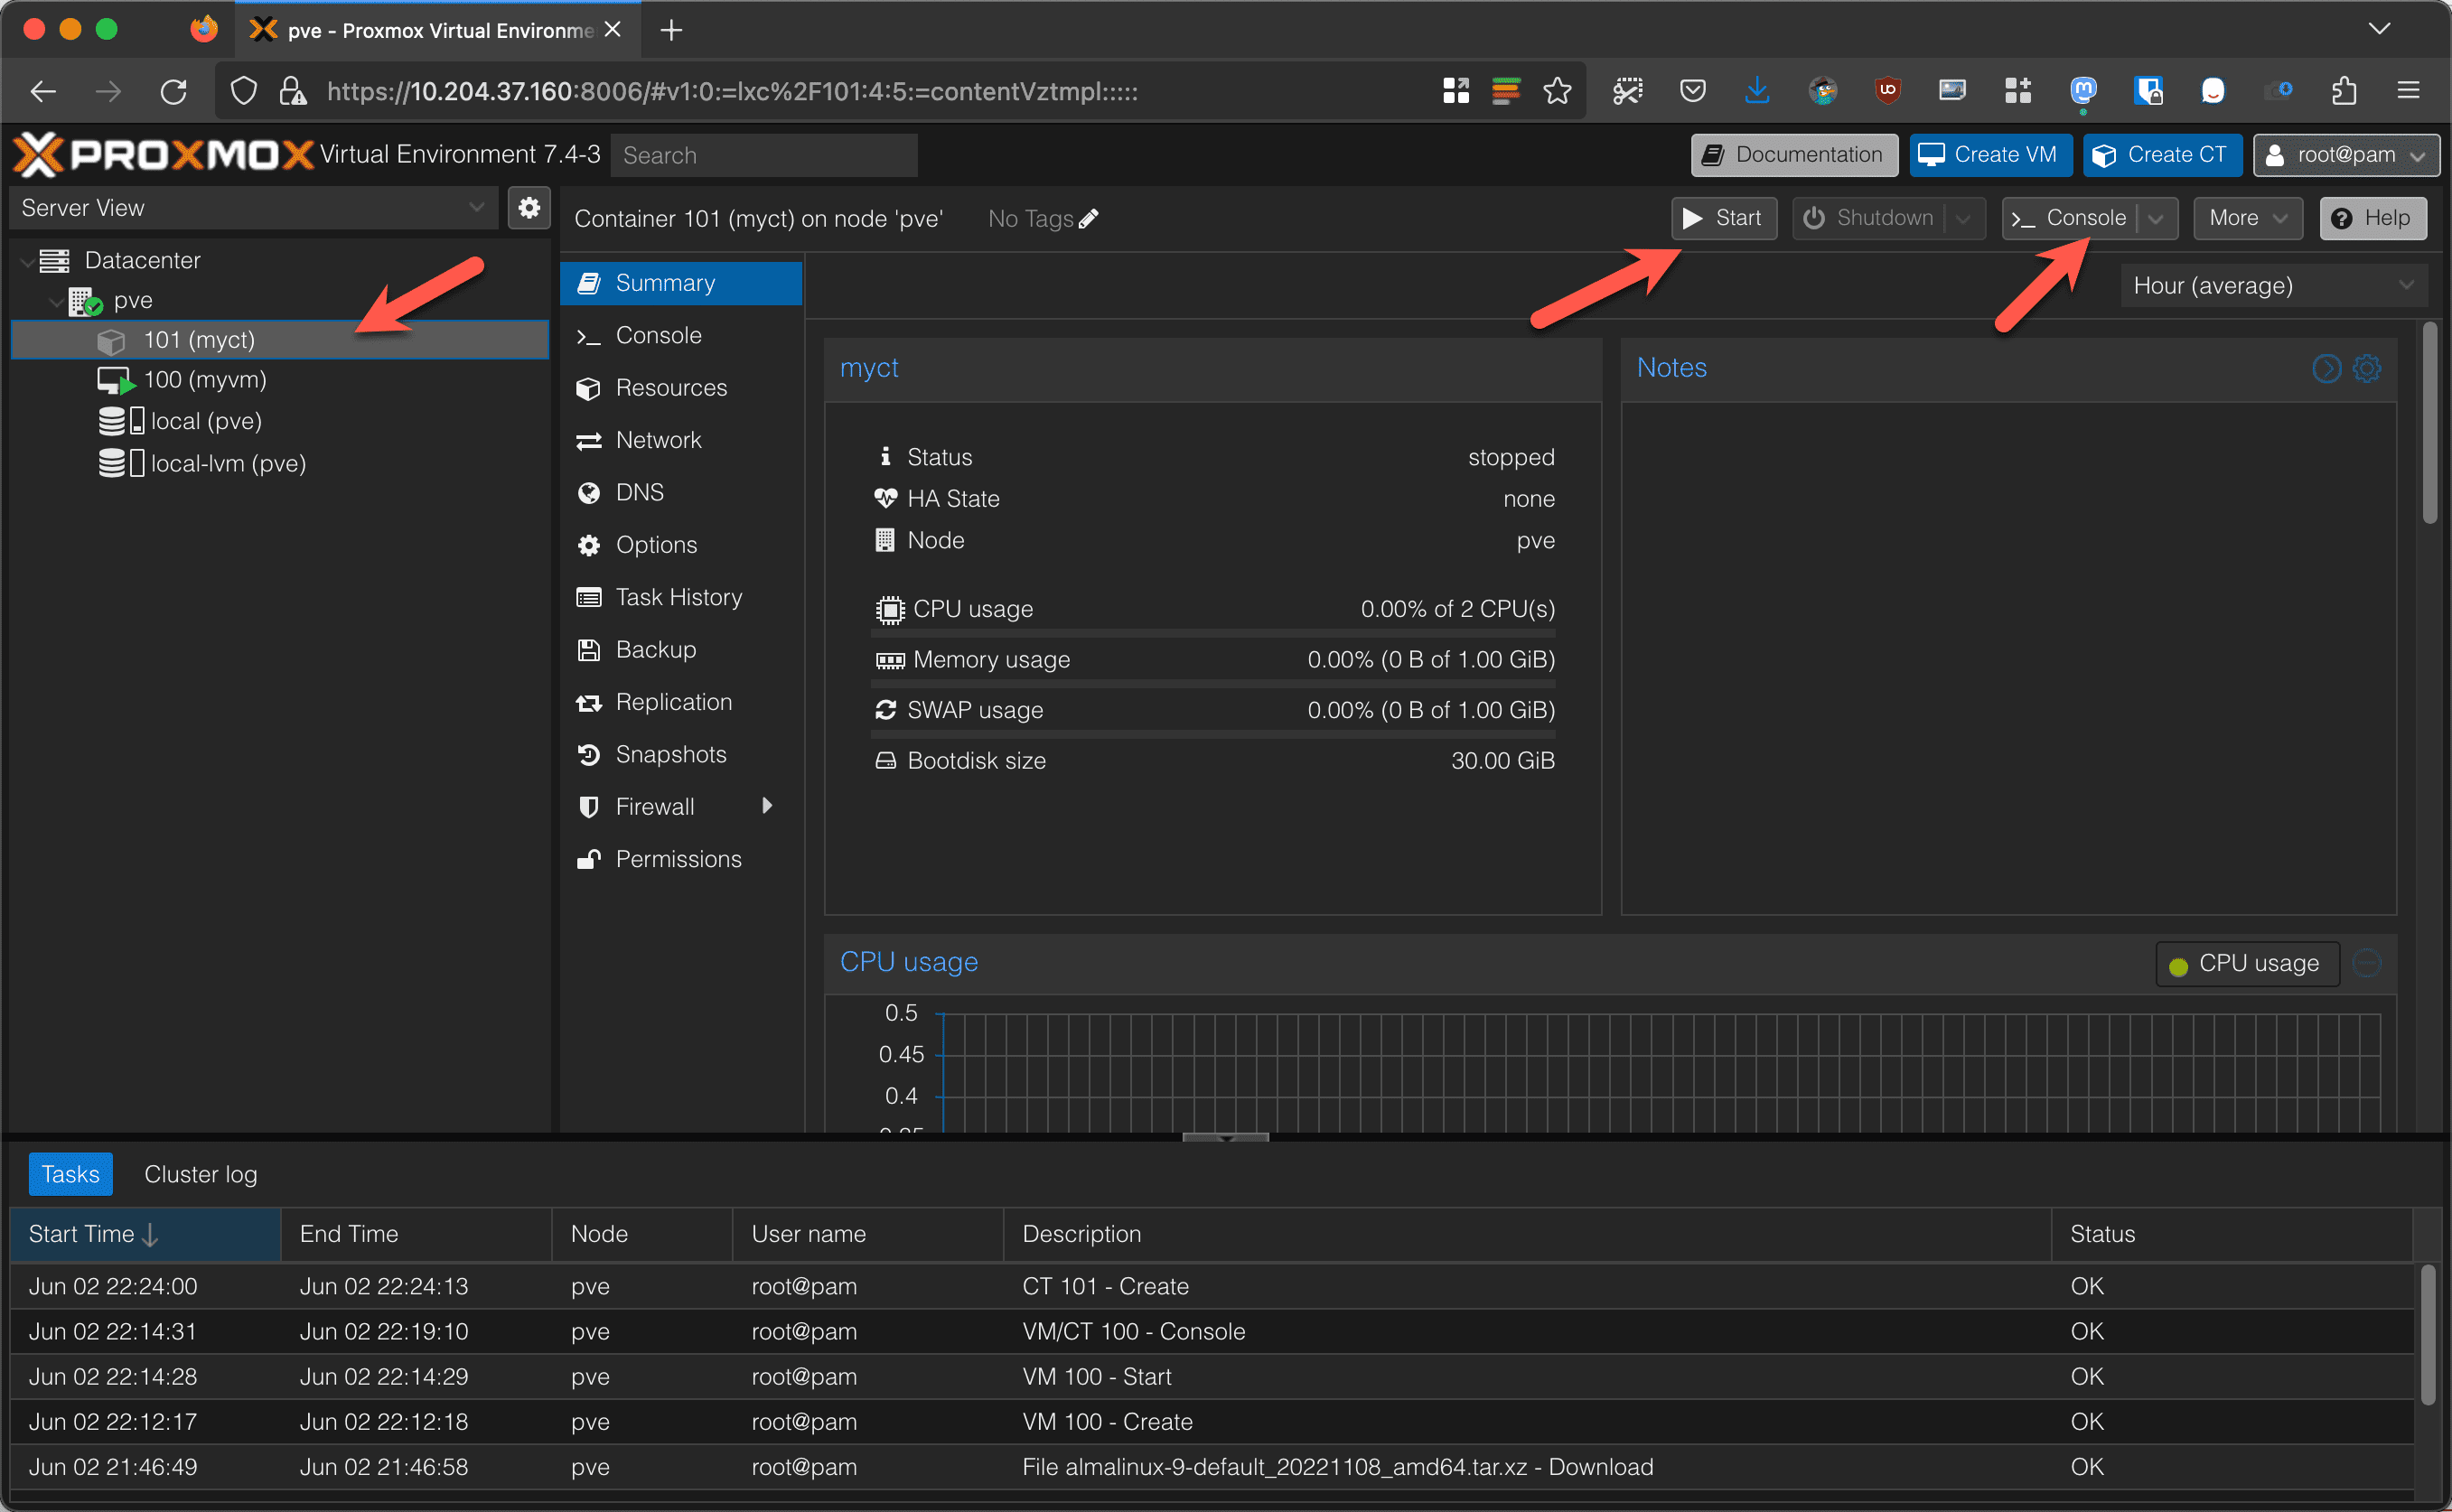
Now you can click on the container in the side menu, then click on Start and Console. You’ll notice that containers boot extremely fast – primarily because they use the host and all those services are already running.
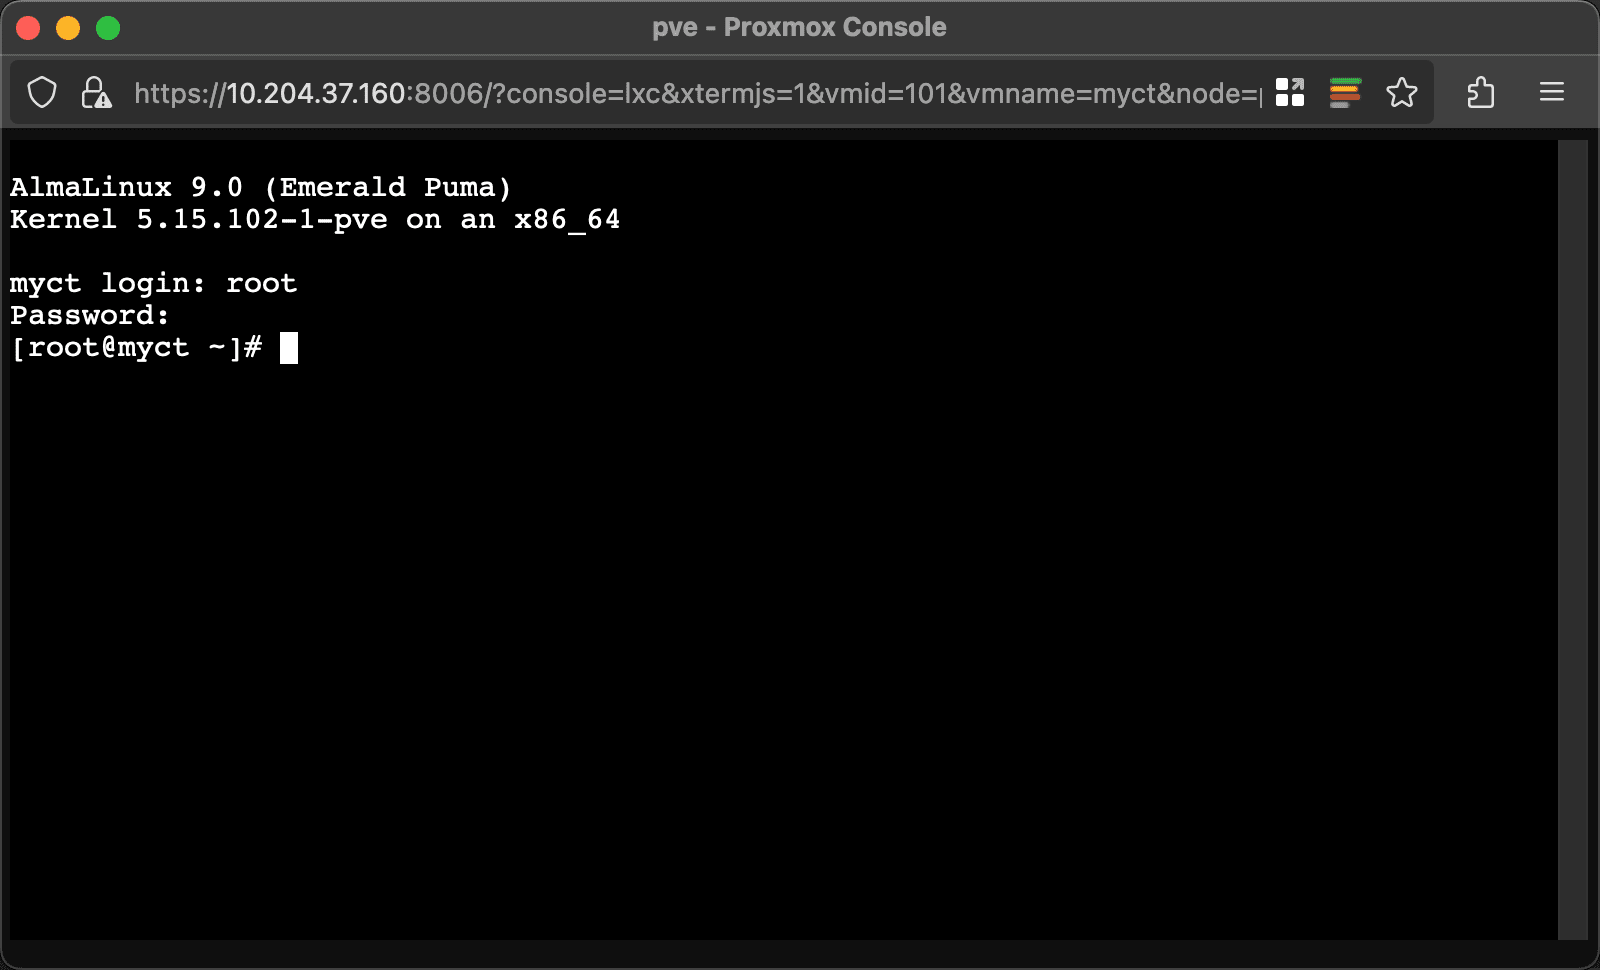
However, container images can be really out of date. AlmaLinux 9 is already on 9.2 and the image that is available is 9.0. Make sure you update your container after installing. Remember, kernel updates are based on your host node. So if you want to update your container kernel, you’ll need to update your host node kernel.
And that’s it! Now you can create VMs and containers for your services and to learn system administration!
Stay tuned for our next part!